Multiple languages in the same notebook
Execute Ruby, Python and JavaScript within a single notebook in the browser. Style notes with Markdown.
![]()


a web-native computational notebook for programmers
Execute Ruby, Python and JavaScript within a single notebook in the browser. Style notes with Markdown.
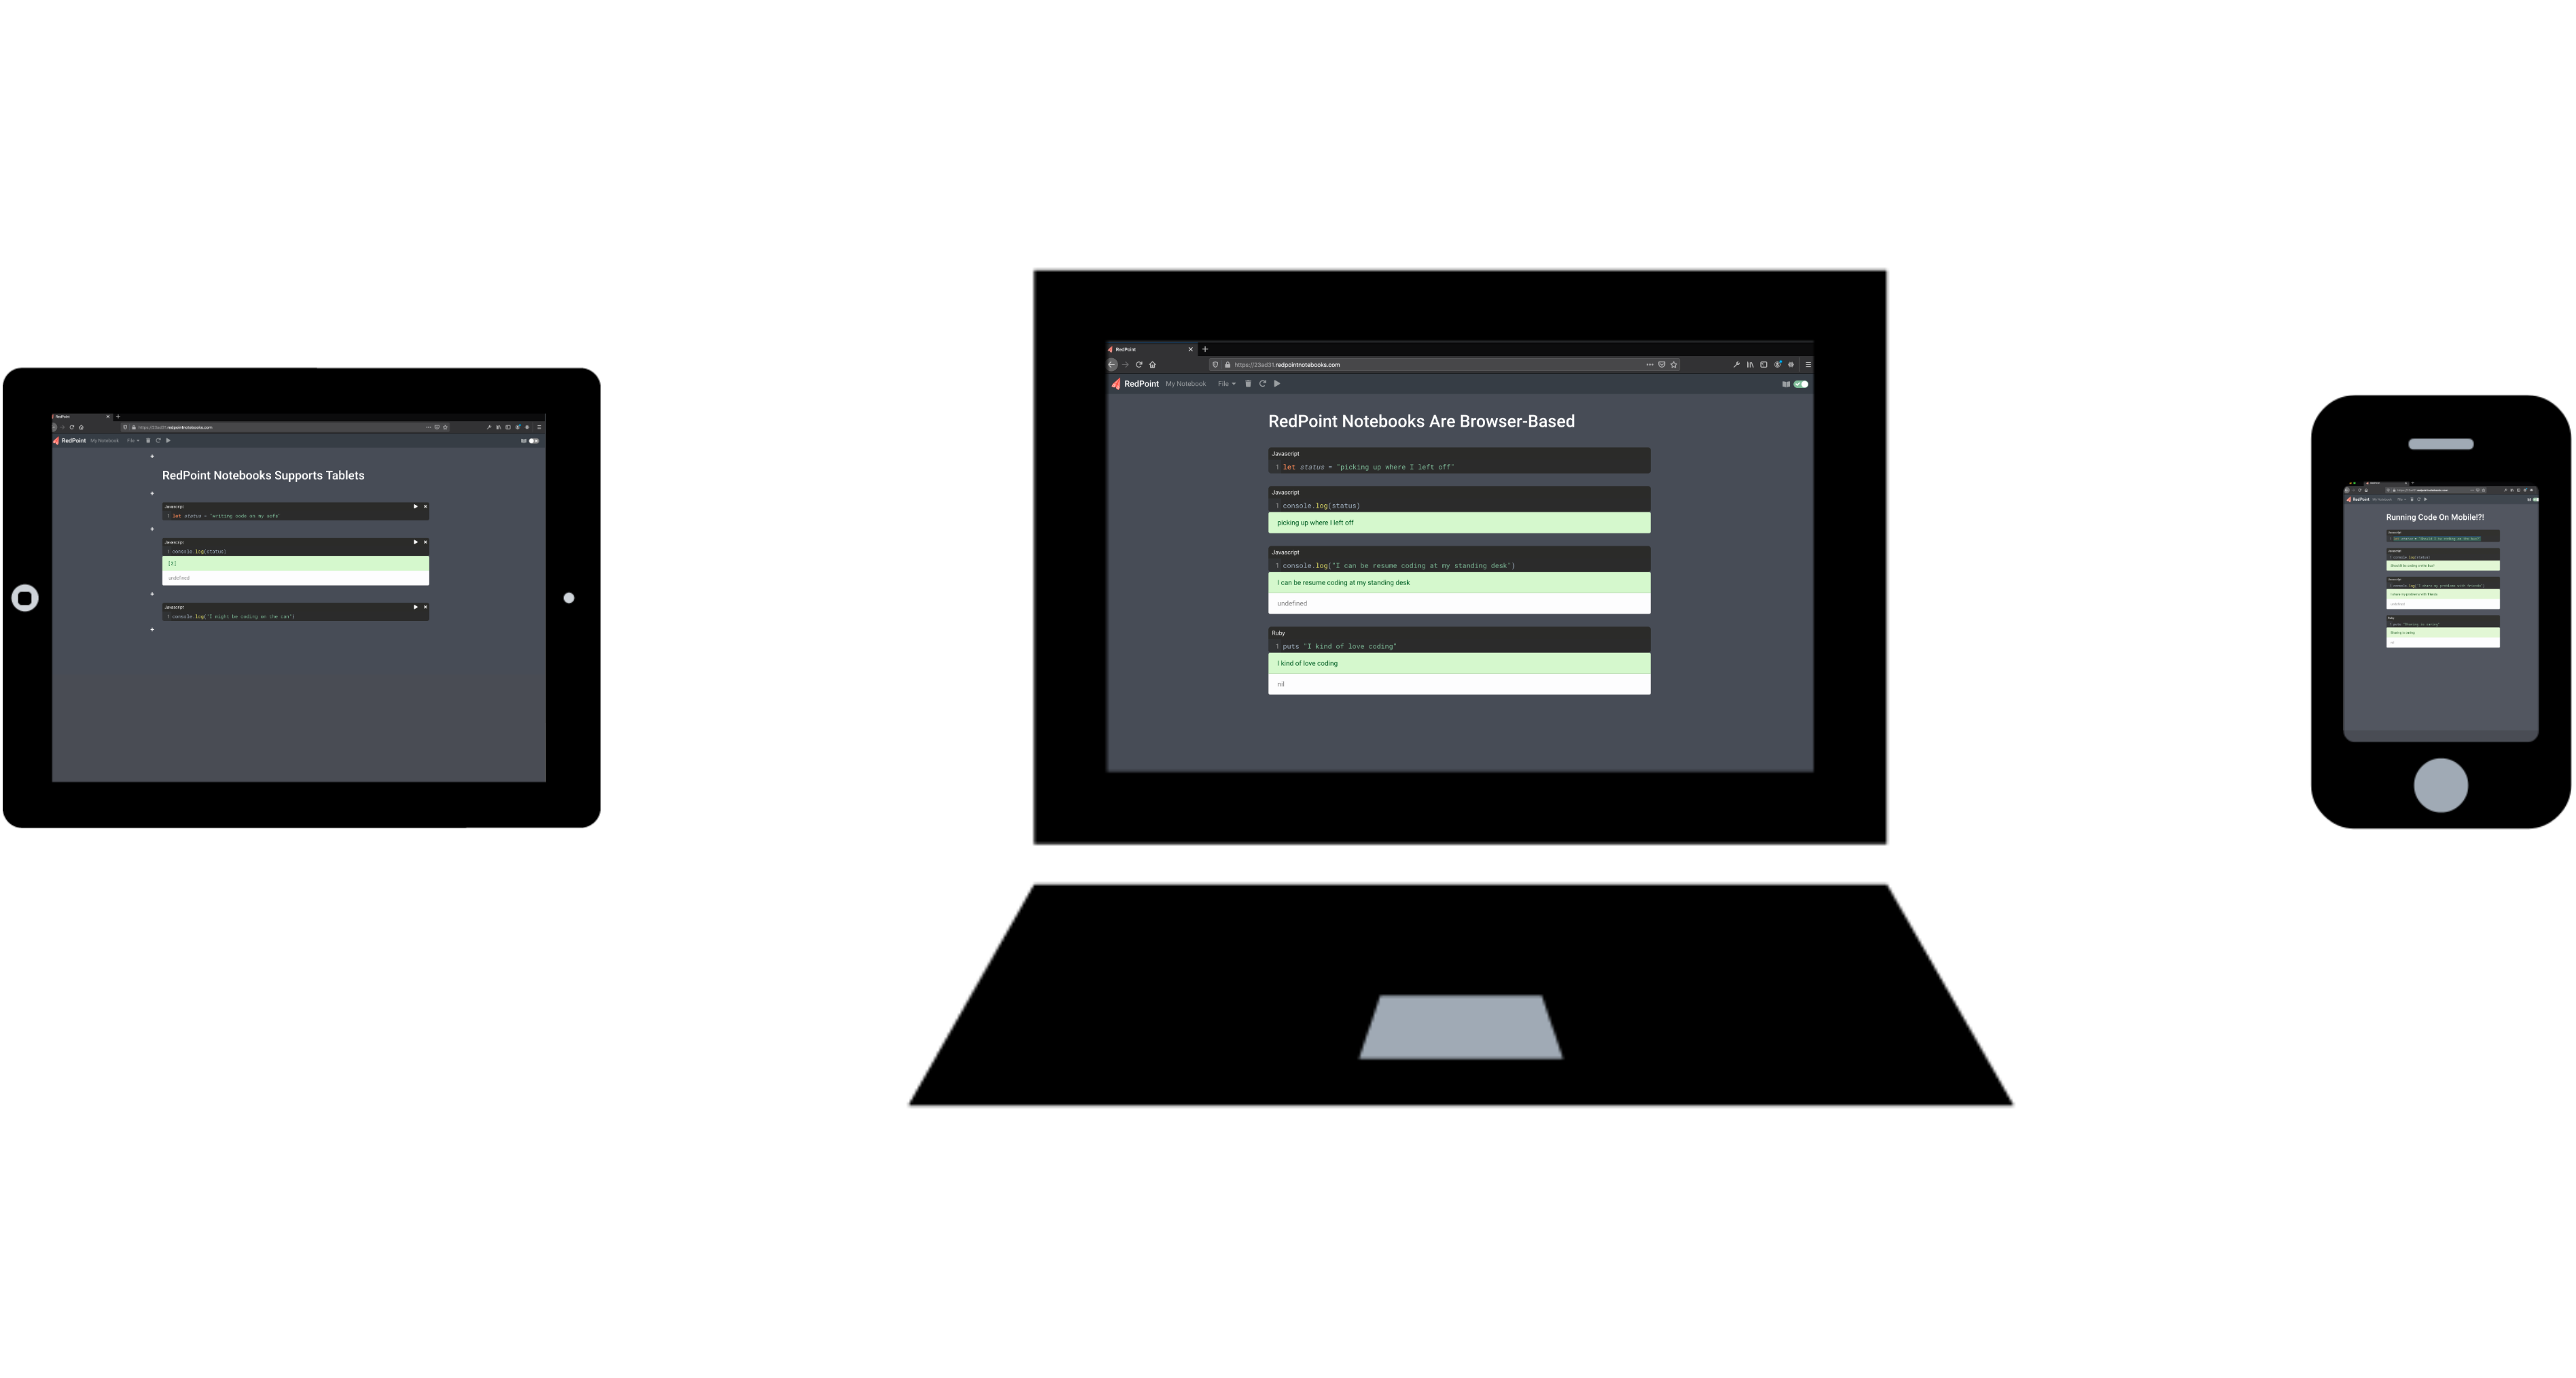
Get the same experience on mobile and desktop. Share notes easily between devices and with others. Use clones to share public-facing notebooks.

Interact with API endpoints. Test webhooks. Interact with JSON data programatically directly inside a RedPoint notebook.
RedPoint is a free and open-source computational notebook tool that emphasizes ease of use, multi-language support and web connectivity. RedPoint notebooks run in the browser, and allow you to write and execute JavaScript, Ruby, and Python code within the same document. This case study will explain the uses of notebooks in general, detail the design goals and features of RedPoint, and highlight our solutions to the many technical challenges involved in building a web-native computational notebook.
Computational notebooks are dynamic documents that combine styled text with runnable code. A notebook is made up of modular units called cells. Cells fall into two broad categories: text cells and code cells.
Each text cell is essentially a mini text editor. Many notebook products support the Markdown language for their text cells, which enables many common editor features such as headings, subheadings, lists, and inline images. In a typical notebook, text cells are interspersed with code cells, and used to document and explain the code in those cells.
Code cells act as mini code editors, supporting features such as syntax highlighting and auto-indentation. A key feature of notebooks is that they are backed by a computational engine, and code written in a code cell can be executed in-place. When a cell is executed, information about the execution, such as output or return value, is displayed below the cell. Code cells share state across cells, but the implementation is different in different notebook products. Notebooks with a data science emphasis often use code cells to render visualizations.
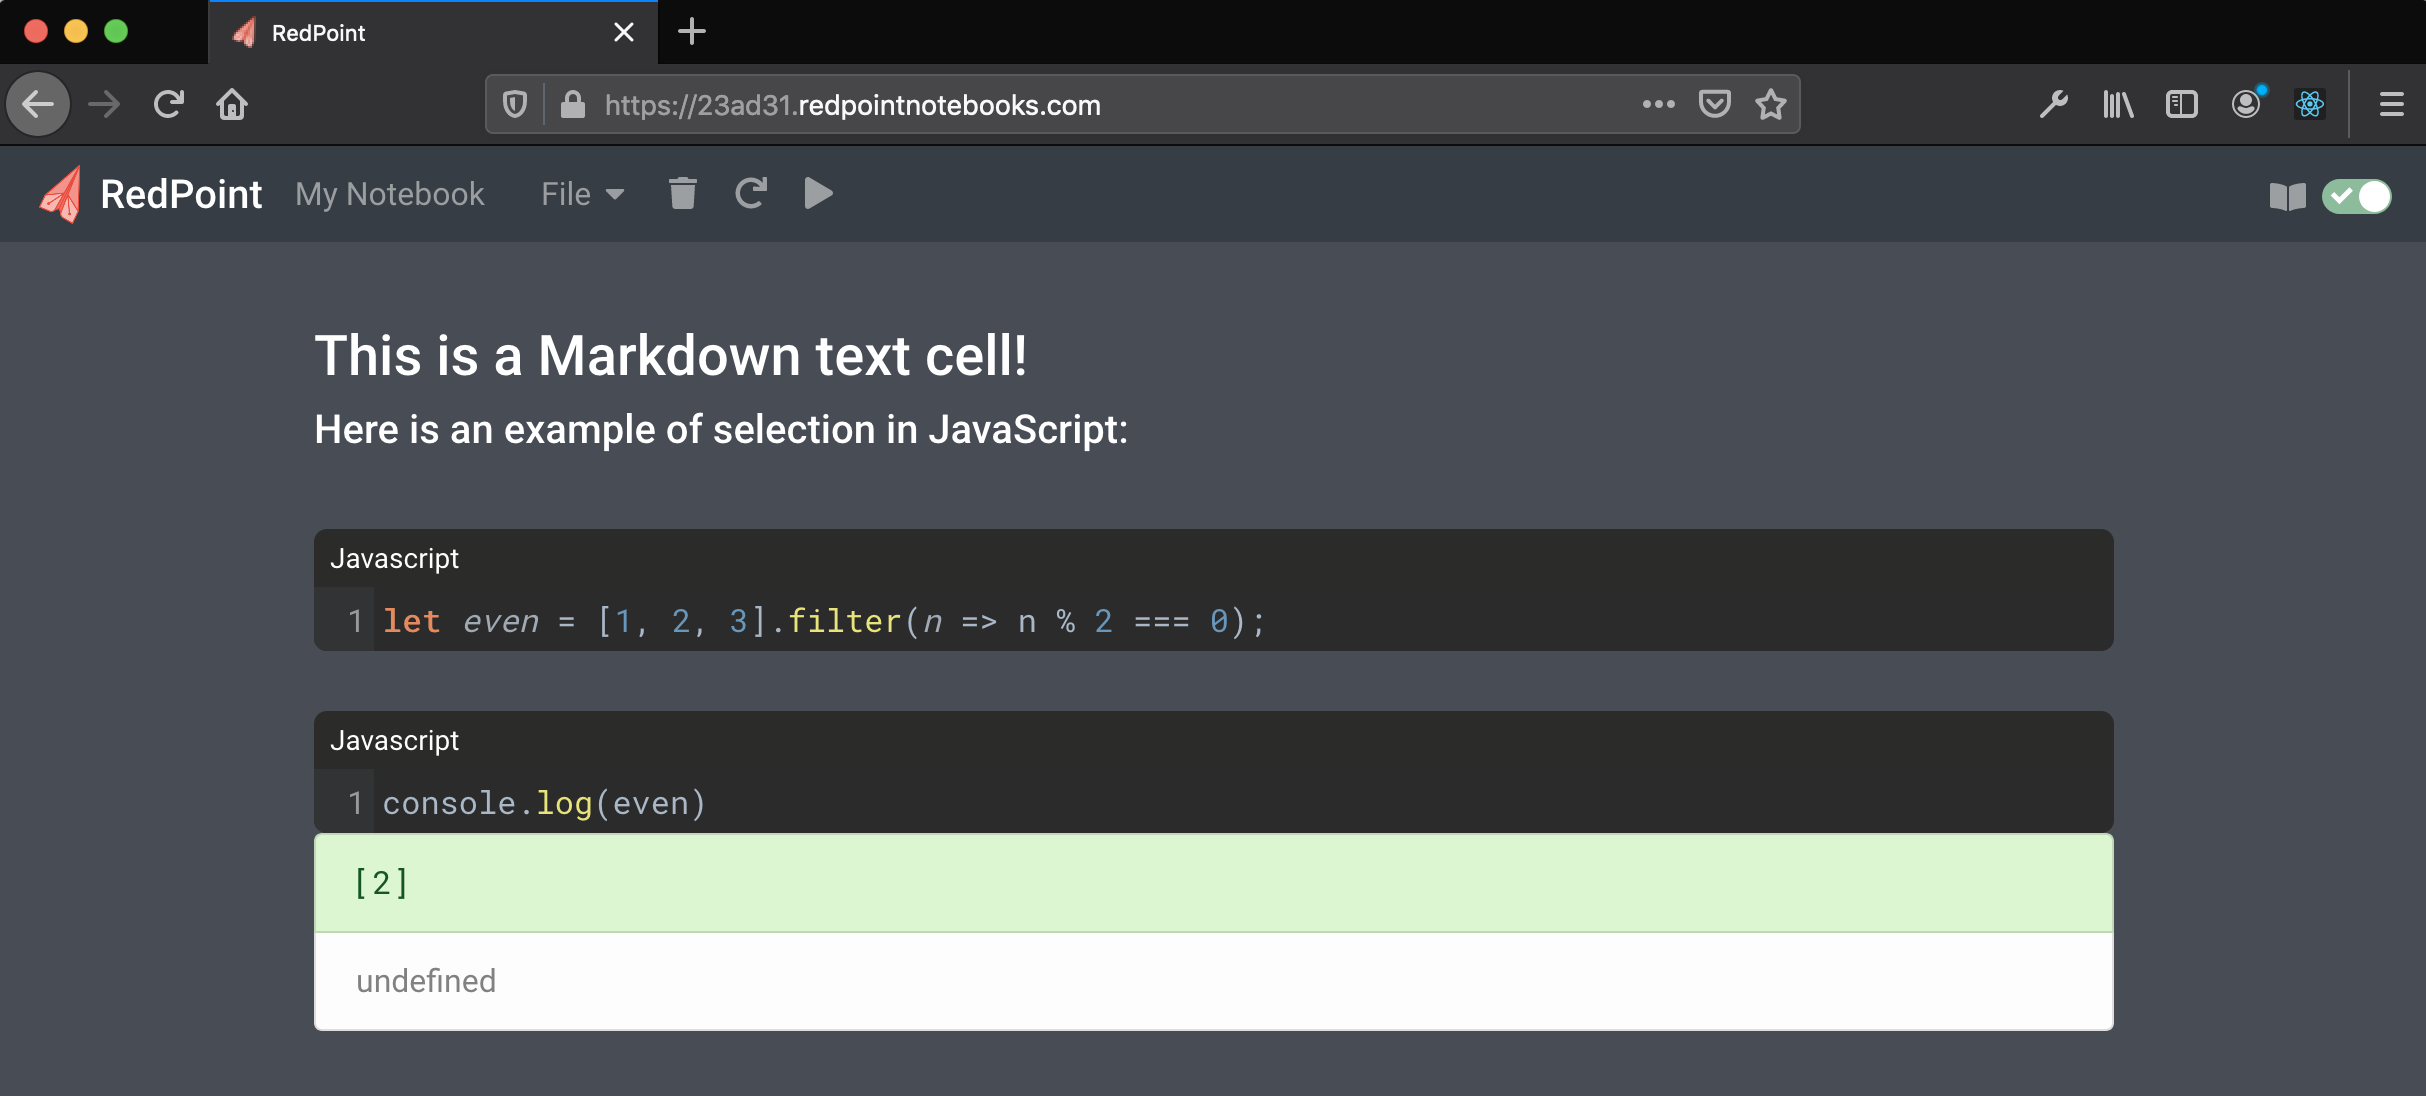
Simple example with a rendered Markdown text cell above two code cells
When you combine dynamic code cells with descriptive text cells it provides the building blocks for what’s called a computational narrative. Inline code comments help us make narrative sense of the dense syntax of the surrounding code. Computational notebooks elevate the descriptive text of comments to the same level of importance as the code itself. Fernando Perez, co-creator of the popular Jupyter Notebook, described the goal of computational notebooks as:
“the weaving of a narrative directly into a live computation, interleaving text with code and results to construct a complete piece that relies equally on the textual explanations and the computational components."
- Fernando Perez, co-creator of Jupyter Notebooks
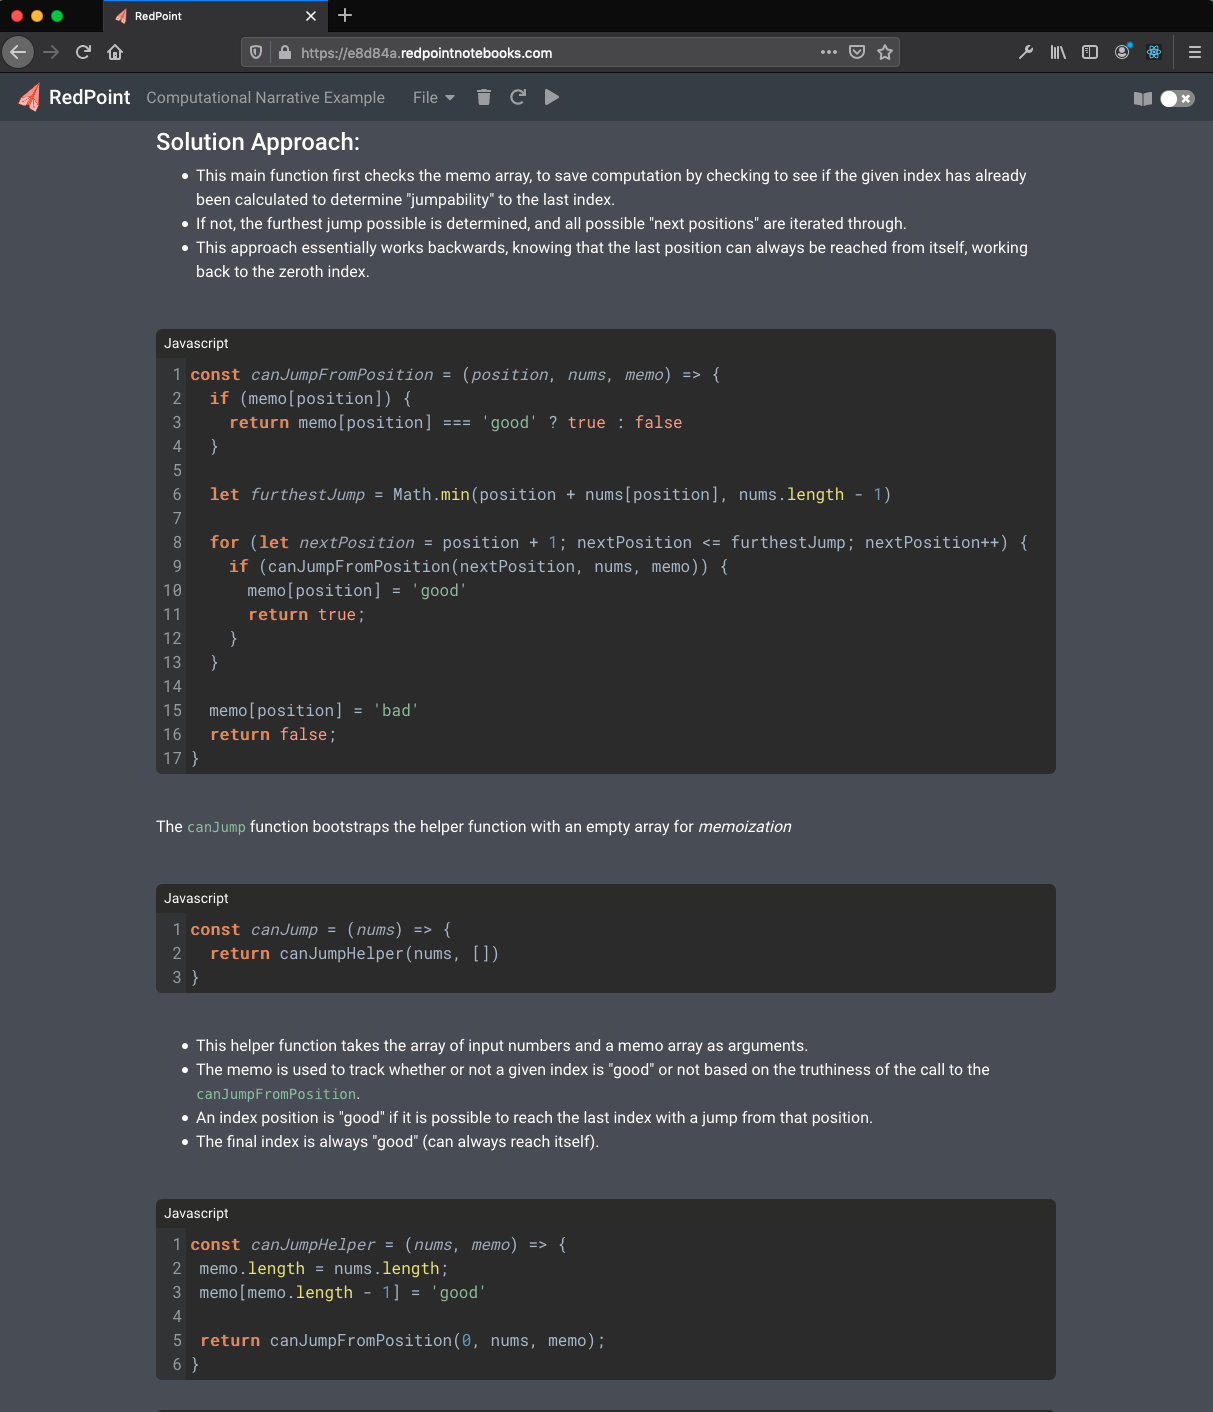
Excerpt from a computational narrative
The traditional use of notebooks is in the field of data science, using computational narratives as an enhanced alternative to static presentations of data sets. They enable the presentation of code in a dynamic and iterative way --the same way that scientific discoveries are made.
Jupyter notebooks allow a given cell to be executed multiple times, independently from other cells, to allow iterative exploration. This style of notebook is backed by a computational kernel that behaves like a REPL, building up program state across multiple cell executions.
These design decisions support a data science workflow, but the way they handle code state creates
complicated mental overhead. When code cells are re-executed, the visible state of the notebook can become
out
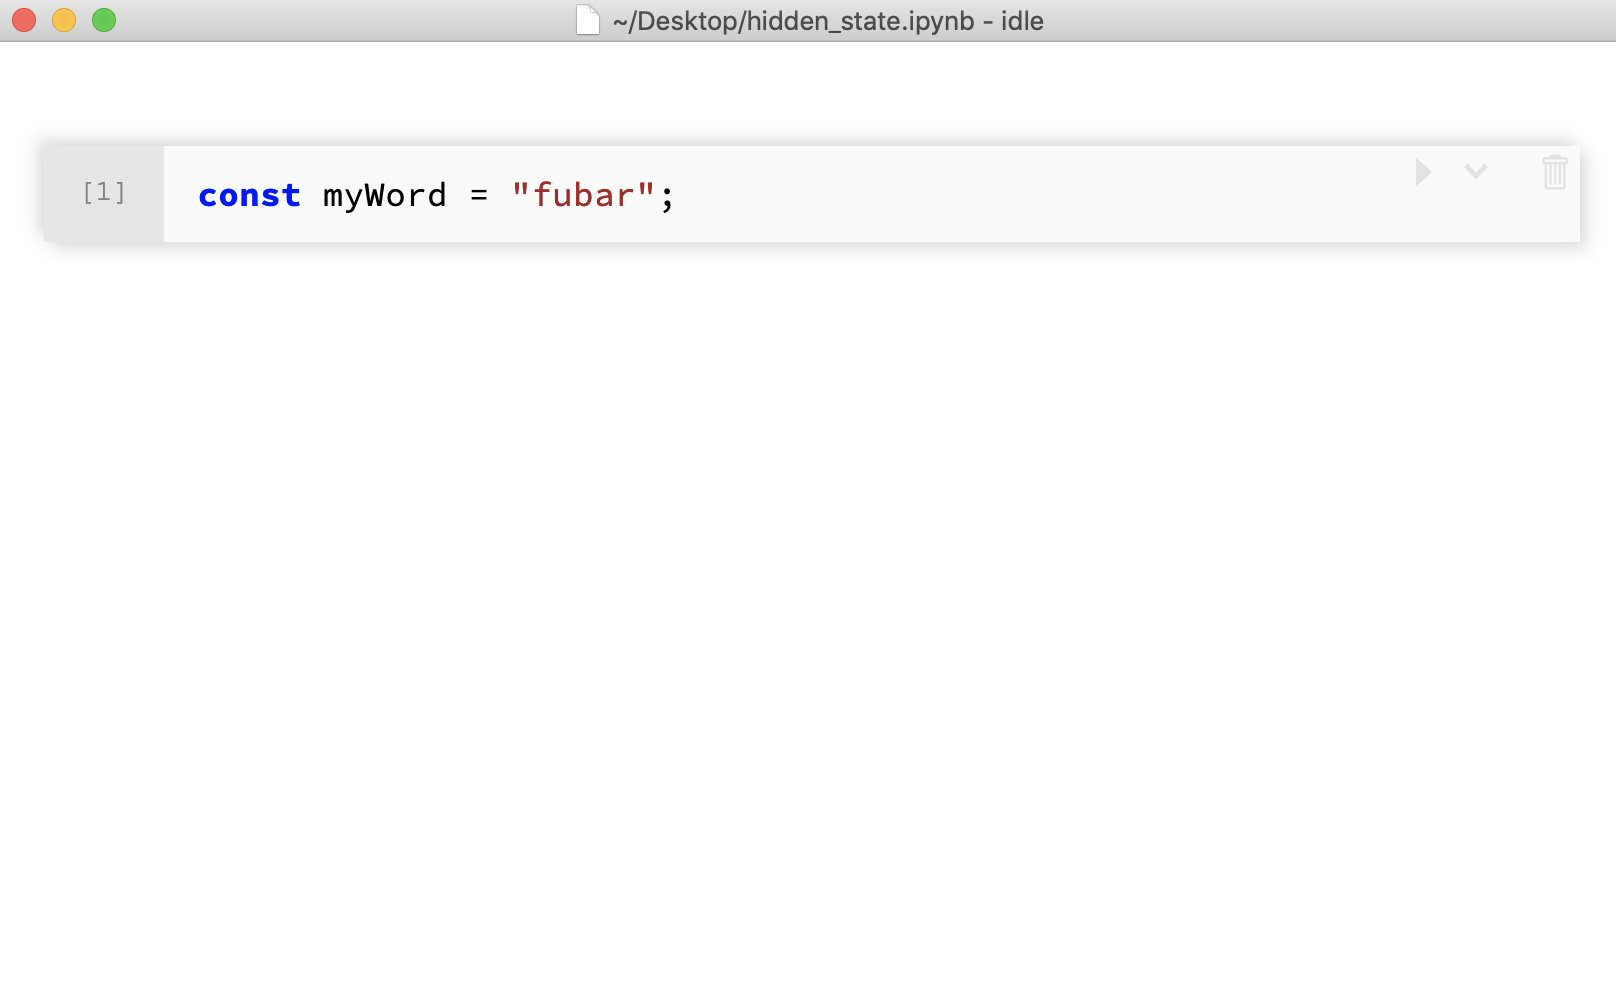
of phase with the hidden state of the kernel. For example, in JavaScript, cells that contain
const
declarations will produce errors if the same cell is run more than once.
Cell is executed with a typo
As far as the underlying program state is concerned, the variable myWord has already been
declared. This hidden notebook state can make iterating on code confusing for programmers used to
top-to-bottom execution. It
also limits sharing notebooks to people who have experience with the intricacies of Jupyter notebook state.
Other notebook products such as Observable use a custom system to link state between cells, and a non-standard dialect of JavaScript. Although they can enable powerful features, non-standard language dialects are not suitable for people interested in documenting and sharing vanilla code.
Most programmers looking to document code choose more traditional note-taking applications to present their notes. A subset of note-taking apps are focused on programmers, such as Quiver, MedleyText, and Boostnote.
Note-taking apps support syntax highlighting and other stylization features, although most don’t include a full-featured code editor. The key limitation is that note taking apps are not backed by a computational engine. Code within note-taking apps exist only in a static form, and must be copy-pasted into code editing software to be run. Another limitation with note-taking apps is that none of the major ones are web-native.
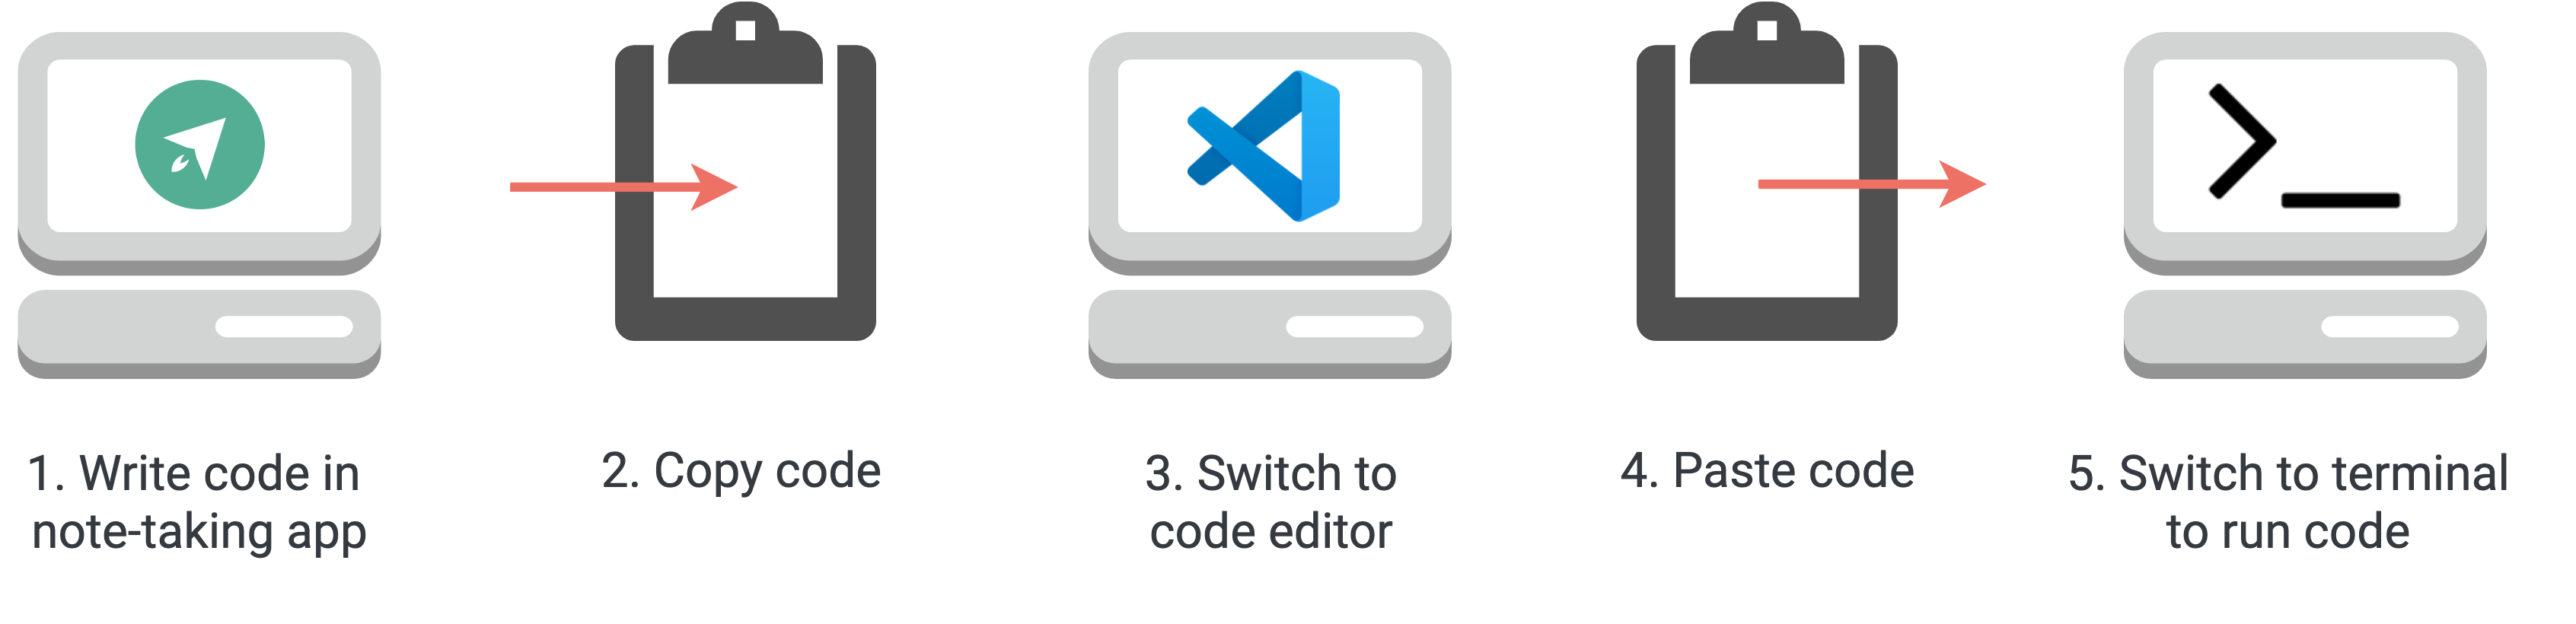
Note-taking apps require context switching to execute code
We built RedPoint to bridge the gap between data-science oriented notebooks and traditional note-taking applications. Like note-taking apps, we wanted to present a clean and simple UI that emphasizes the note contents. We wanted to avoid the context-switching that traditional approaches require, by letting users run the code they are documenting directly in their notebook.
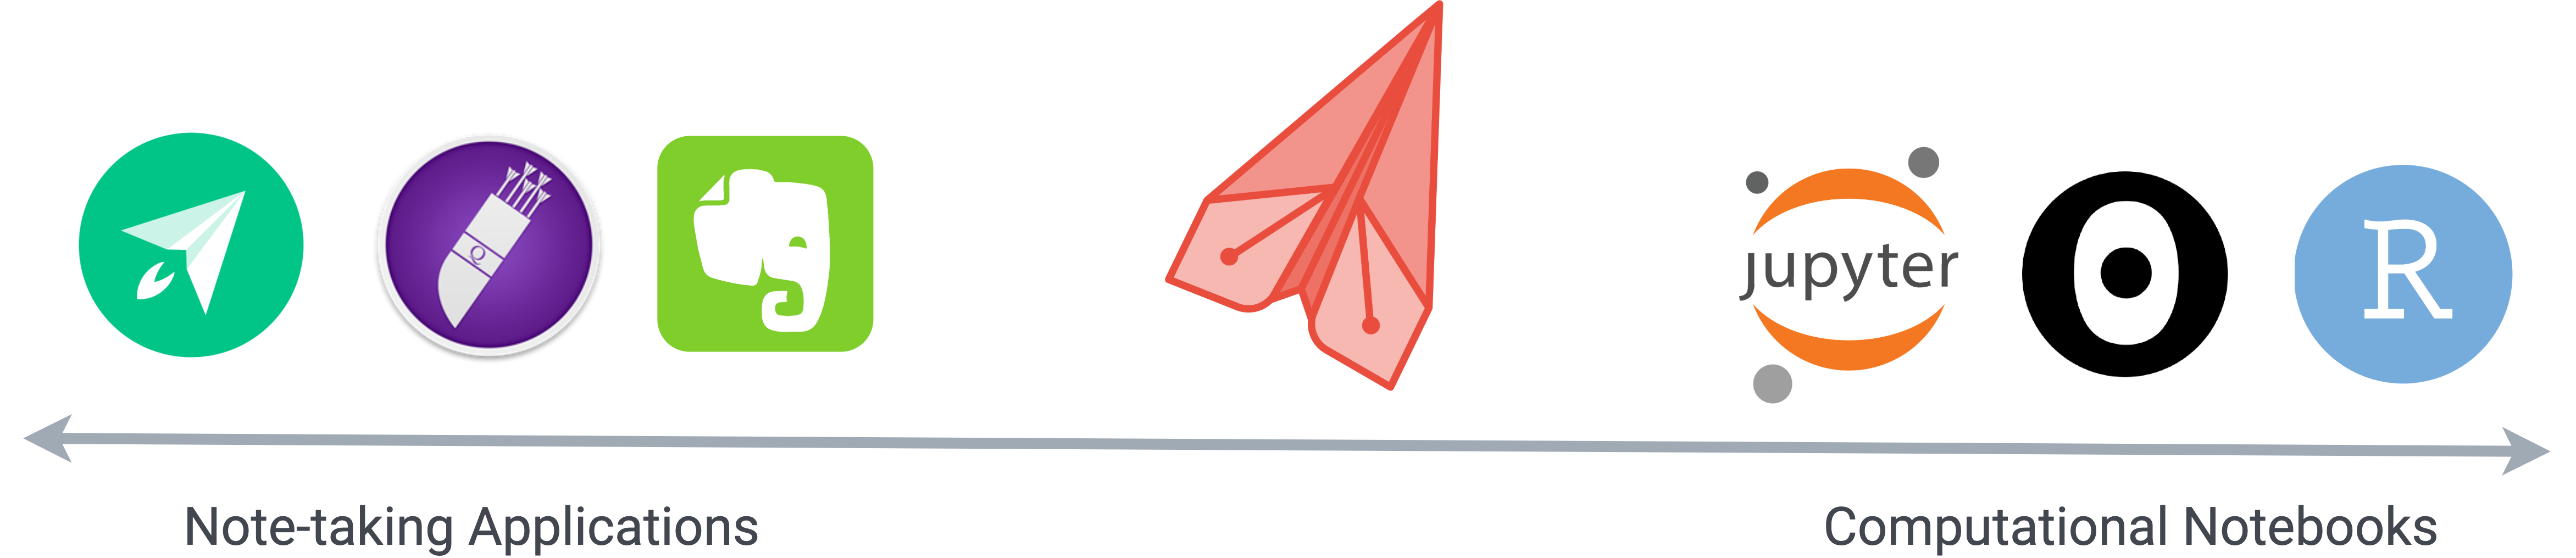
Like other notebook products, we wanted to support the creation of computational narratives, but in an environment optimized for people interested in documenting and sharing the code itself. Our core goals were to create a notebook whose program state is immediately obvious and where the rendering of code execution information is presentable and clear.
Although Jupyter notebooks support multiple programming languages, each notebook only supports a single language. Other notebook products such as Observable and Runkit only support a single language (JavaScript). We decided to create a notebook environment where different languages could be run within the same notebook. Being able to run multiple languages with one click in a cell-based environment allows you to compare and contrast different languages without context switching.
We wanted to take full advantage of being web-native by making note sharing easy, and by offering a responsive design that allows use on mobile devices as easily as on desktop computers. Most computational notebooks are designed for data science, but given our different use case, we wanted to support features for web developers. Supporting computational interaction with APIs and webhooks directly from within a notebook are two examples that demonstrate this. RedPoint notebooks convert JSON payloads and insert them into a notebook cell, where it is possible to inspect and interact with the resulting object programatically.
Finally, we wanted to create a tool for other programmers that is totally free and open-source. You can try a hosted version of RedPoint here. In the following sections of this case study, we’ll detail some of the problems we encountered in implementing these design goals, and some of the solutions we devised to resolve them.
Interacting programmatically with API data in a notebook
Our first major decision was deciding whether to execute user code on the client or server side. The main advantage of client-side code execution is that there is no network latency incurred by a round-trip to a server. However, browsers only have native support for JavaScript, and any other languages would have to be transpiled into JavaScript to be executed.
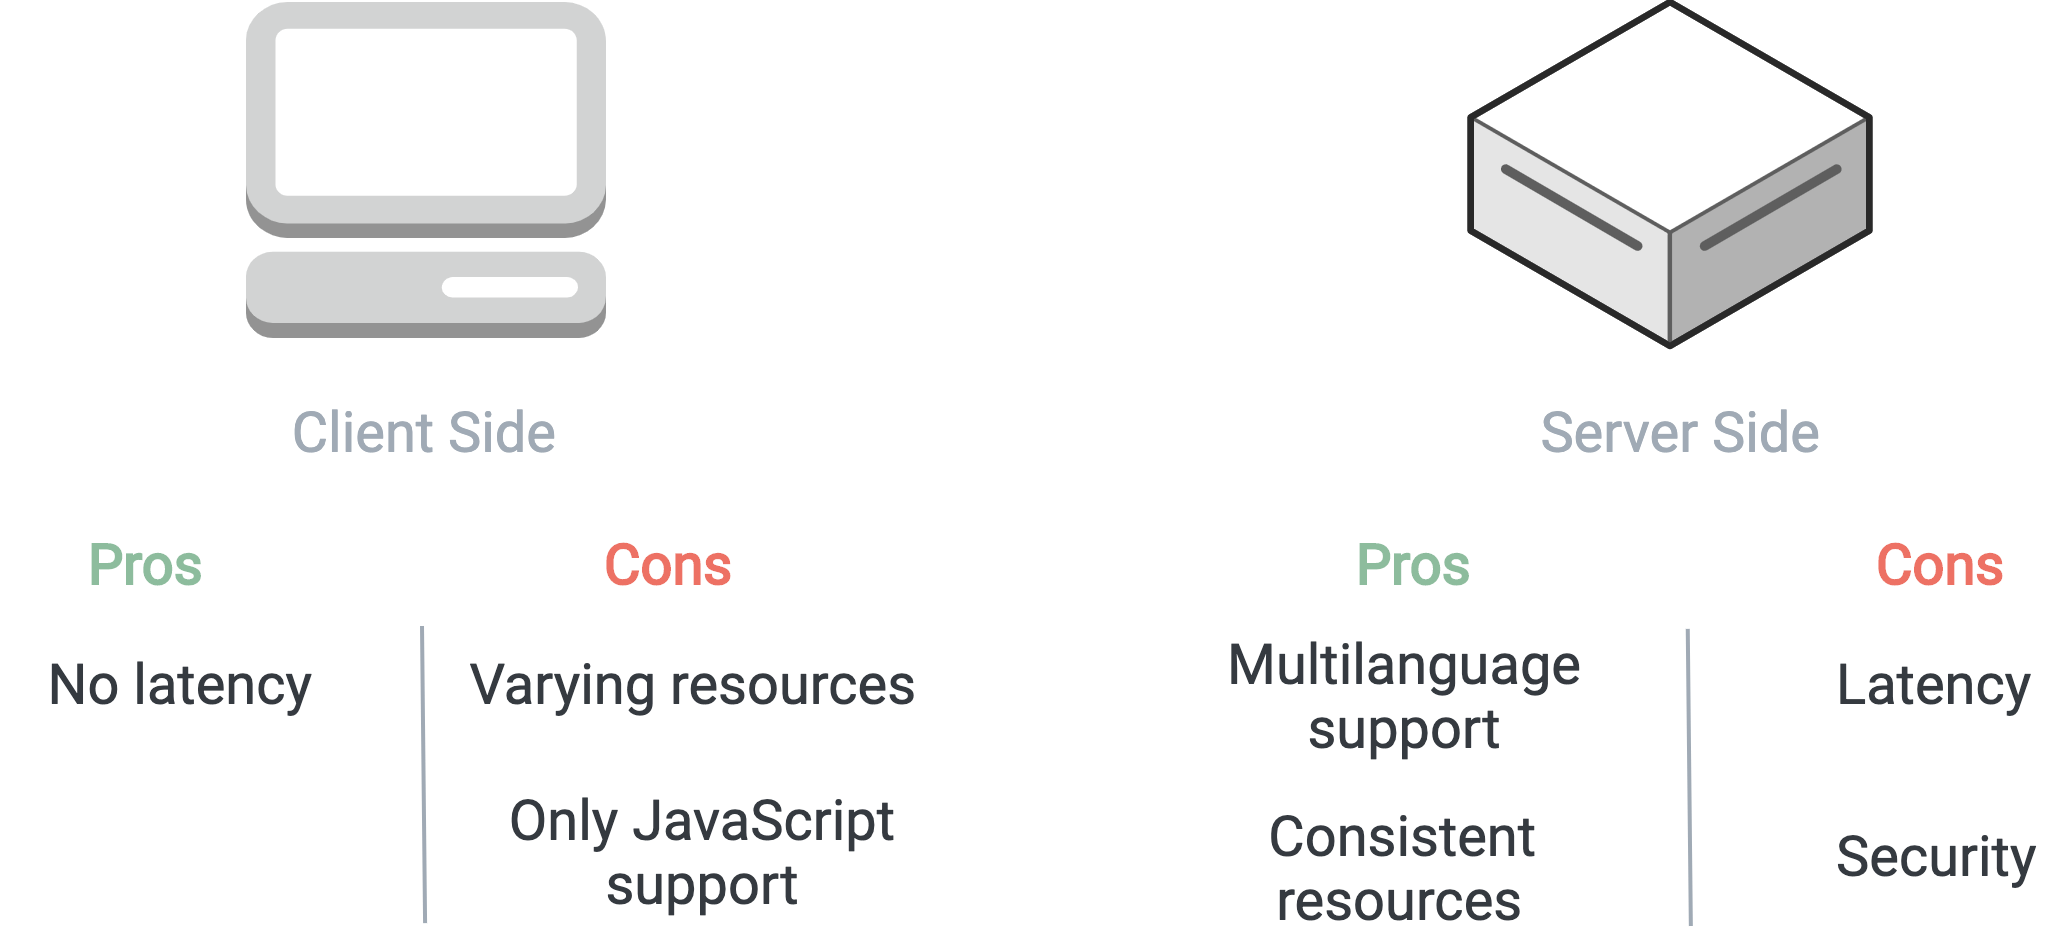
Our experiments with in-browser transpilers for other languages showed them to be slow and unreliable. Each additional supported language for our notebook would require another in-browser transpiler, which would quickly escalate client memory usage to unacceptable levels. Client-side execution would also rely on the client’s computing resources, and would lead to a poor user experience on slower (mobile) devices.
Executing arbitrary user code on our server presents security concerns. We devised several strategies to mitigate them, which we discuss in our section on security.
Our early prototype used an HTTP POST request containing the user code as its payload. As the script was executed server-side, relevant data (output, errors, and return value) was stored in a single JavaScript object, which was serialized and returned to the client in the HTTP response. This approach worked fine in basic examples, but had drawbacks with more complex code.
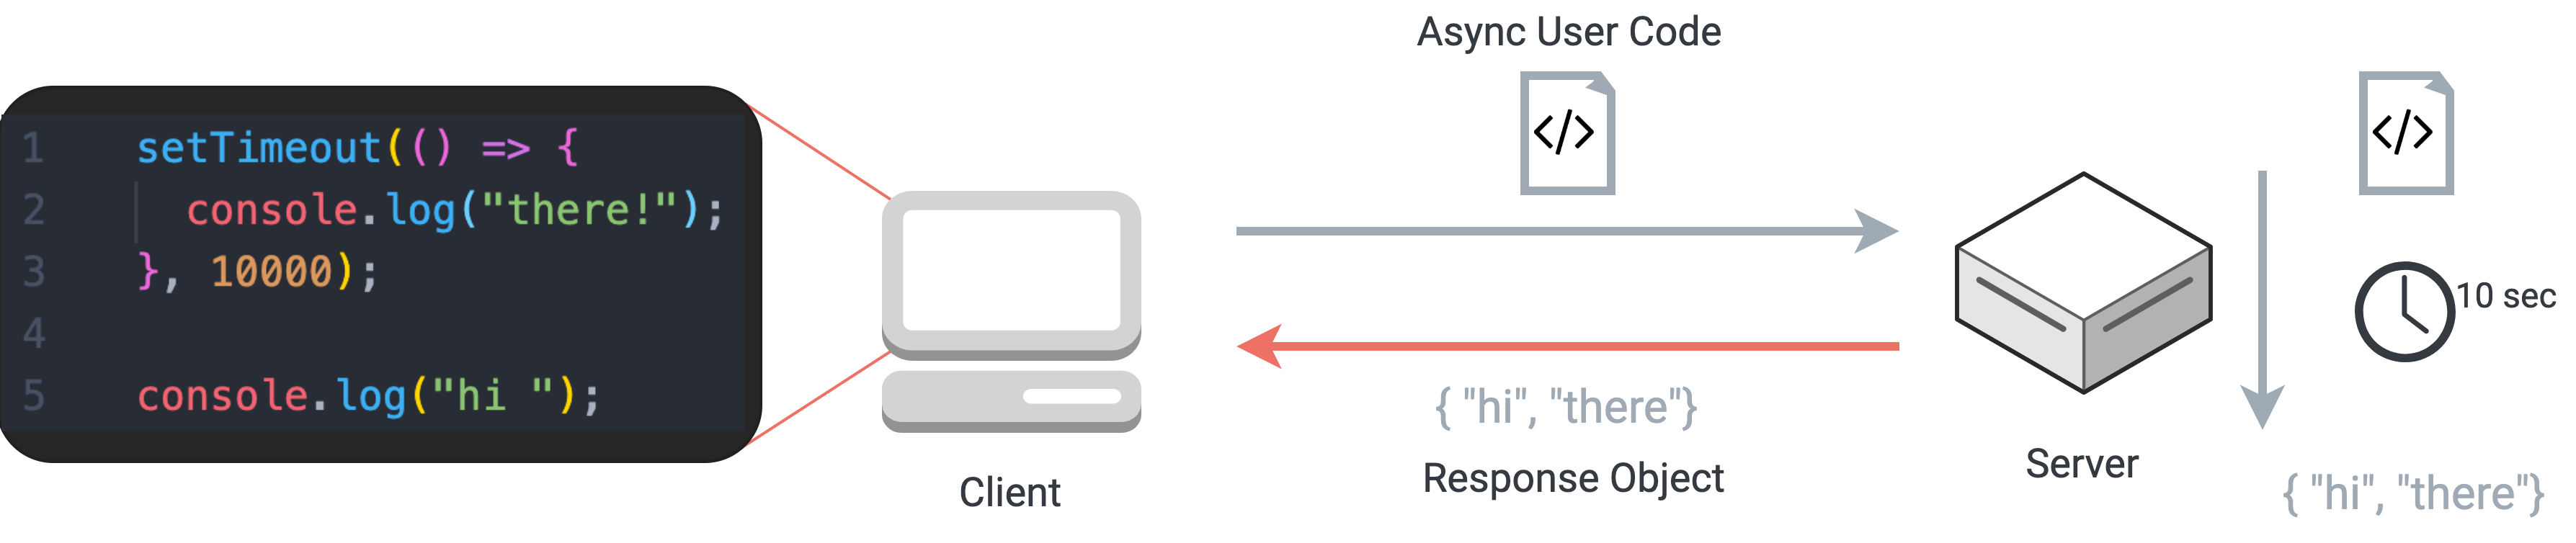
HTTP leads to a poor user experience for code with varying execution times
In the above example using a single HTTP request/response cycle, even though the server processes the first log statement immediately, the user has to wait ten seconds for the asynchronous code to execute before seeing any results. In order to improve the responsiveness of our application, we needed a connection that would permit the server to issue many responses to a single client request. That way, a user could receive real-time feedback as each cell of code was run by our server, rather than waiting for the slowest code to execute.
There are also other alternatives. We could continually ping the server to check for execution results (short-polling), or hold open an HTTP connection (long-polling), but both of these approaches are inefficient. Server-sent events would allow our server to issue multiple responses, but do not accommodate true bi-directional communication. SSEs also have a limitation of ~6 concurrent connections, which is too few for our use case.
A better fit for our needs was to create a WebSocket connection to the code processing server upon the initial page load. The main advantage of WebSockets is that it enables true bi-directional communication between client and server. After an initial handshake over HTTP, the client and server communicate over a single, persistent TCP connection which allows full duplex communication. The reduced message size due to lack of HTTP headers means that WebSocket messages incur less latency.
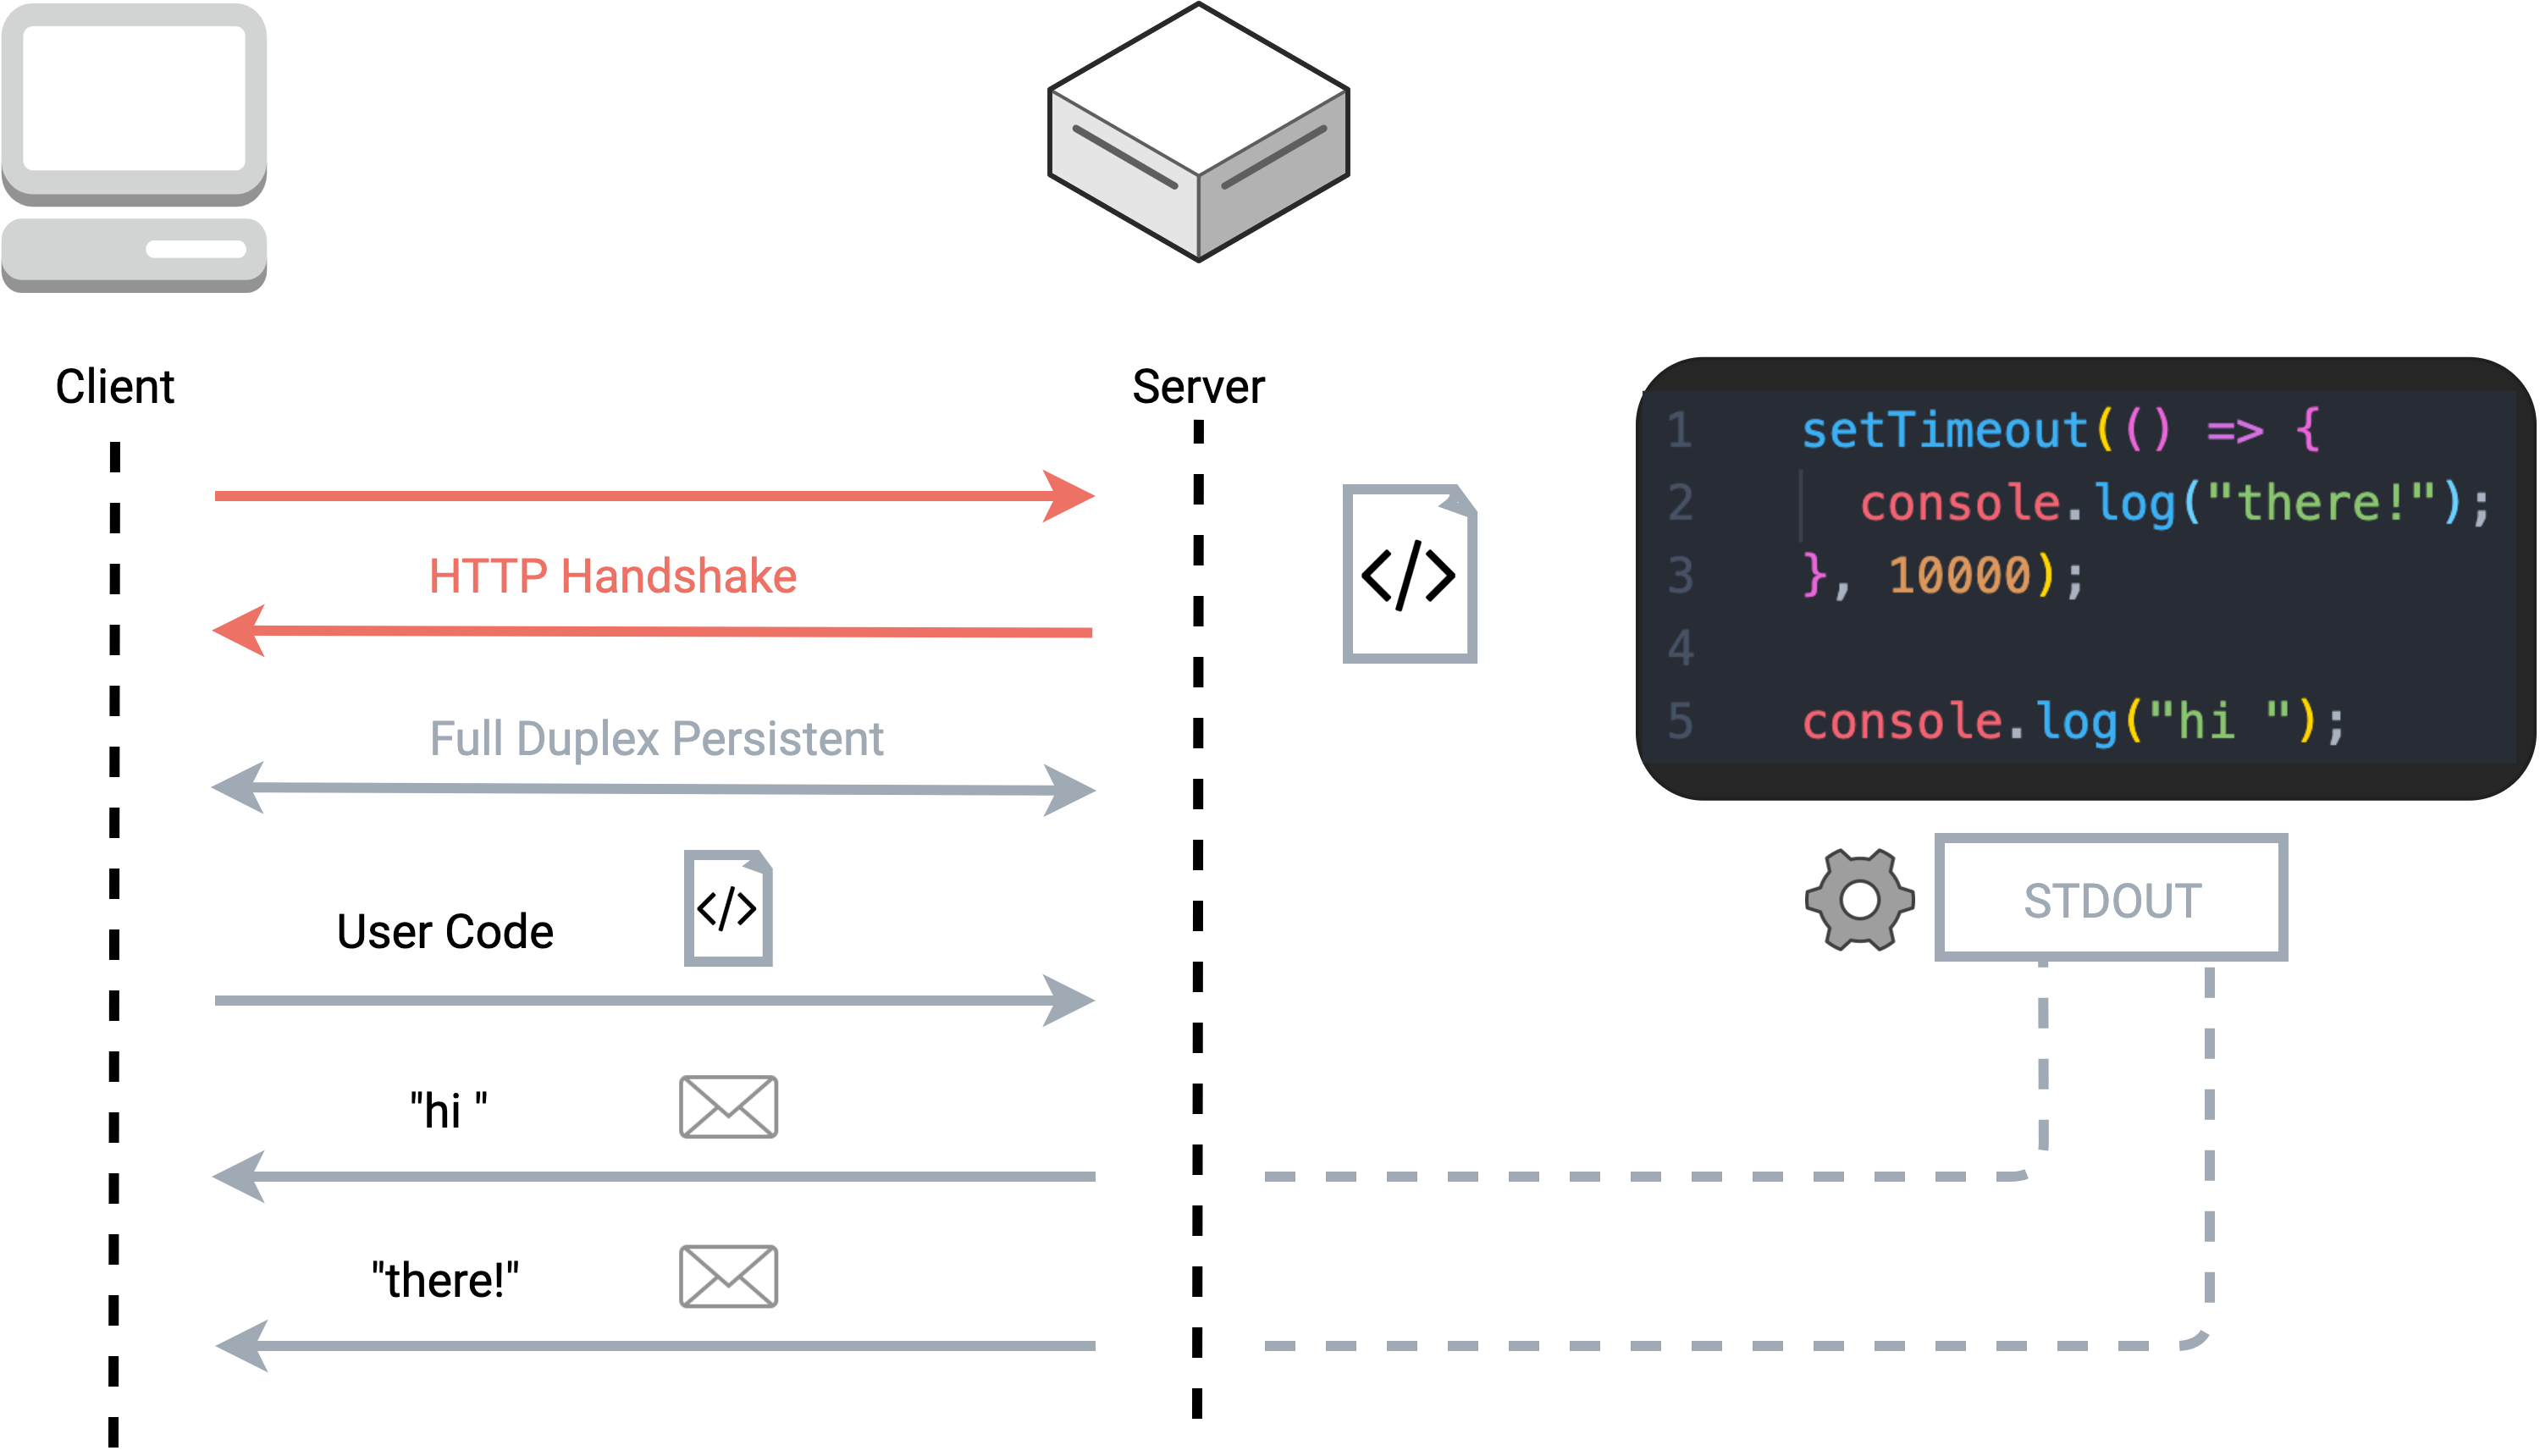
WebSockets enables the server to send multiple responses to a single code execution request
Using the same code example as above, we see the benefit of enabling the server to send multiple messages to
the client in response to a single code execution request. The first log statement is displayed to the user as
soon as it is executed, then the delayed log statement inside the setTimeout callback is sent
later in a separate message.
Another advantage of WebSockets is that it allows us to determine when a user has ended a session. The
WebSocket
connection remains open until a client or server disconnects, causing a close message to be
fired. By listening for
this close message, we are able to tear down containers and conserve our host
system resources. The trade-off is that using WebSockets introduces some additional complexity to our
codebase.
Having established our network architecture, we can now outline some of the features we were able to implement as a web-native tool. Adding API support turned out to be relatively simple. We initiate a GET request to an API endpoint from the client, then convert the JSON response into a Javascript object and insert it directly into the state of our notebook. Although the technologies are similar, implementing webhooks presented more of an engineering challenge.
Webhooks are a method of real-time, event-driven notification using HTTP requests. They provide an efficient way for a server to respond to events on another server through a subscription model. Webhooks are an alternative to less-efficient methods of server-to-server notification such as continuous polling.
The challenge with testing webhooks is that they are a server-to-server communication and require an existing URL endpoint to receive webhook data. We provide each notebook with a unique URL endpoint to receive webhook data.
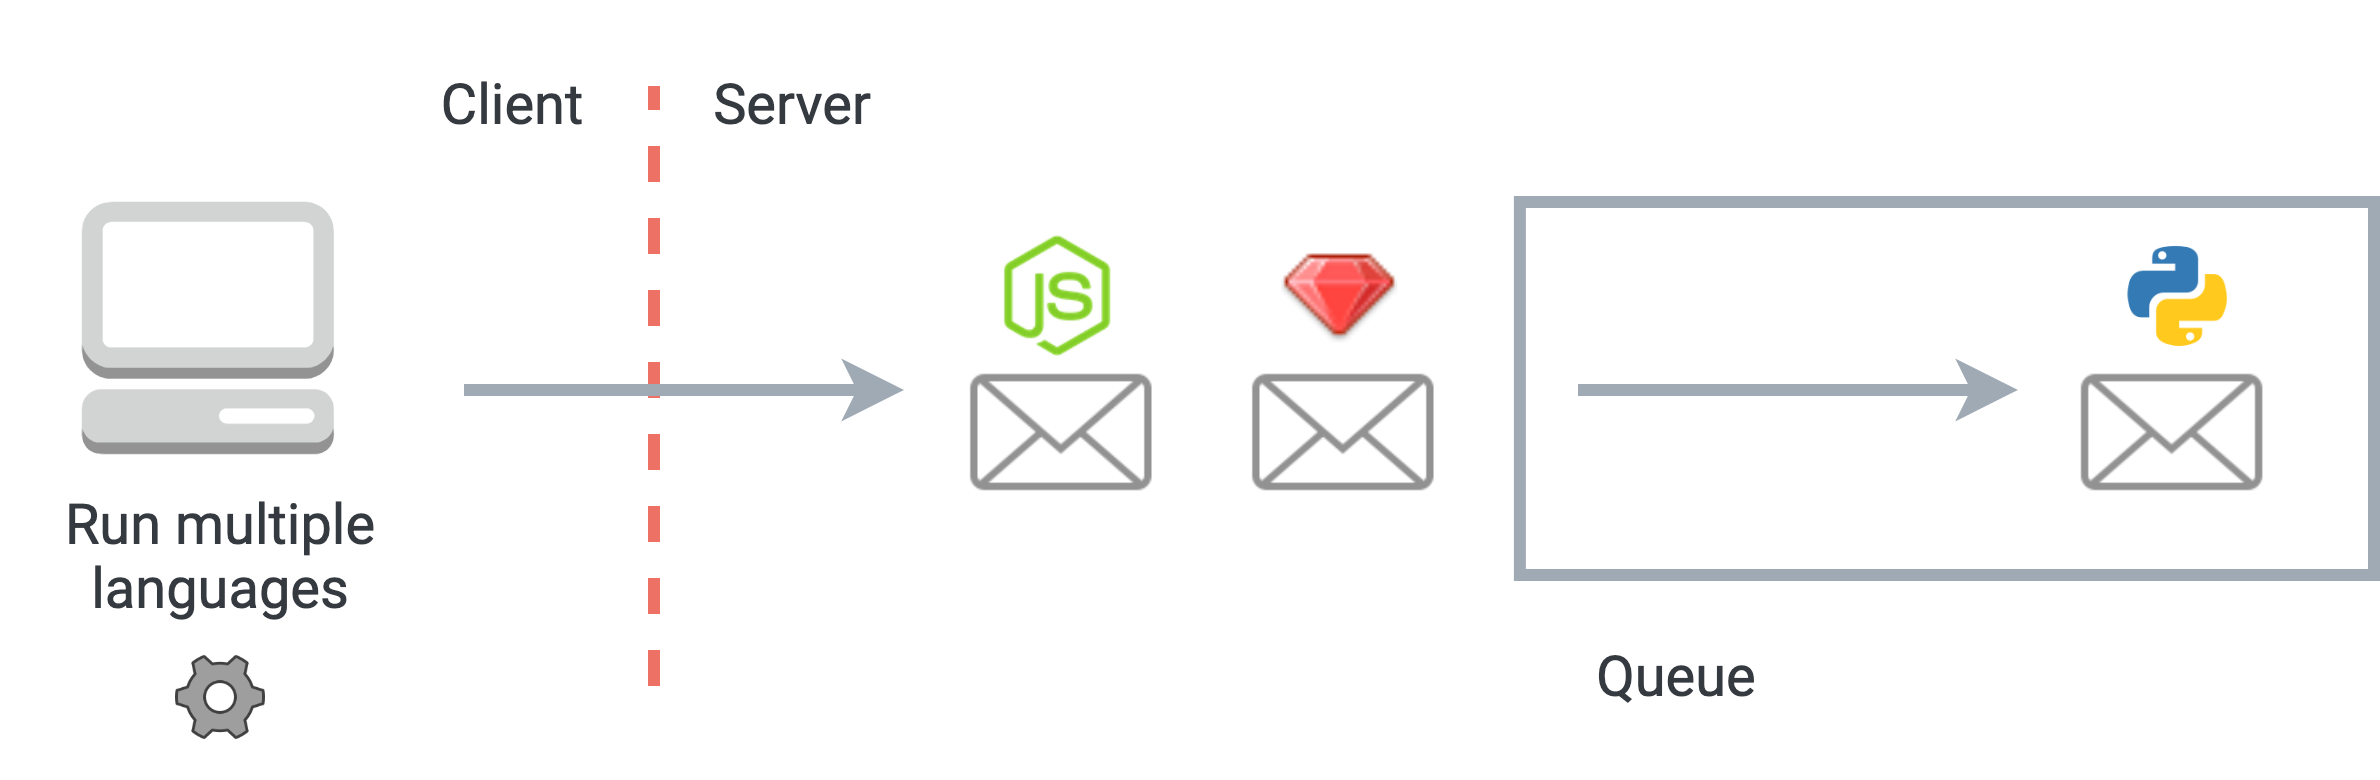
Due to their event-driven nature, the volume of incoming webhook traffic to a given endpoint is inconsistent. Webhook consumers have no control over the rate of incoming traffic. Providers that generate a high level of outgoing webhooks could flood our system and tie up our server resources.
We implemented a messaging queue to address this problem, effectively decoupling the incoming rate of webhook traffic from the rate at which we process them internally. We used the RSMQ library to handle the queue interactions with Redis.
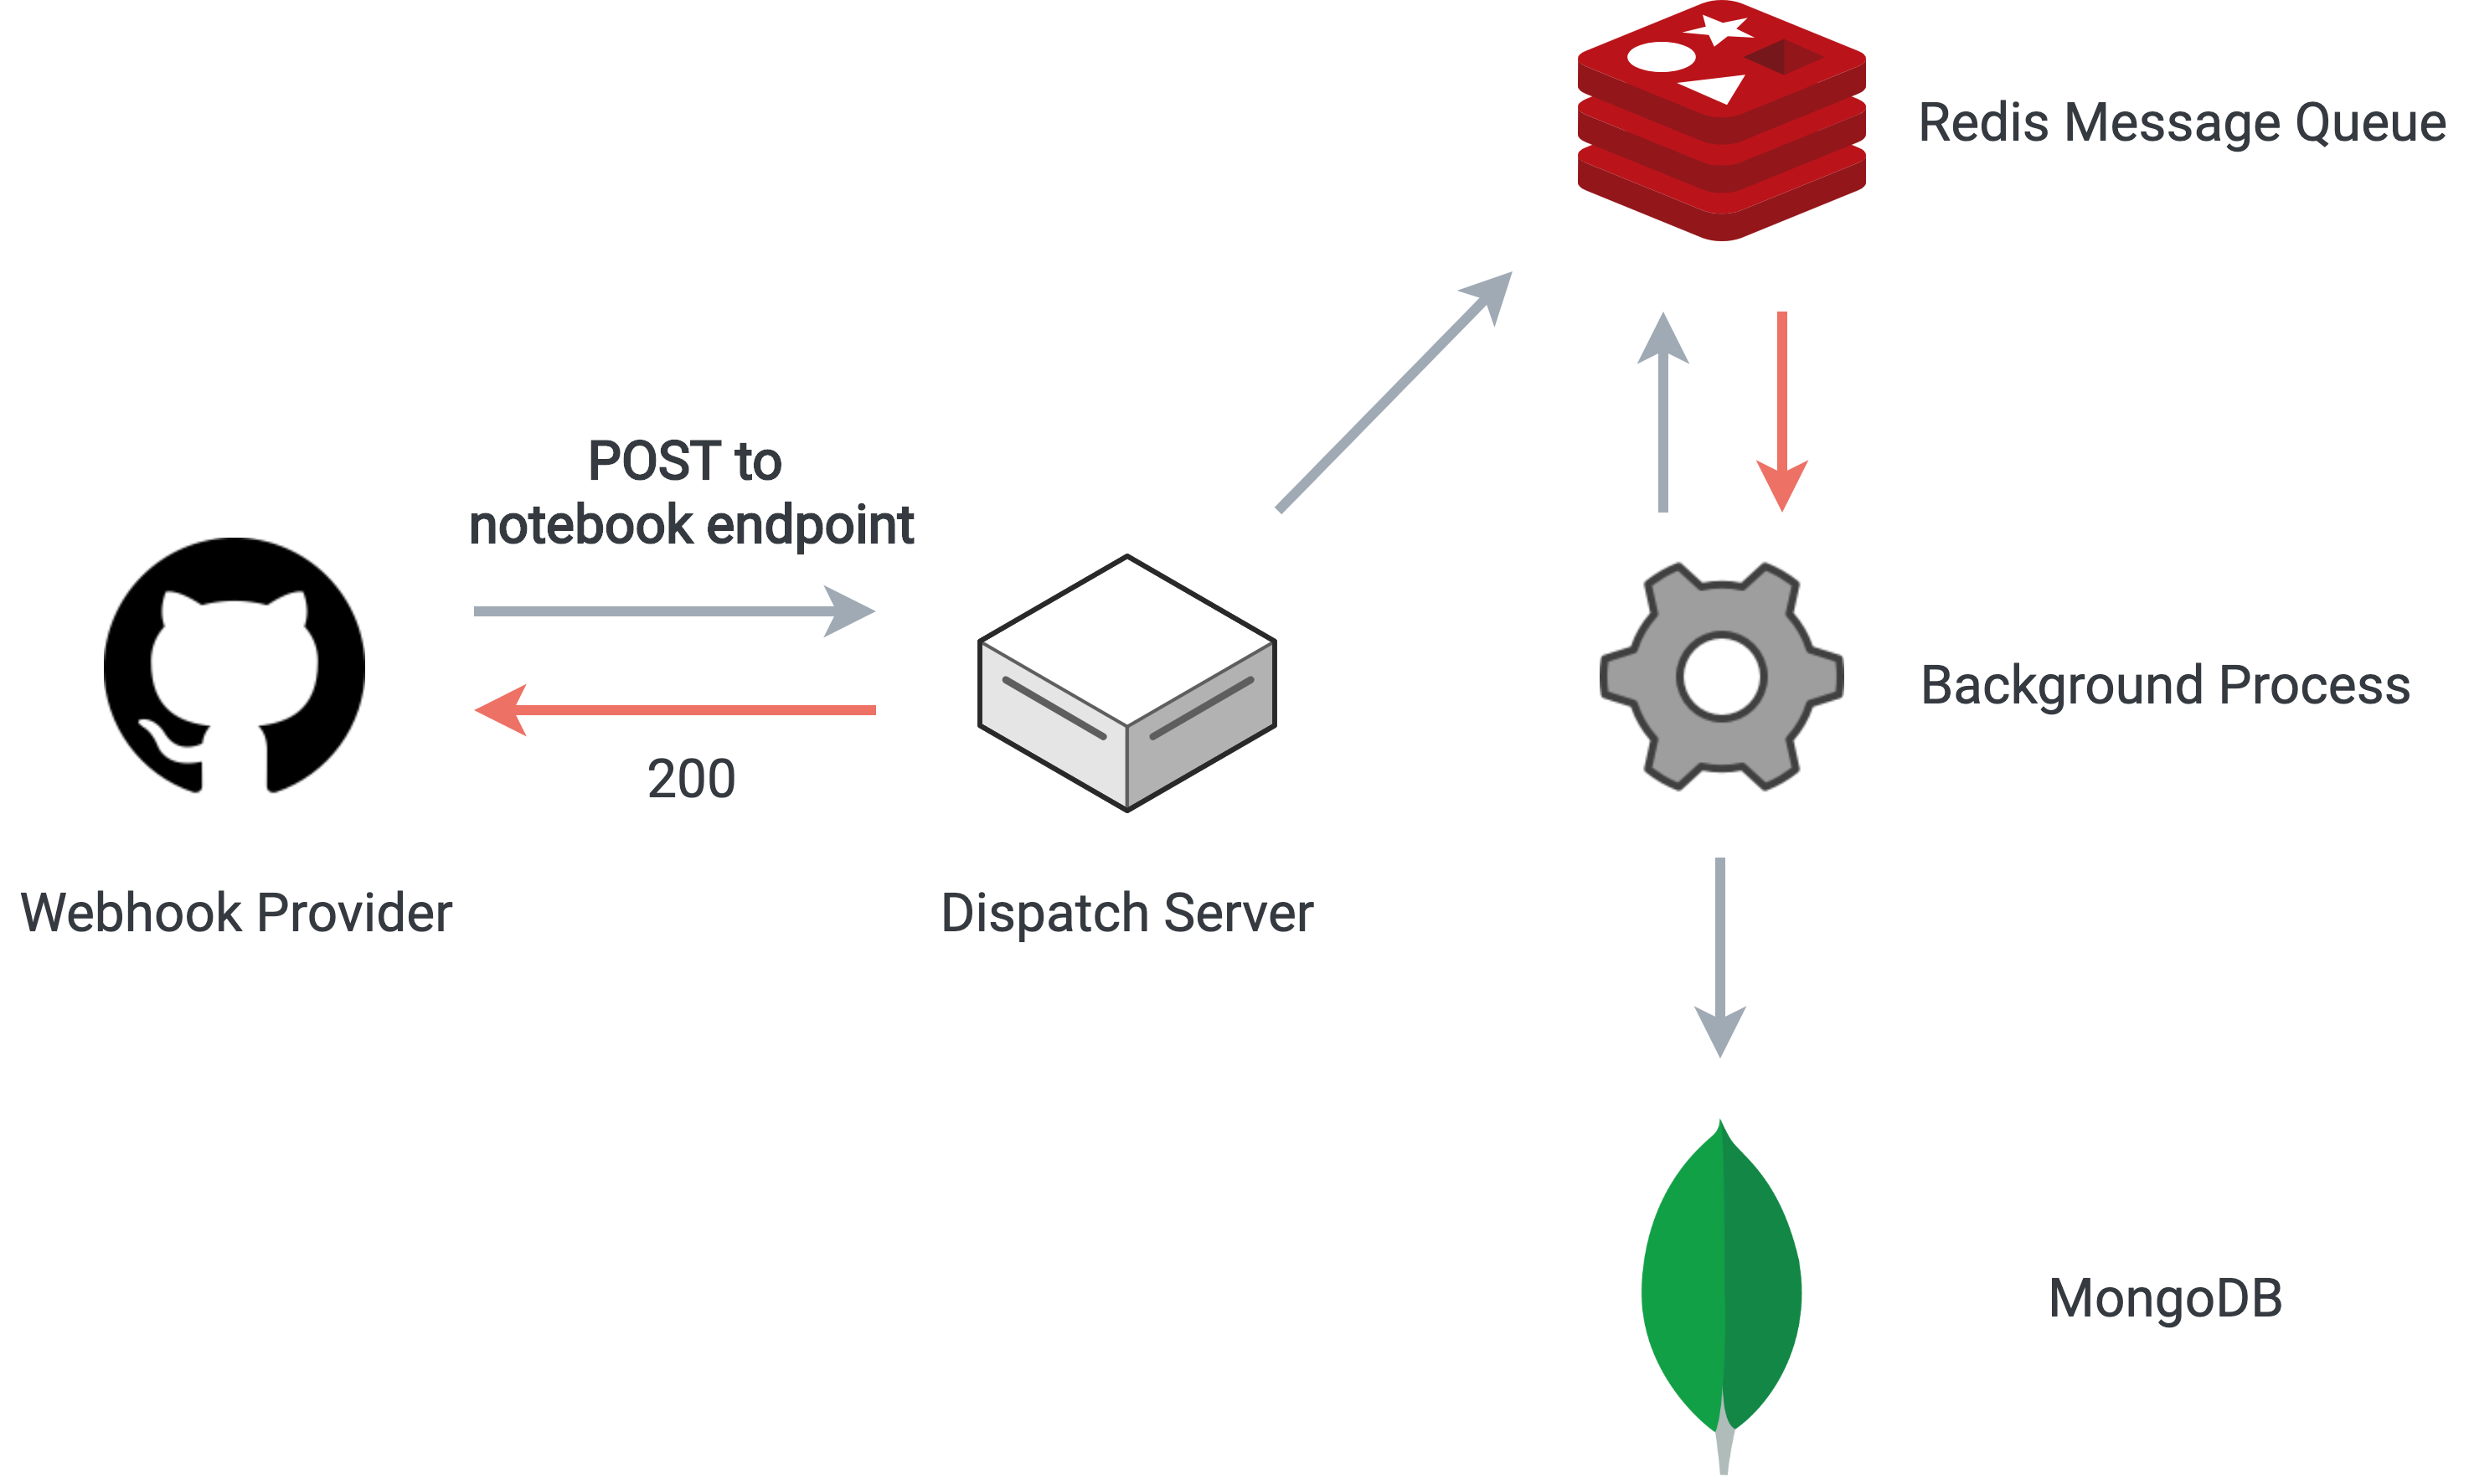
A message queue decouples the incoming webhook rate from the internal processing rate
When an incoming webhook request reaches our dispatch server, a response with a 200 status code is immediately issued. Then, the notebook ID associated with the webhook is parsed from the Host header of the request, and this ID, along with the JSON body of the request, are added to the Redis message queue. Asynchronously, a background process picks messages from the queue and inserts the webhook data into the correct notebook in MongoDB.
Webhook data is stored in a separate array in the MongoDB document associated with the notebook. When the notebook is loaded and hydrated on the front end in our React client, each webhook entry is inserted into its own JavaScript cell at the top of the notebook, where the user can then interact programmatically with the resulting JavaScript object.
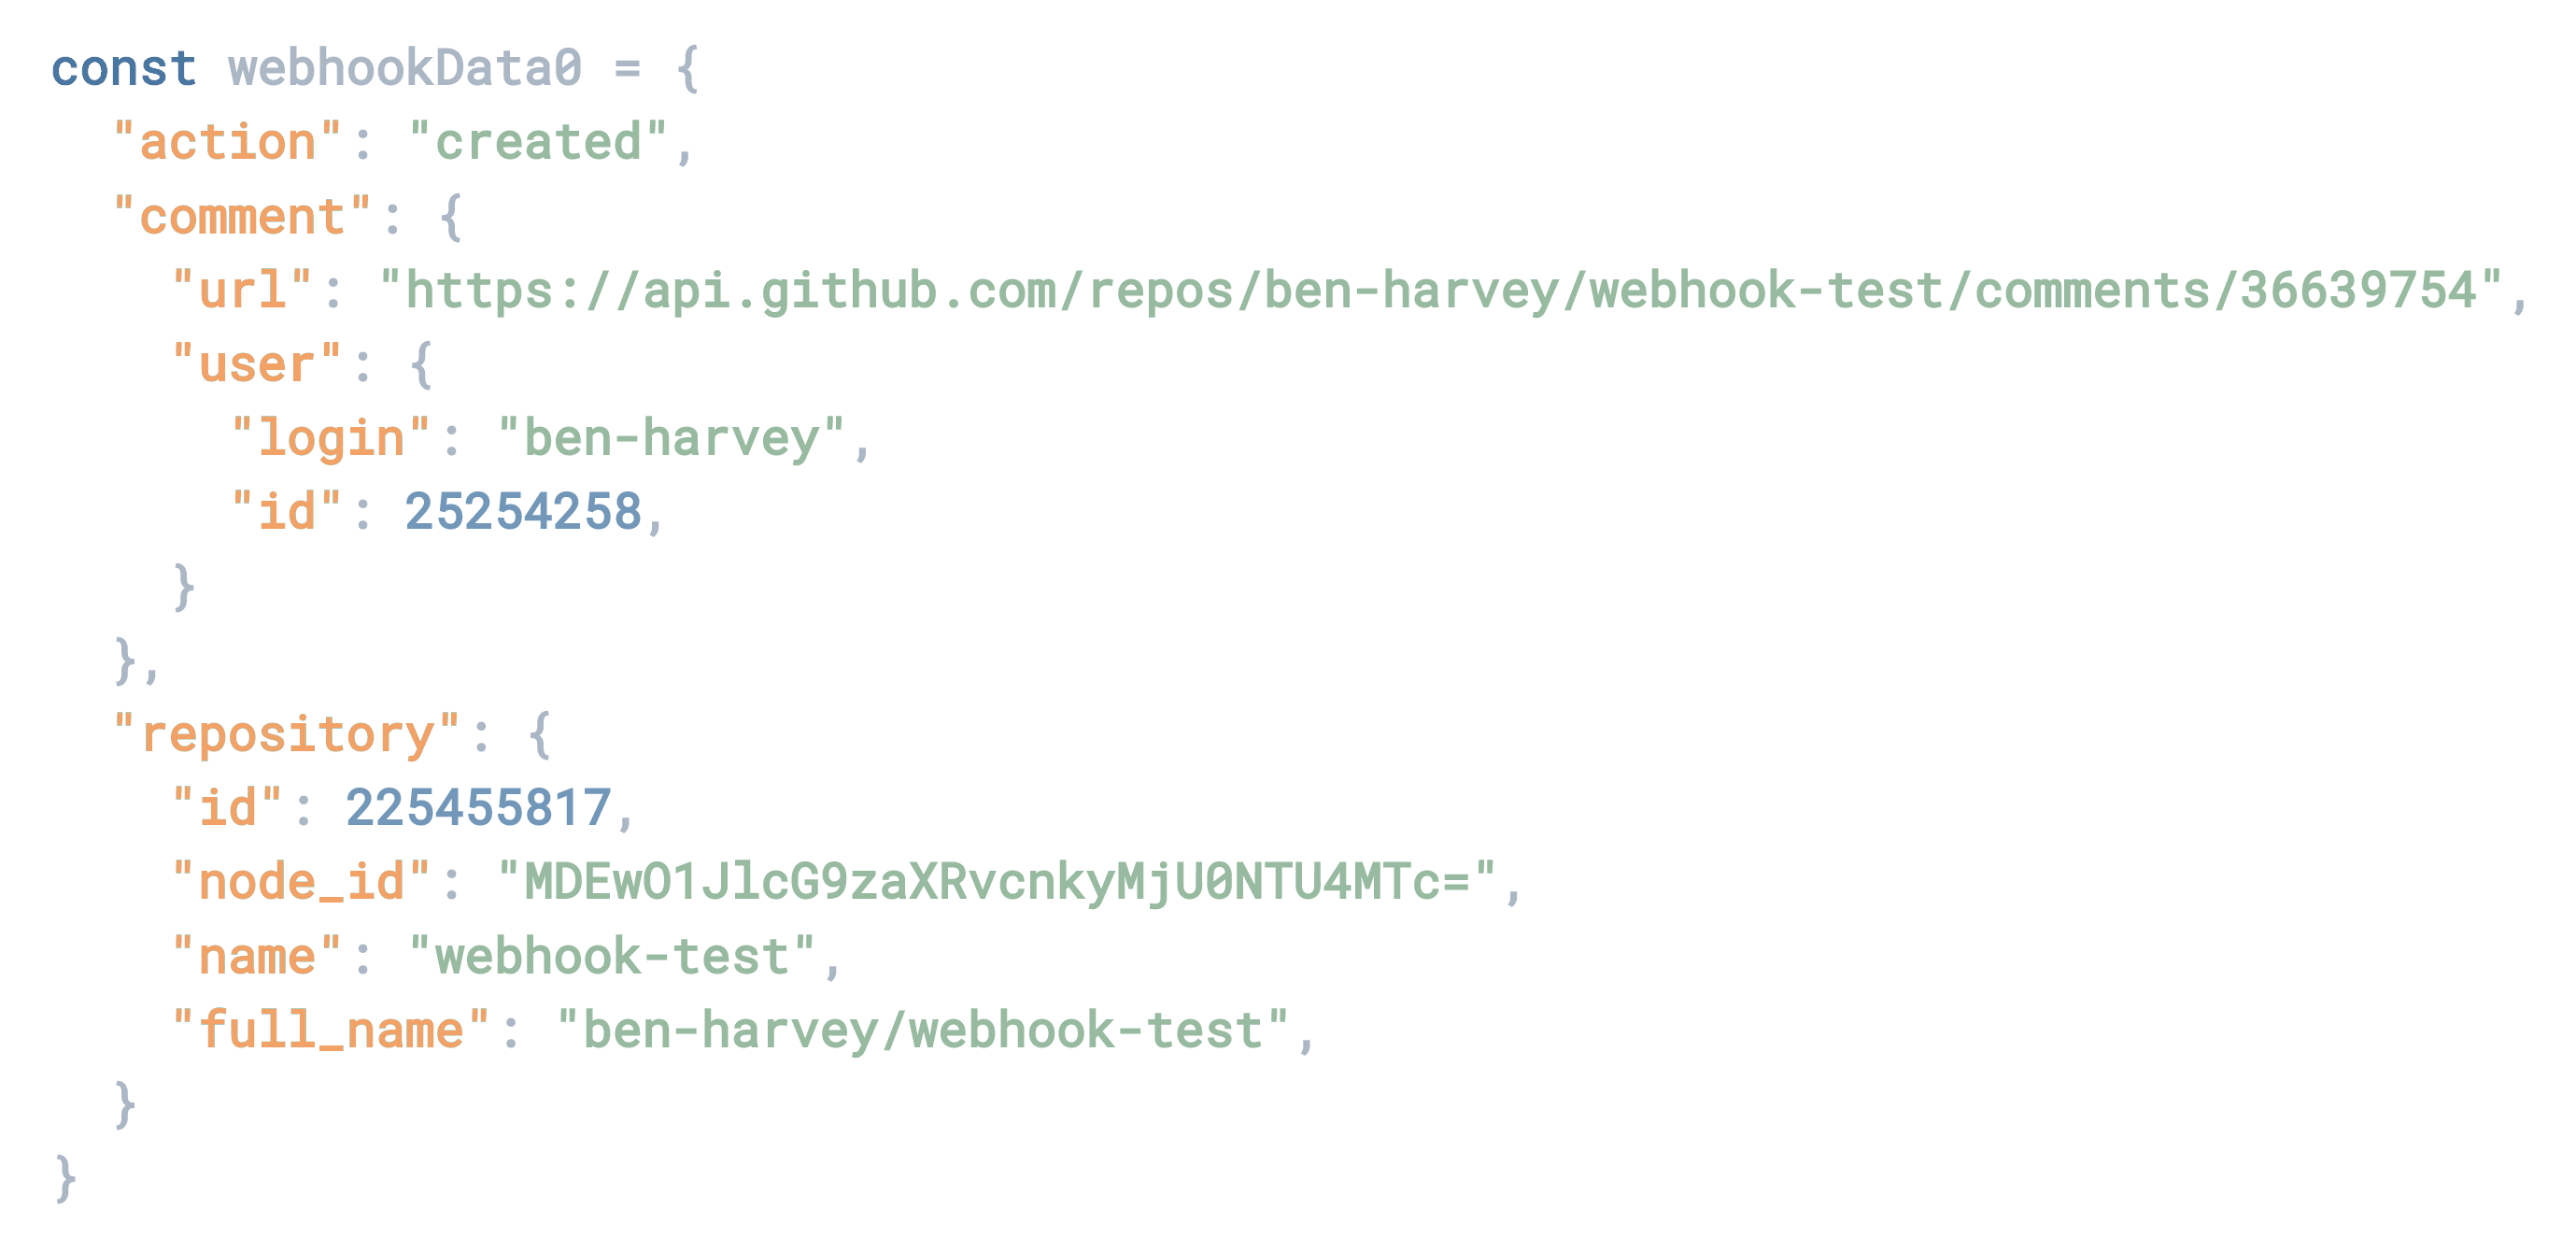
An example of GitHub webhook data
Our design goals for user experience had a big influence on our code execution strategy. Our three major design goals were to provide predictable scope and state, to render execution results cleanly and clearly and to render results correctly under the cells that produced them.
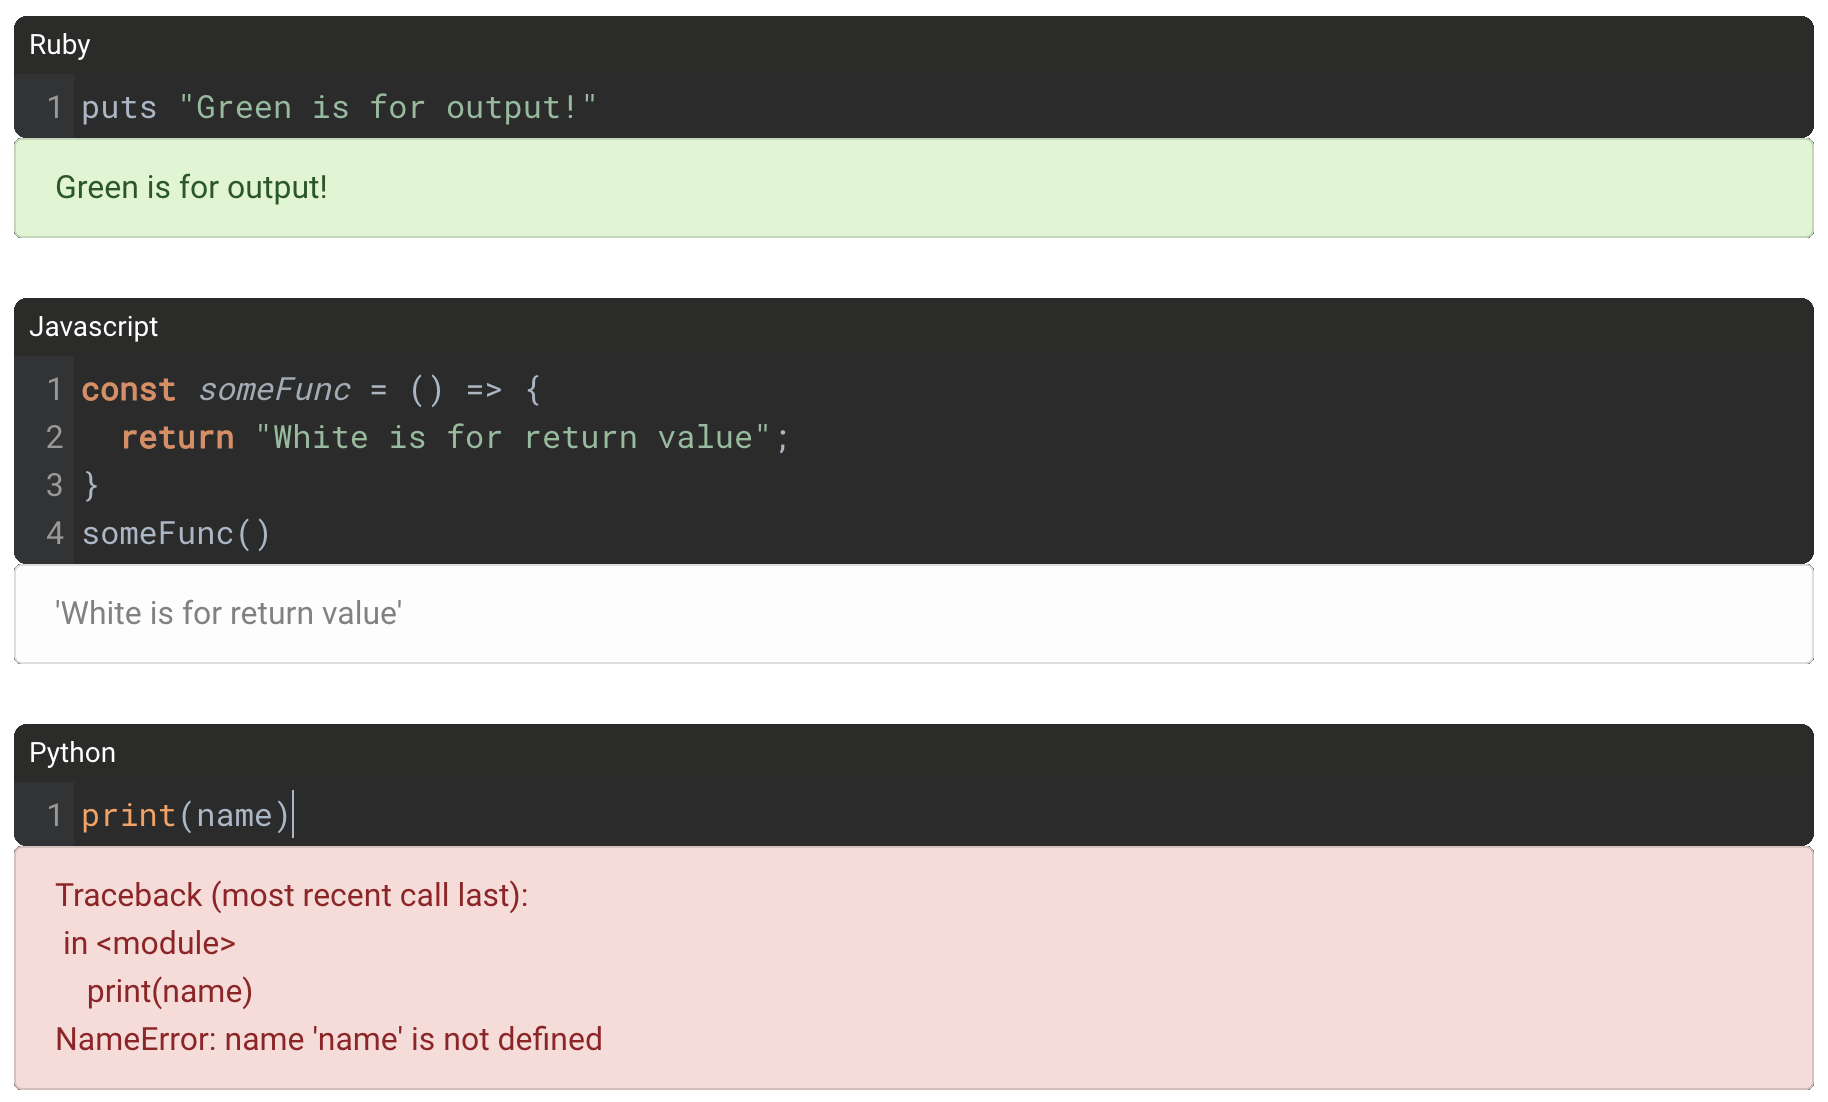
Rendering execution results cleanly and clearly was a major design goal
To us, a predictable scope and state means behaving like a typical development environment. To make sure that code cells build state from top to bottom, we don’t allow running a single cell in isolation. Instead, when a single cell is executed, all preceding cells of the same language up to and including the executed cell are assembled and sent to the server for processing.
By building program state sequentially instead of allowing arbitrary cell execution order, confusion over notebook state and scope is avoided. In the following example, three cells of Ruby code are concatenated into a single script on the server. When the third cell is run, variables declared in the cells above it are in scope.
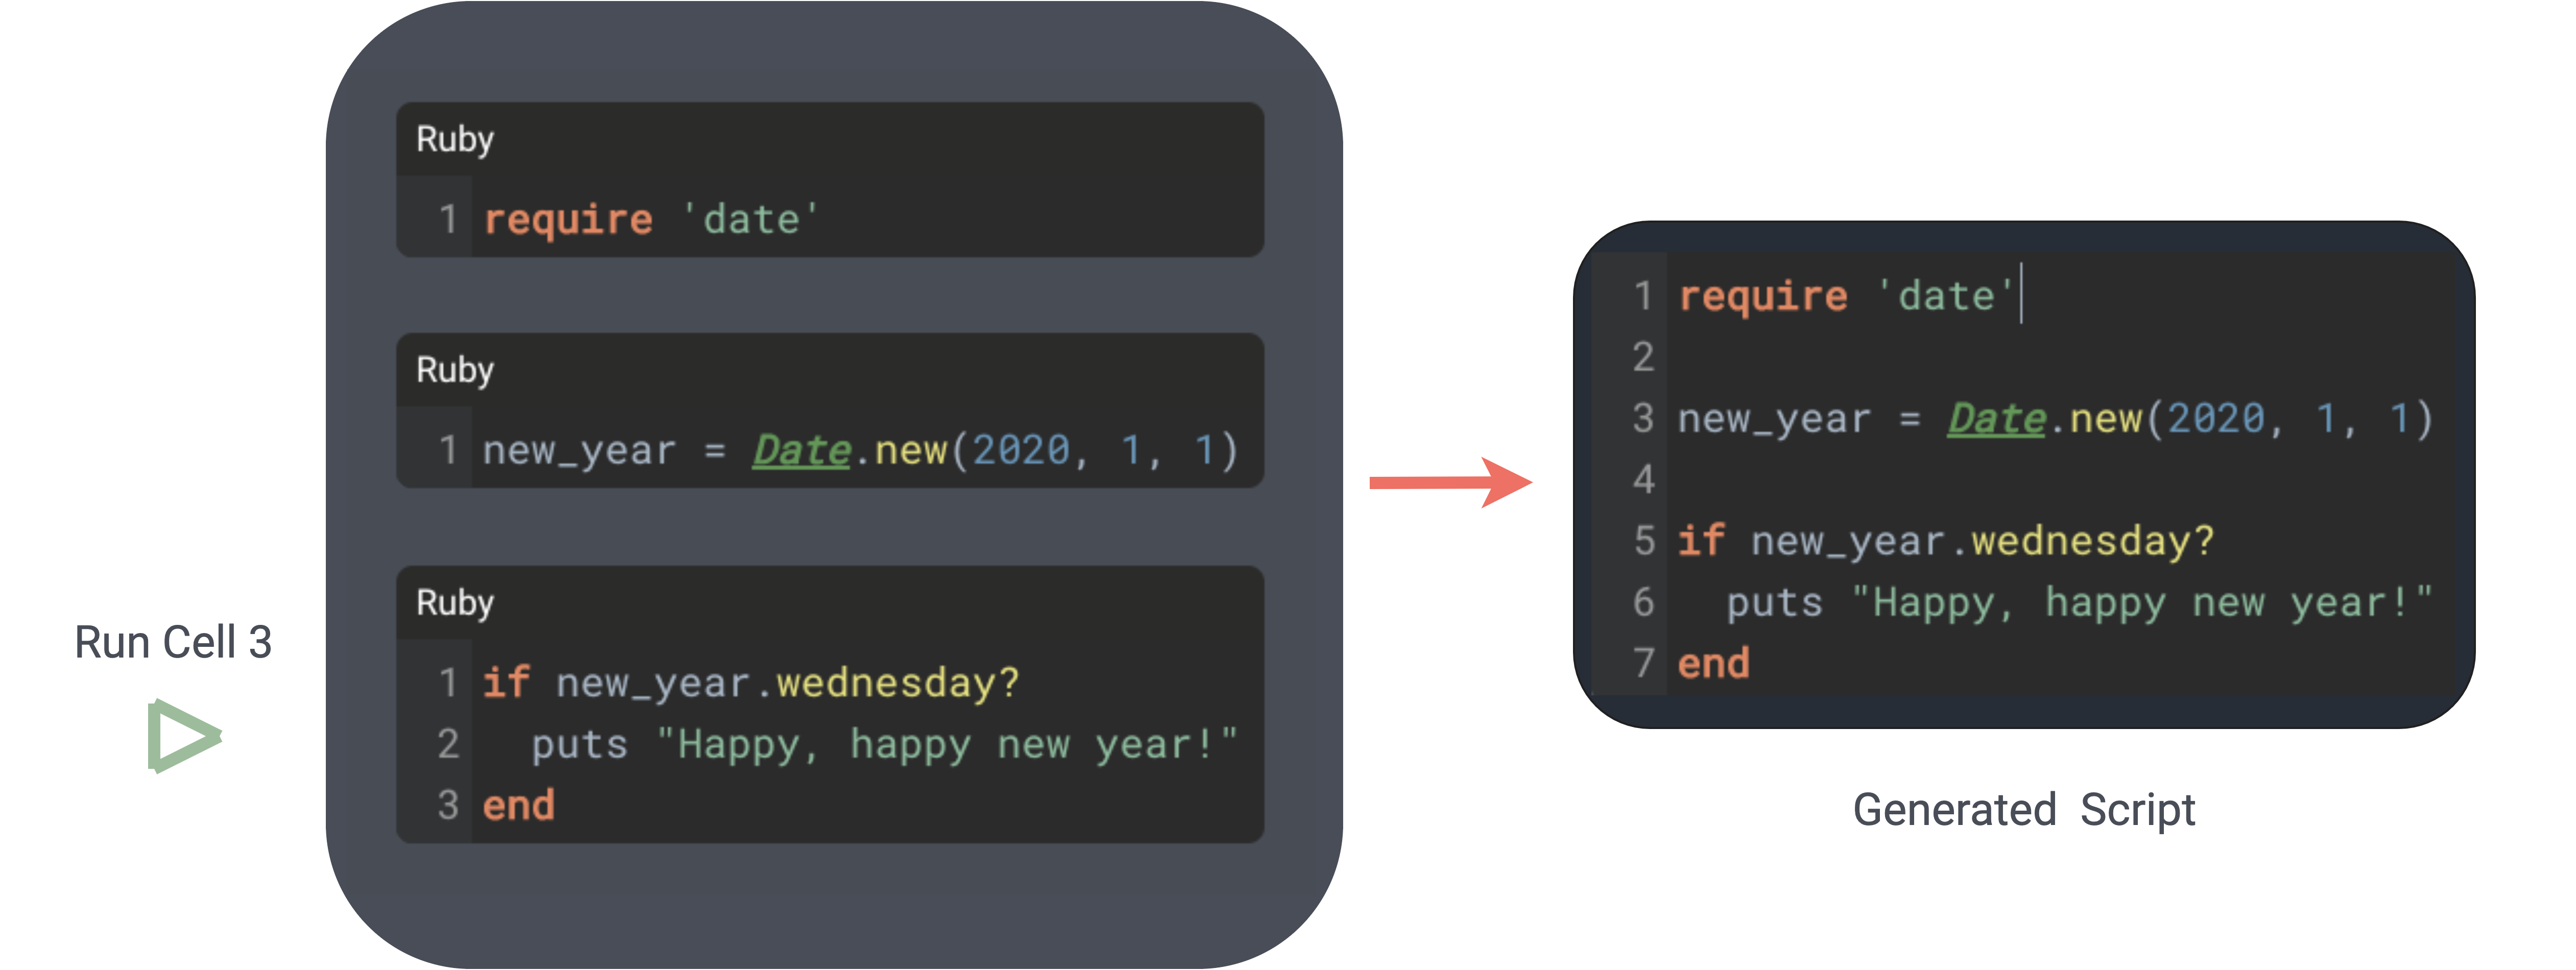
The code in cell 3 shares scope with the code in the cells above
Once the serialized user code arrives at the server, we need a way to execute it and capture any output,
return value and errors generated by the code. Our first thought was to take an approach like Jupyter notebook
and run the array of stringified user code against a Read-Evaluate-Print-Loop (REPL). The node-pty library allows us to
spawn REPLs as Node.js child processes for each of our supported languages, which can then serve as the
computational engines for our notebook. Keeping a persistent REPL process alive on our server across code
executions would mean simpler server-side code.
However, using a persistent REPL would mean that the current program state of a notebook at any given point would be effectively invisible to the user. This doesn’t fit our use case of making notebook state easy to reason about for users. Our solution was to spawn a new REPL process each time user code is run, ensuring a blank slate of state for each execution. The inefficiency of re-computing previous work is acceptable as a tradeoff for reinforcing one of our core design goals.
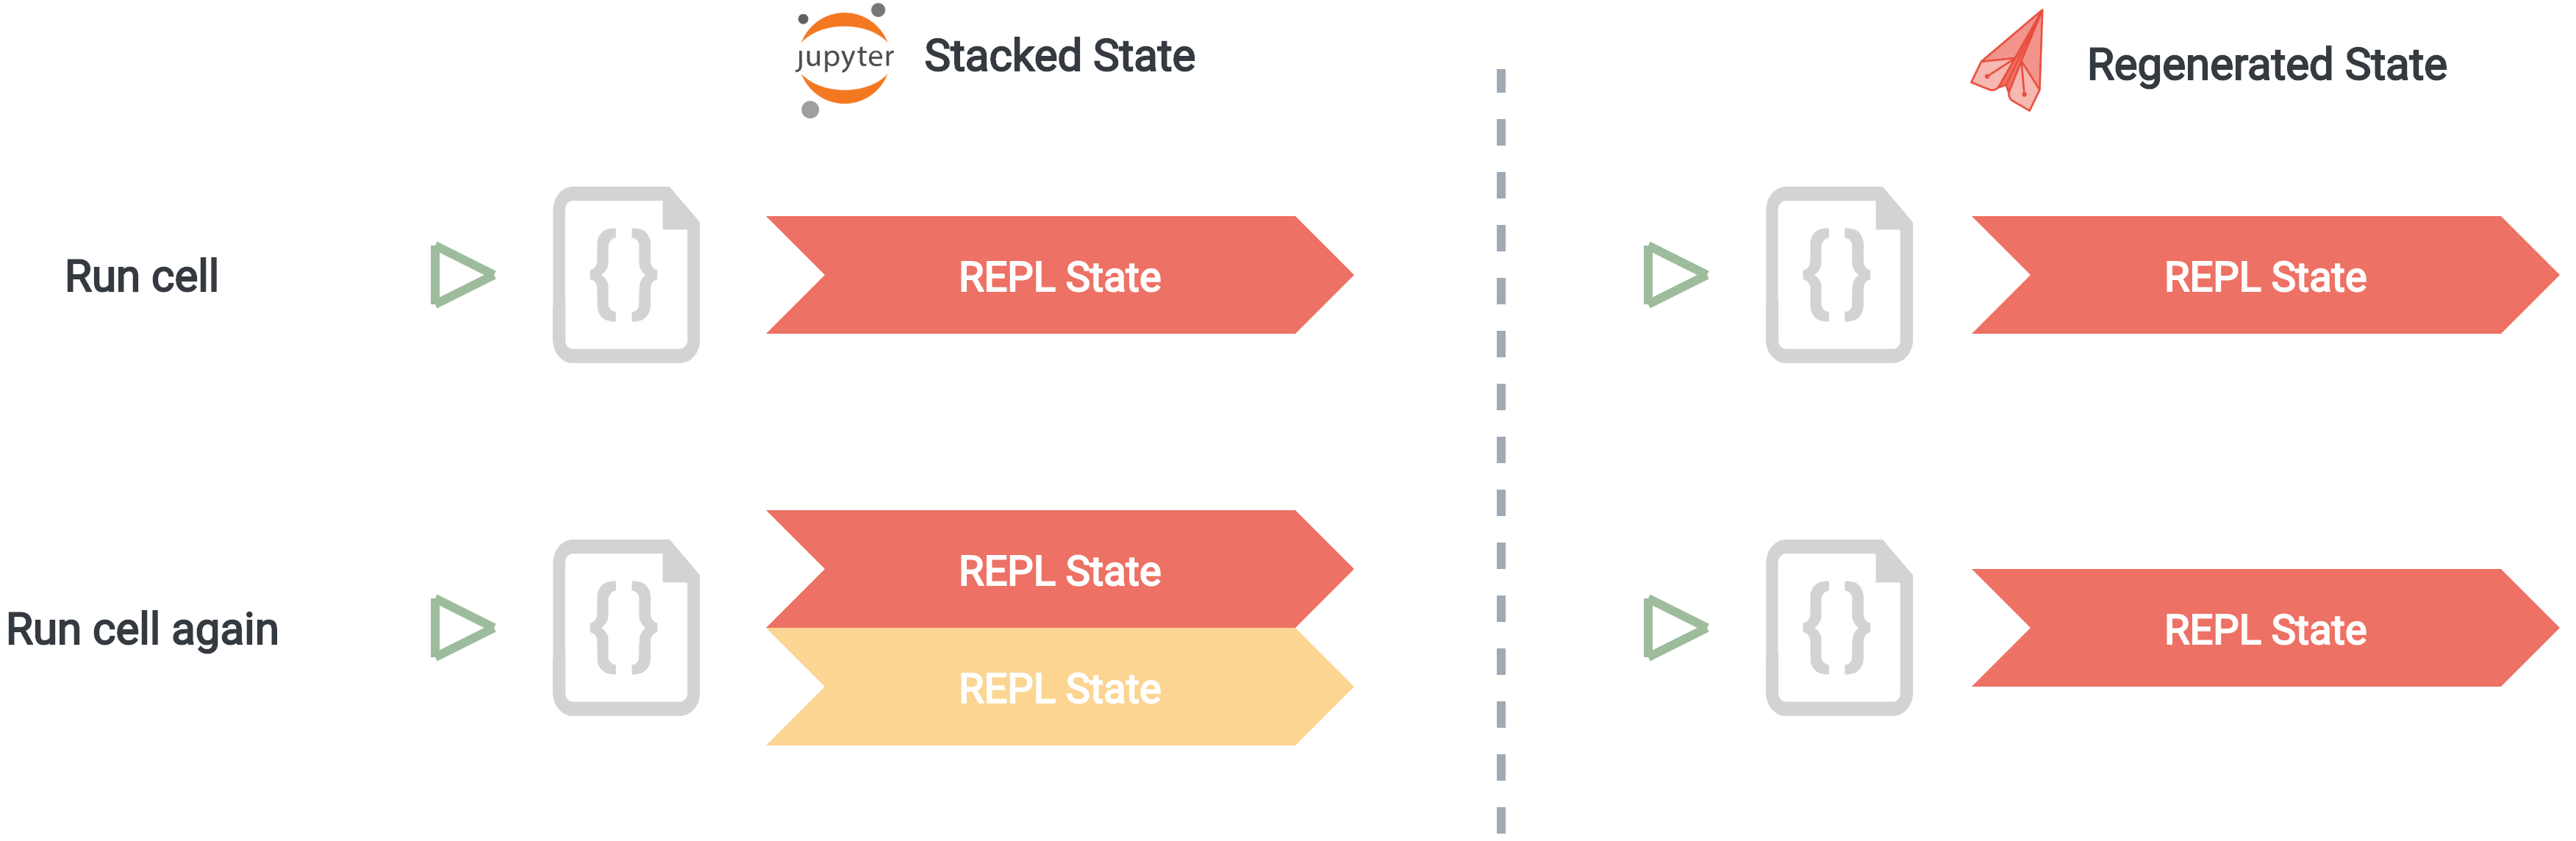
By respawning a REPL for each execution, we avoid the problem of confusion over hidden state
One difficulty with this approach is that the REPL also generates unwanted command-line UI artifacts, such as
prompts. Given our note-taking use case, we don’t want to present unfiltered REPL stdout, which would
unnecessarily clutter our notebook’s UI. Cleaning up the stdout would require significant parsing
unique to each language, and would compound as we add support for more languages.
Furthermore, errors in the user code don’t trigger an error event or halt REPL execution, which would produce unusual execution results. A programmer would generally expect code with an error to halt execution, but a REPL would allow that line to fail silently and then continue processing the rest of the code. On the other hand, extracting the return value of the last-executed cell is comparatively trivial with this approach, seeing as it is always the last line of the REPL stdout.

When code generates a return value, it is always the last line of REPL output
The other option for executing user code server-side is to write it to a temporary script file, then execute
the script using the Node child_process.exec method. By setting event listeners on the
stdout and stderr streams of the child process, we can cleanly capture output and
errors, while avoiding all of the unwanted command-line UI artifacts that a REPL produces. By using a
persistent WebSocket connection, as soon as output or errors are produced we can serialize them as JSON and
send them back to the client to provide a dynamic user experience.

Separate stdout and stderr listeners provide clean results from script execution
The drawback to this approach is that executing a script doesn’t generate a return value. By combining the results generated by both the REPL and temporary script, we have a consistent strategy for capturing return values, output, and errors from code execution.
The order of execution for these two approaches is important. In the case of errors in the user code, the REPL will continue to run code, rather than halting execution and outputting only the error message as expected. This can result in the REPL producing the wrong return value for code which contains errors.
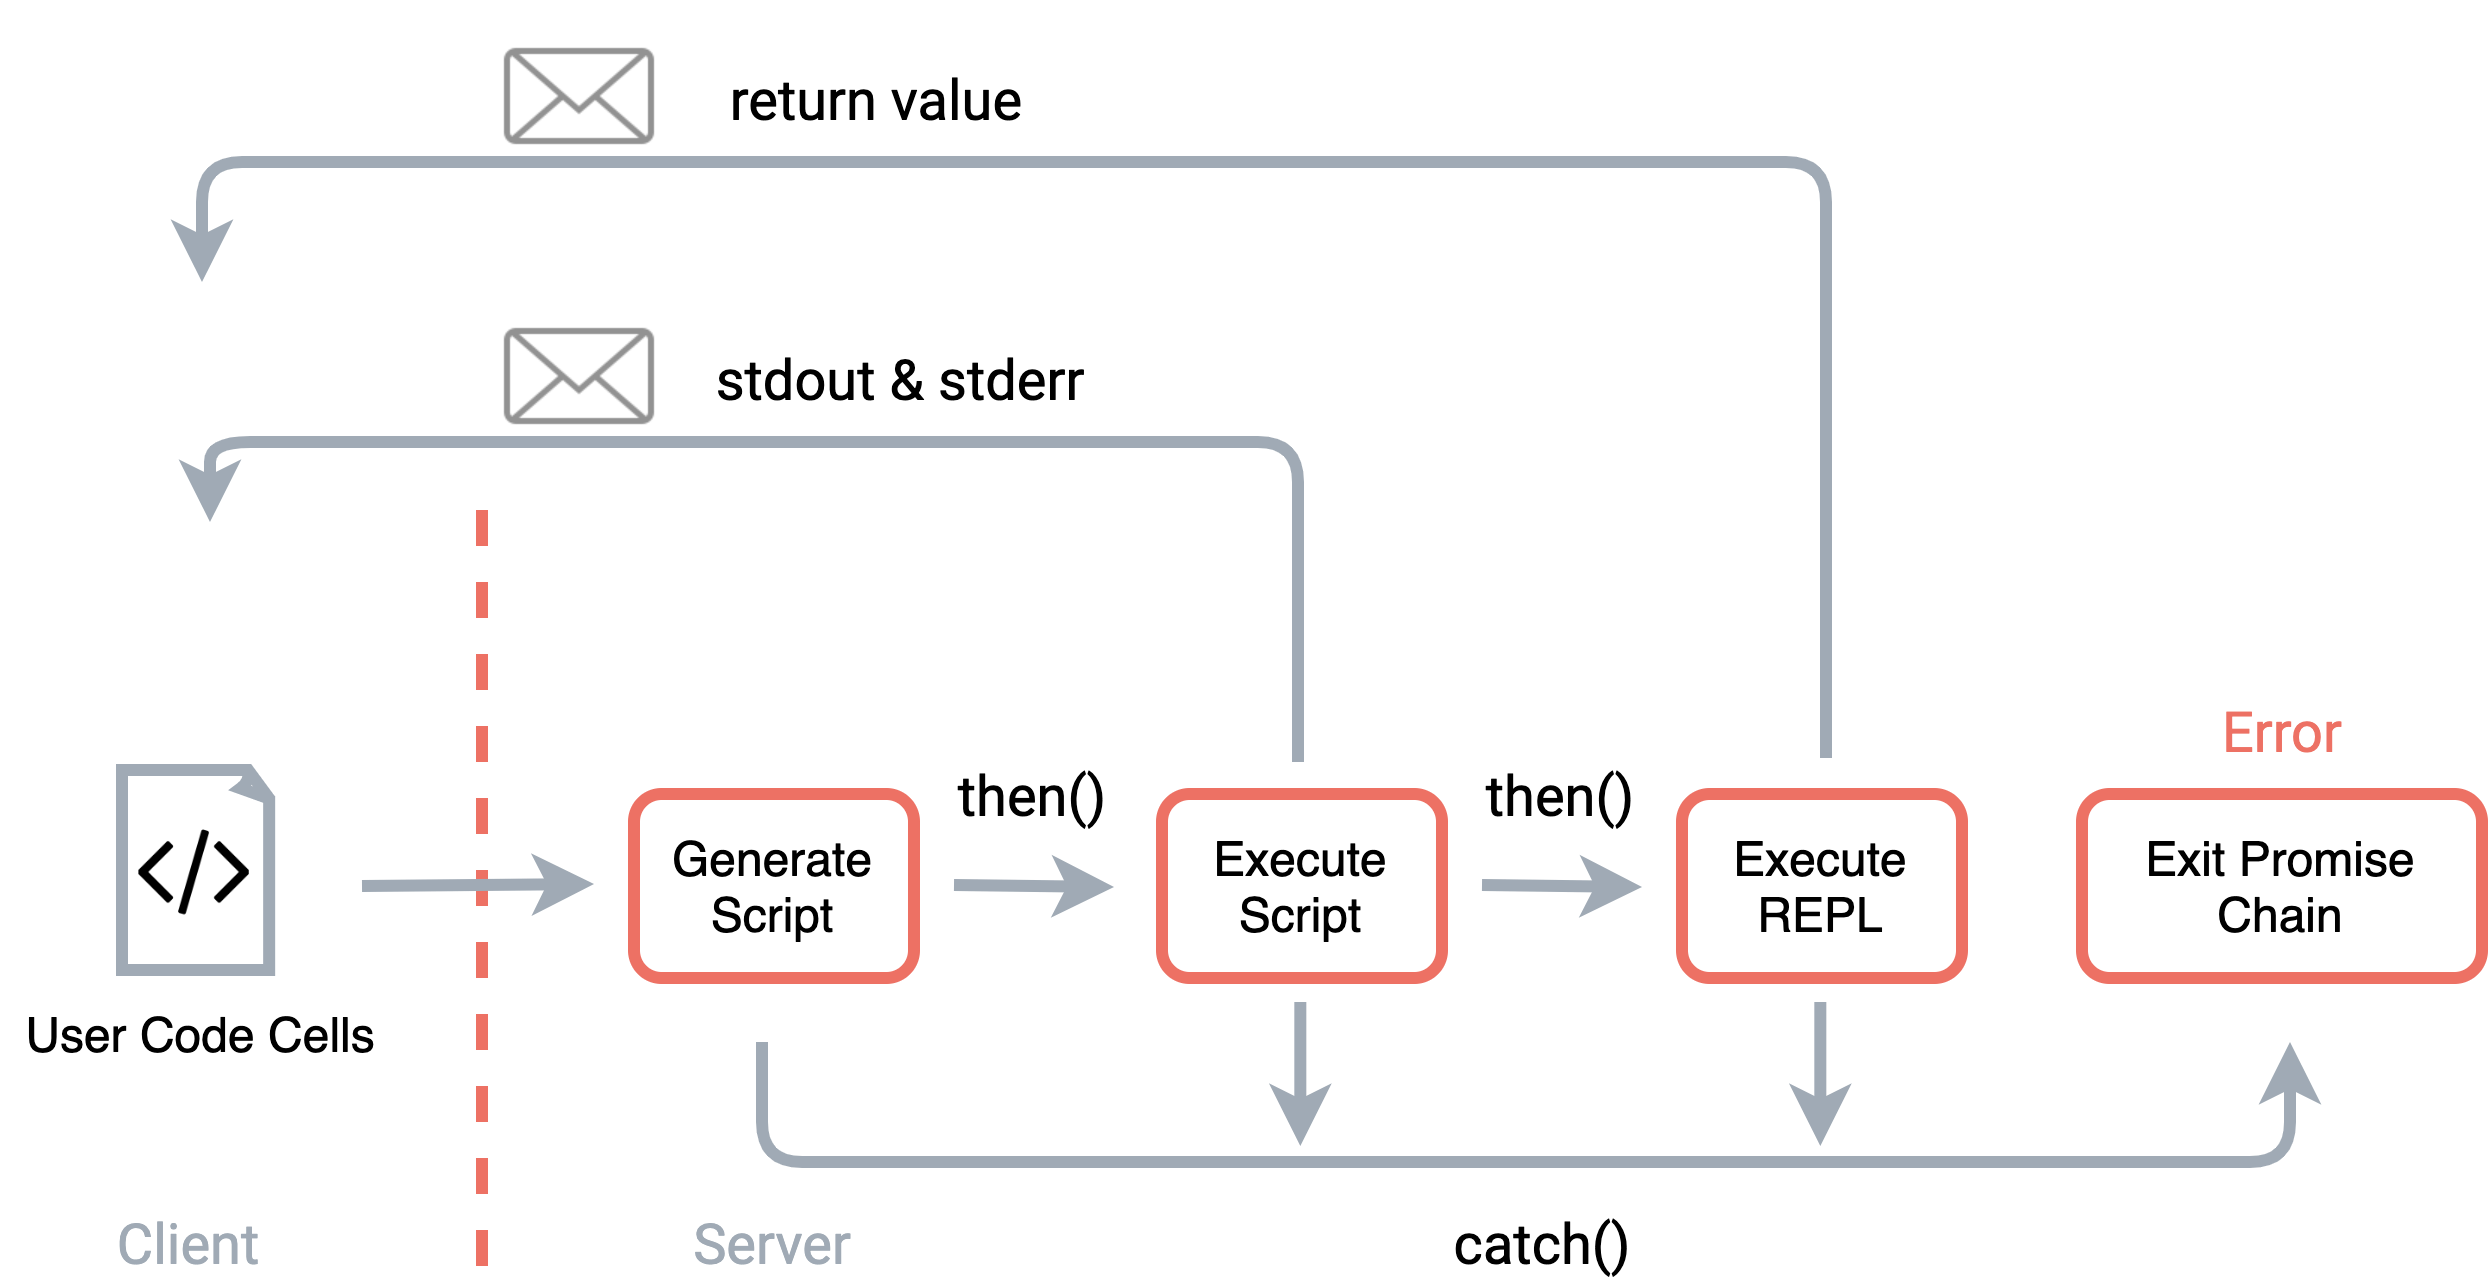
Our solution was to use JavaScript Promises to ensure that the temporary script is always
executed before the REPL. The script execution function returns a Promise that either resolves if
no errors are thrown, or rejects in the event of an error. In the event that the script execution promise
rejects, the error is returned to the client, and the REPL is not executed.
Now that we have our code execution results, the next challenge is to distribute these results correctly to the cells that generated them.
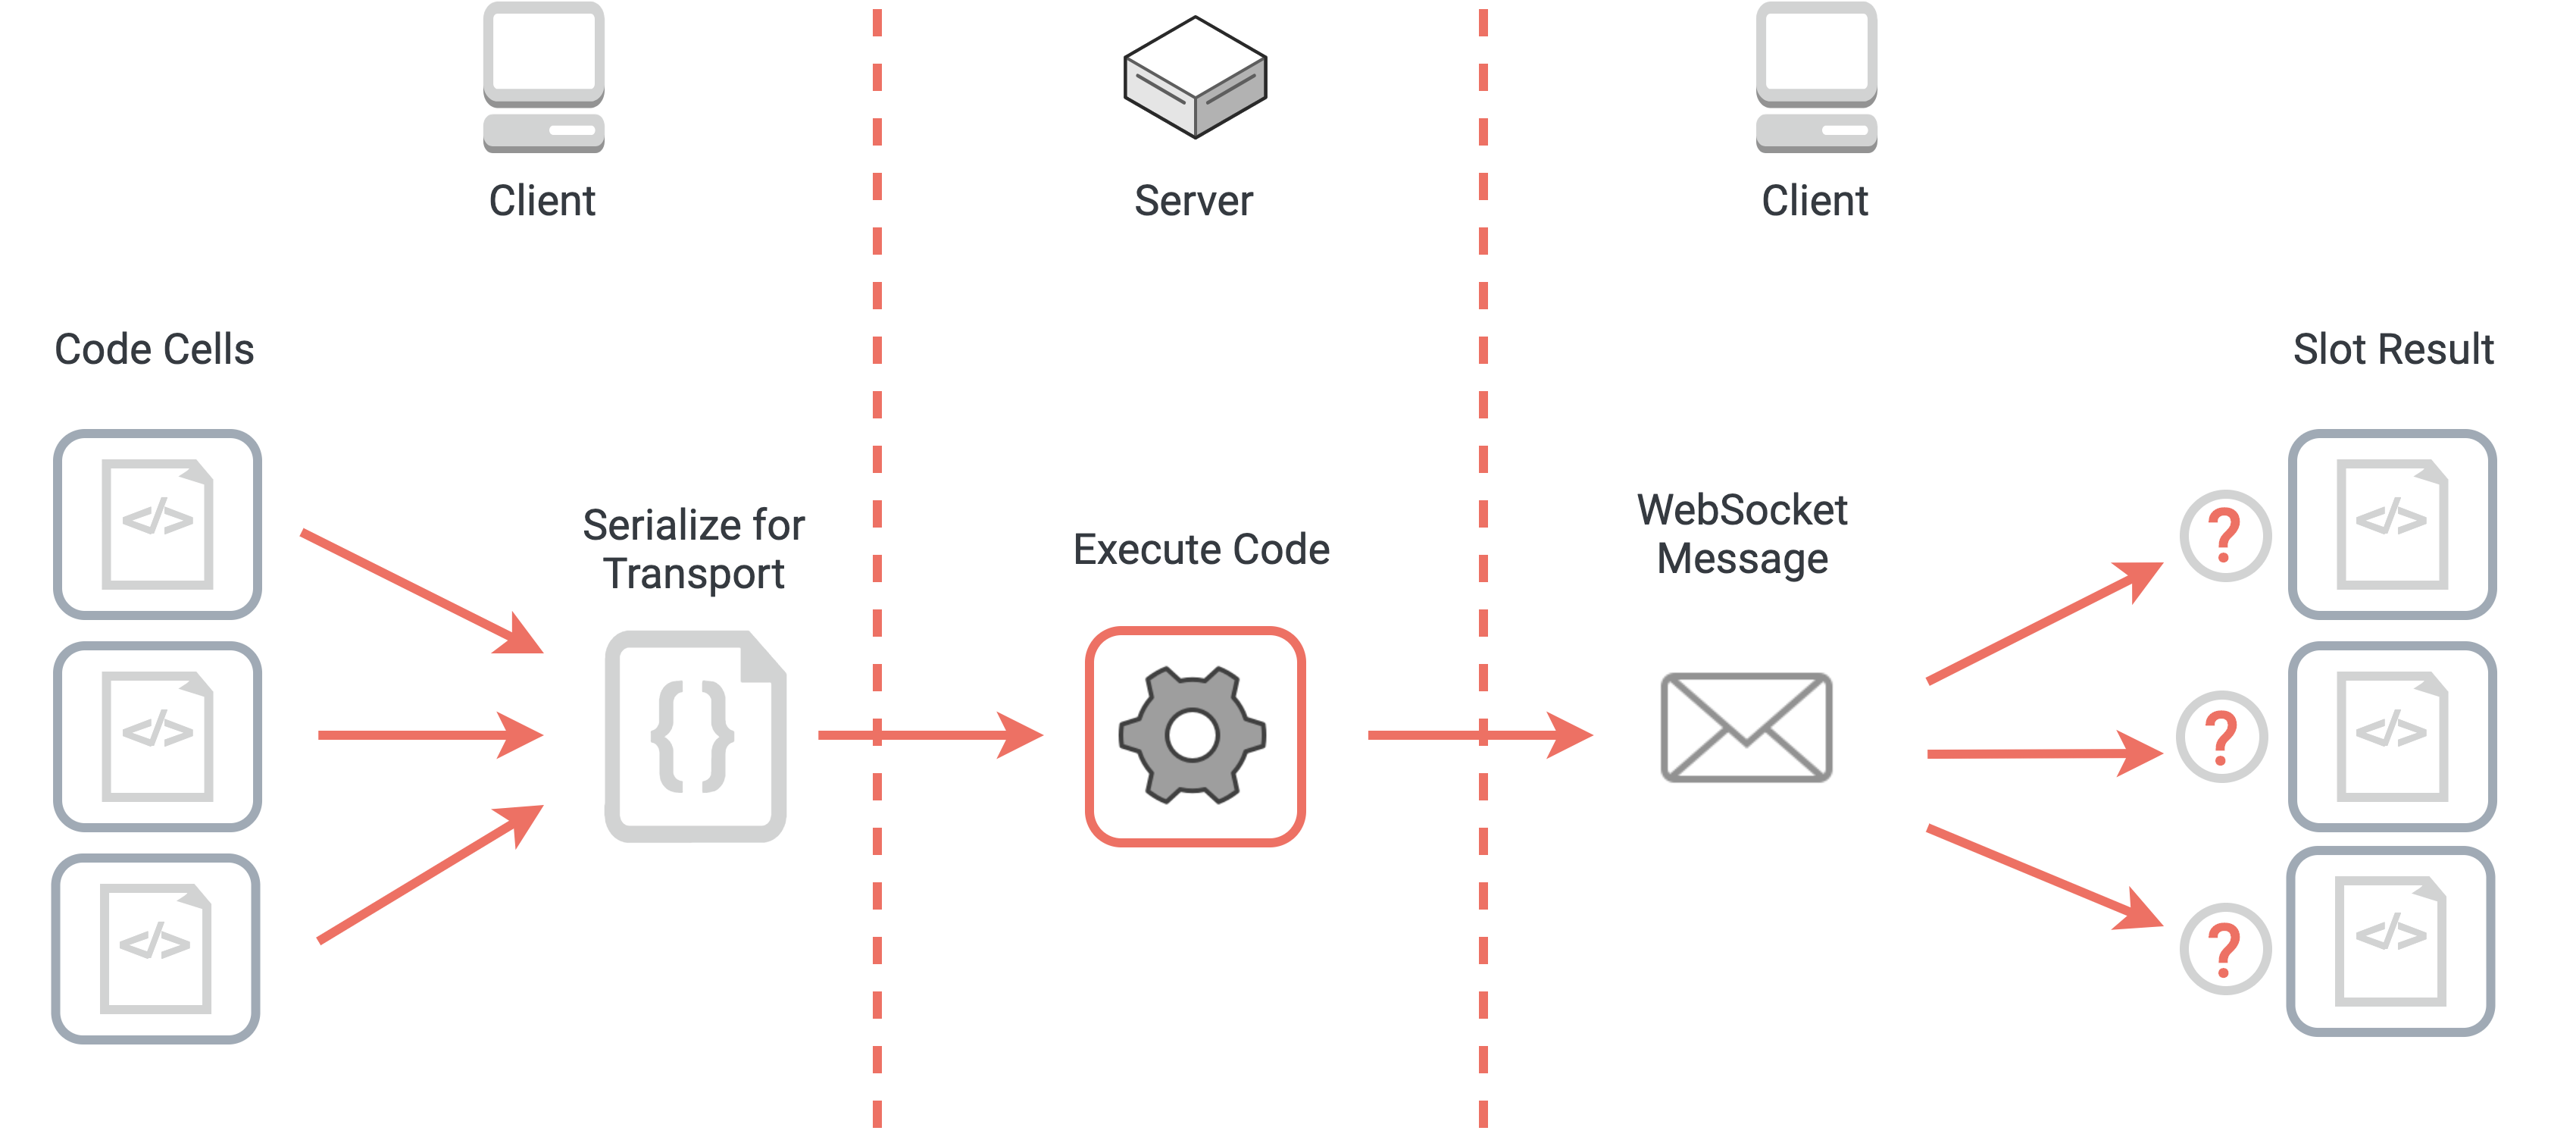
Distributing code results to the cell that generated them presents a challenge
Our naive solution was to build a new script for each cell that was executed,
meaning 3 scripts for 3 cells, 5 scripts for 5 cells, and so on. This approach works, but is very inefficient.
A better solution is to inject delimiters into the code before executing it. When the application server
receives serialized user code, we use the language type of the code to generate a language-specific delimiter
log statement. First, we generate a UUID4 to use as the delimiter, then create a log statement in the given
language type. For example, for JavaScript, the statement would be
console.log(‘dbd8999d-e01d-4ab0-ab68-119f0d0a5d34’).
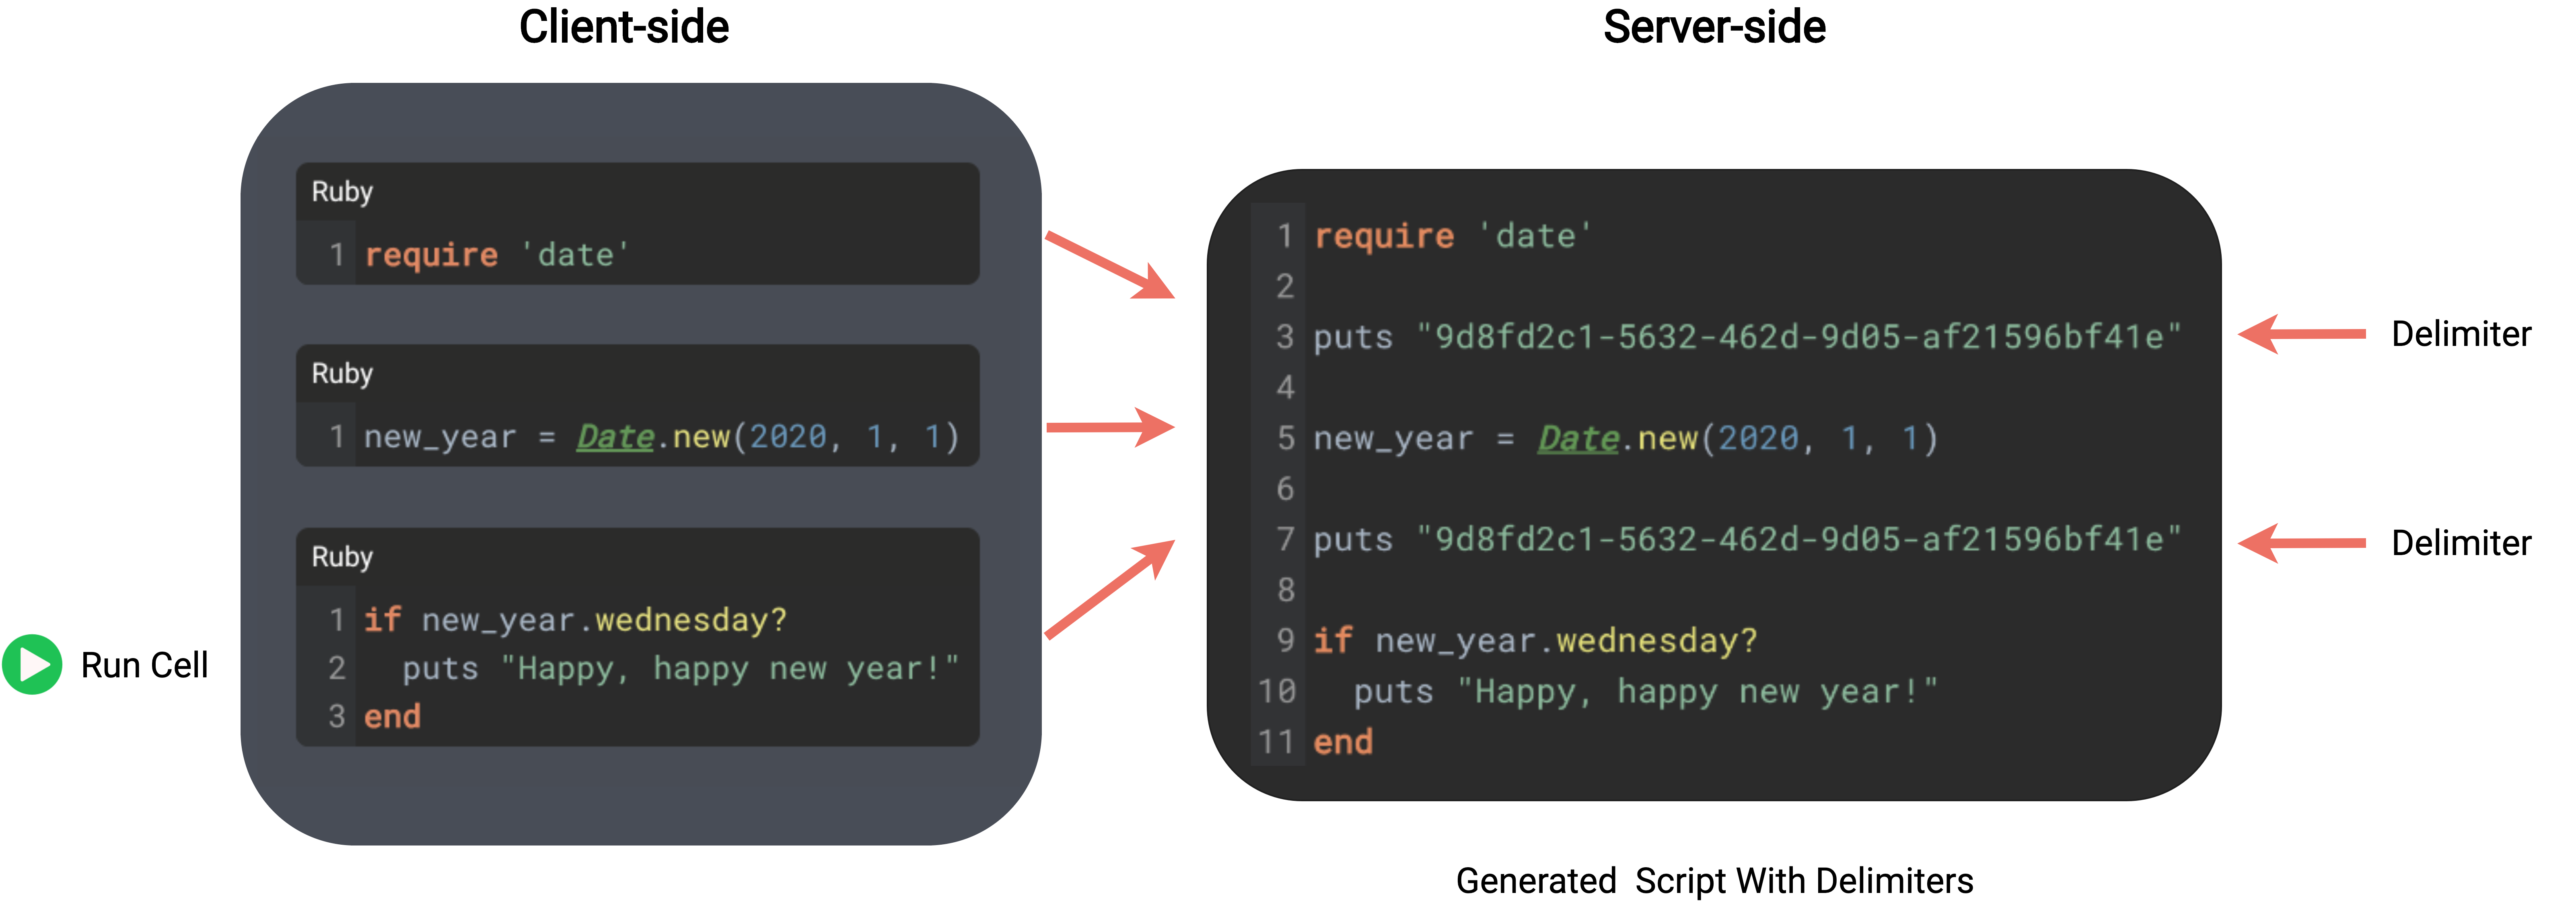
Language-specific delimiter statements are injected into a script as when it is assembled
Next, we generate a script by joining the array of each cell’s code with the delimiter statement. When this
script is executed, the delimiter statements become part of the stdout generated by the script. Any
non-delimiter stdout is sent to the client as a stdout message type. However, when
the server recognizes a delimiter, it sends a “delimiter” WebSocket message to the client instead.
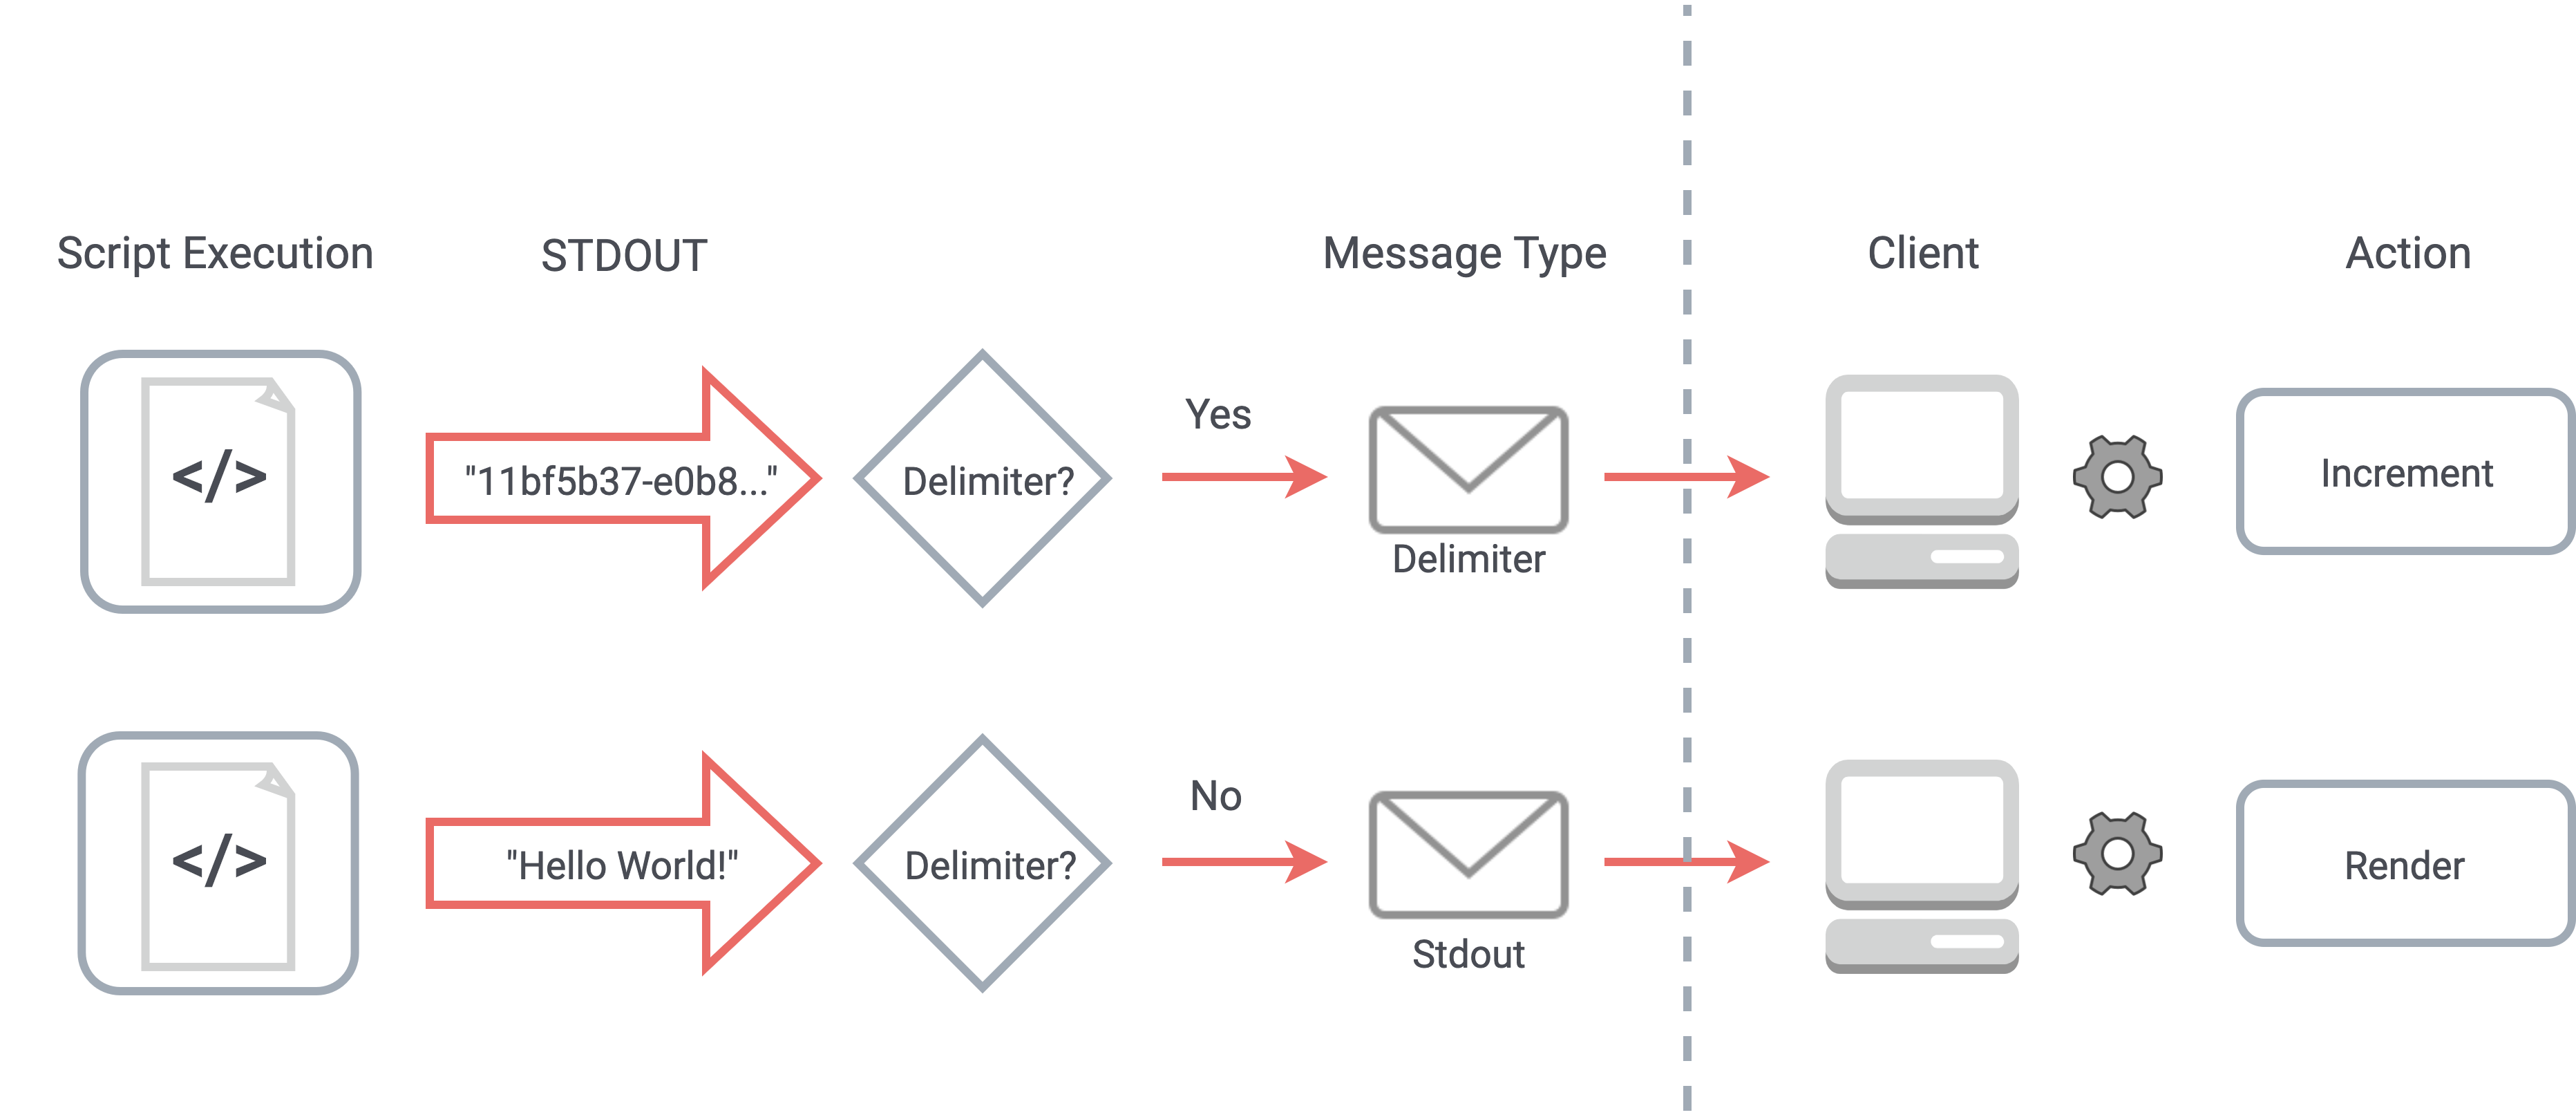
A delimiter in the stdout stream triggers a delimiter message to the client which is used to
slot results correctly
Each time the user executes code, our React client uses an array to keep track of every cell involved in
execution. It also sets a counter, which serves as a pointer to the first executed cell. Any
stdout, stderr, or return messages from the server are initially
attributed to that cell. When the client receives a “delimiter” WebSocket message from the server, it means
that the first cell’s execution has finished, so the counter is incremented. Any subsequent messages from the
server are now attributed to the next cell, until the next delimiter message, and so on.
When processing asynchronous user code, rendering output beneath the cell that produces the output presents a challenge. If a separate script were generated for each individual code cell, it would be much easier to slot asynchronous output under the corresponding cell. However, since we are interested in a shared state across all cells of the same language, that strategy won’t work.
Asynchronous output has to be displayed in the context of all of the cells that are executed. This means that
such output may not be slotted under the cell that produced it, but instead might appear under the last cell
of the language that is executed. Using JavaScript’s setTimeout method as an example, we can
observe the behavior of a delayed log statement. Since JavaScript is single-threaded, functions are not
concurrently executed. Asynchronous functions like the callback to the setTimeout method are
pushed on to the runtime’s callback queue.
When the main call stack is empty, the event loop pushes a callback function from the callback queue to the call stack and executes it. Thus, asynchronous `stdout` in user-code will not appear next to the cell responsible for the log statement, but instead, will be evaluated and rendered after the call stack is empty, and its callback has been dequeued to the main call stack. This slotting behavior is consistent with other web-based notebooks like Runkit and Jupyter Notebook.
In most cases, error slotting works exactly the same way as output slotting does. Using delimiter messages sent by the server to attribute data to the correct cell, both output and errors will be slotted by the client under the cell that generated them.
There’s an important edge case, however, that hinges on the difference between runtime and syntax errors. For
runtime errors, code is executed and stdout, including delimiter statements, is generated. Syntax
errors are thrown before any code is executed, so no stdout is ever generated. Without
stdout, the server never generates any delimiter messages, meaning that syntax errors will be
slotted incorrectly and confuse our users. We need a different strategy for syntax error slotting, one that
doesn’t rely on stdout.
Our solution is to first use the content of the syntax error itself to determine which line number of our generated script was responsible for the error. Although the script isn’t executed due to the nature of the error, we have already injected delimiters into the script that separate each individual cell’s code. Using the content of the script, we count the number of delimiters before the line that generated the syntax error. This gives us the correct index of the cell that generated the syntax error, which is sent along to the client, producing the correct slotting behavior.
In a RedPoint notebook, the user has the option to add and execute code cells in several programming languages. We need to make sure that each language is executed by the correct REPL and script processes, without crossing wires and generating cross-language errors. Our solution was to implement queue on our Node.js code execution server to correctly handle simultaneous execution of multiple languages.
Code execution messages for each language are enqueued server-side
First, a code execution message for each language is packaged up and sent to our server. On the server side, each language’s request for execution is placed in a queue. At the end of the code execution promise chain for a single language, we dequeue its execution message, and check the new length of the queue. If it is non-zero, the same process is repeated on the next queued code execution message, until there are no more messages in the queue.
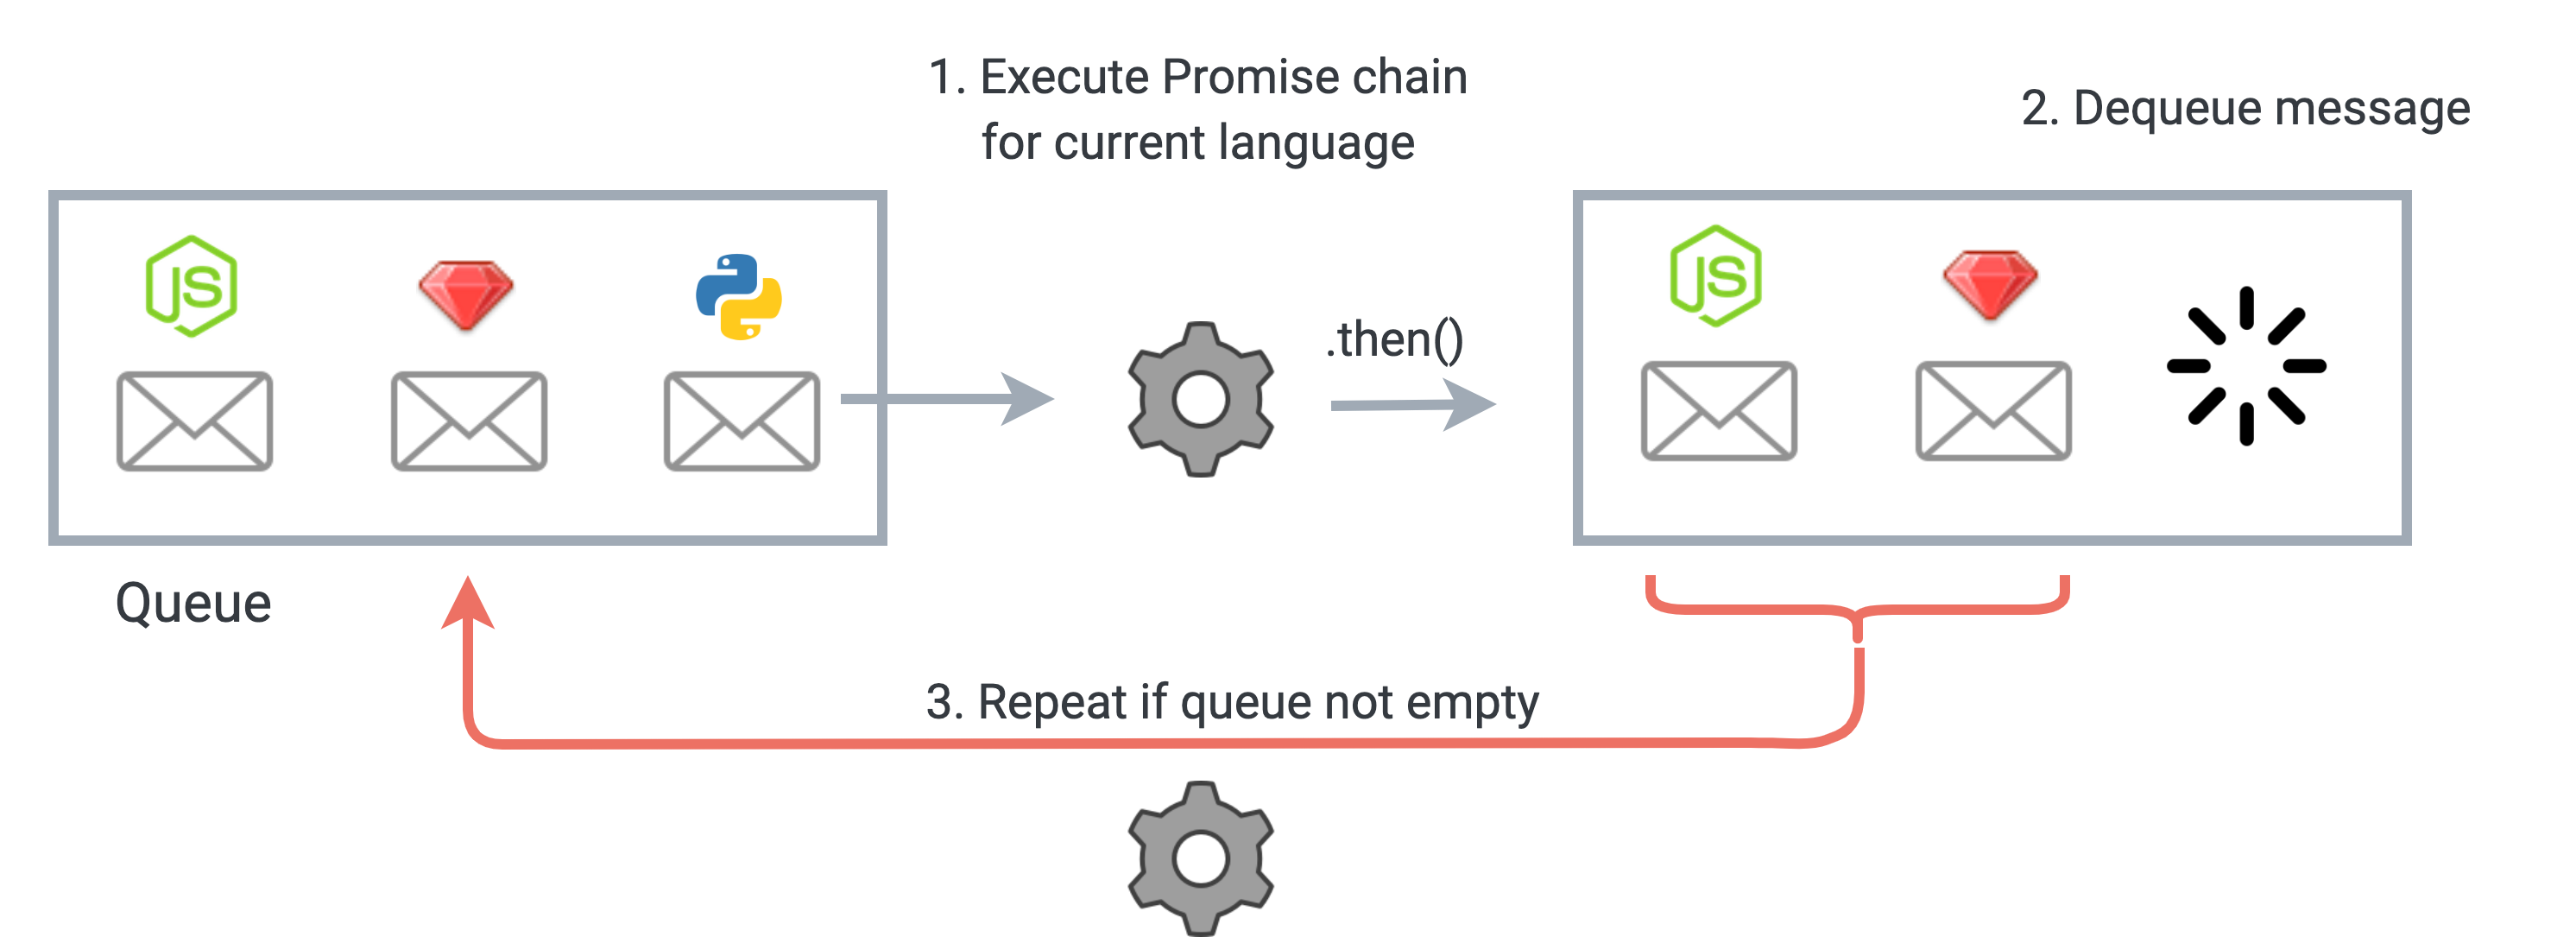
A Promise chain ensures that each language is executed correctly as it is dequeued
Allowing users to run arbitrary code on our server presents a significant security challenge. Specific examples of security concerns include unauthorized access to database data, interference with the sessions of other users, and malicious server file manipulation. To address these concerns, we implemented multiple layers of protection against malicious code on our servers.
Our initial, naive idea was to try a blacklisting approach to sanitizing user code. If we parsed code for a blacklist of harmful commands before submitting it to our back-end, we could catch destructive code before it was executed. This solution proved unworkable for several reasons. First, there is the difficulty of identifying and anticipating all possible harmful commands. Doing this in one language is difficult enough, but to tailor it to multiple languages quickly becomes unworkable. This strategy also introduces the risk of misidentifying and blocking non-malicious code from execution, which would diminish the quality of our user experience for regular users.
A better solution to meet our security needs was to isolate the execution of each user’s code. We accomplish this by spinning up a new Docker container for each notebook being used for code execution. Docker containers are a form of OS-level virtualization created from a blueprint image that defines all of the configuration and dependencies relied on by an application. They provide a way of producing identical but isolated environments within a single host system.
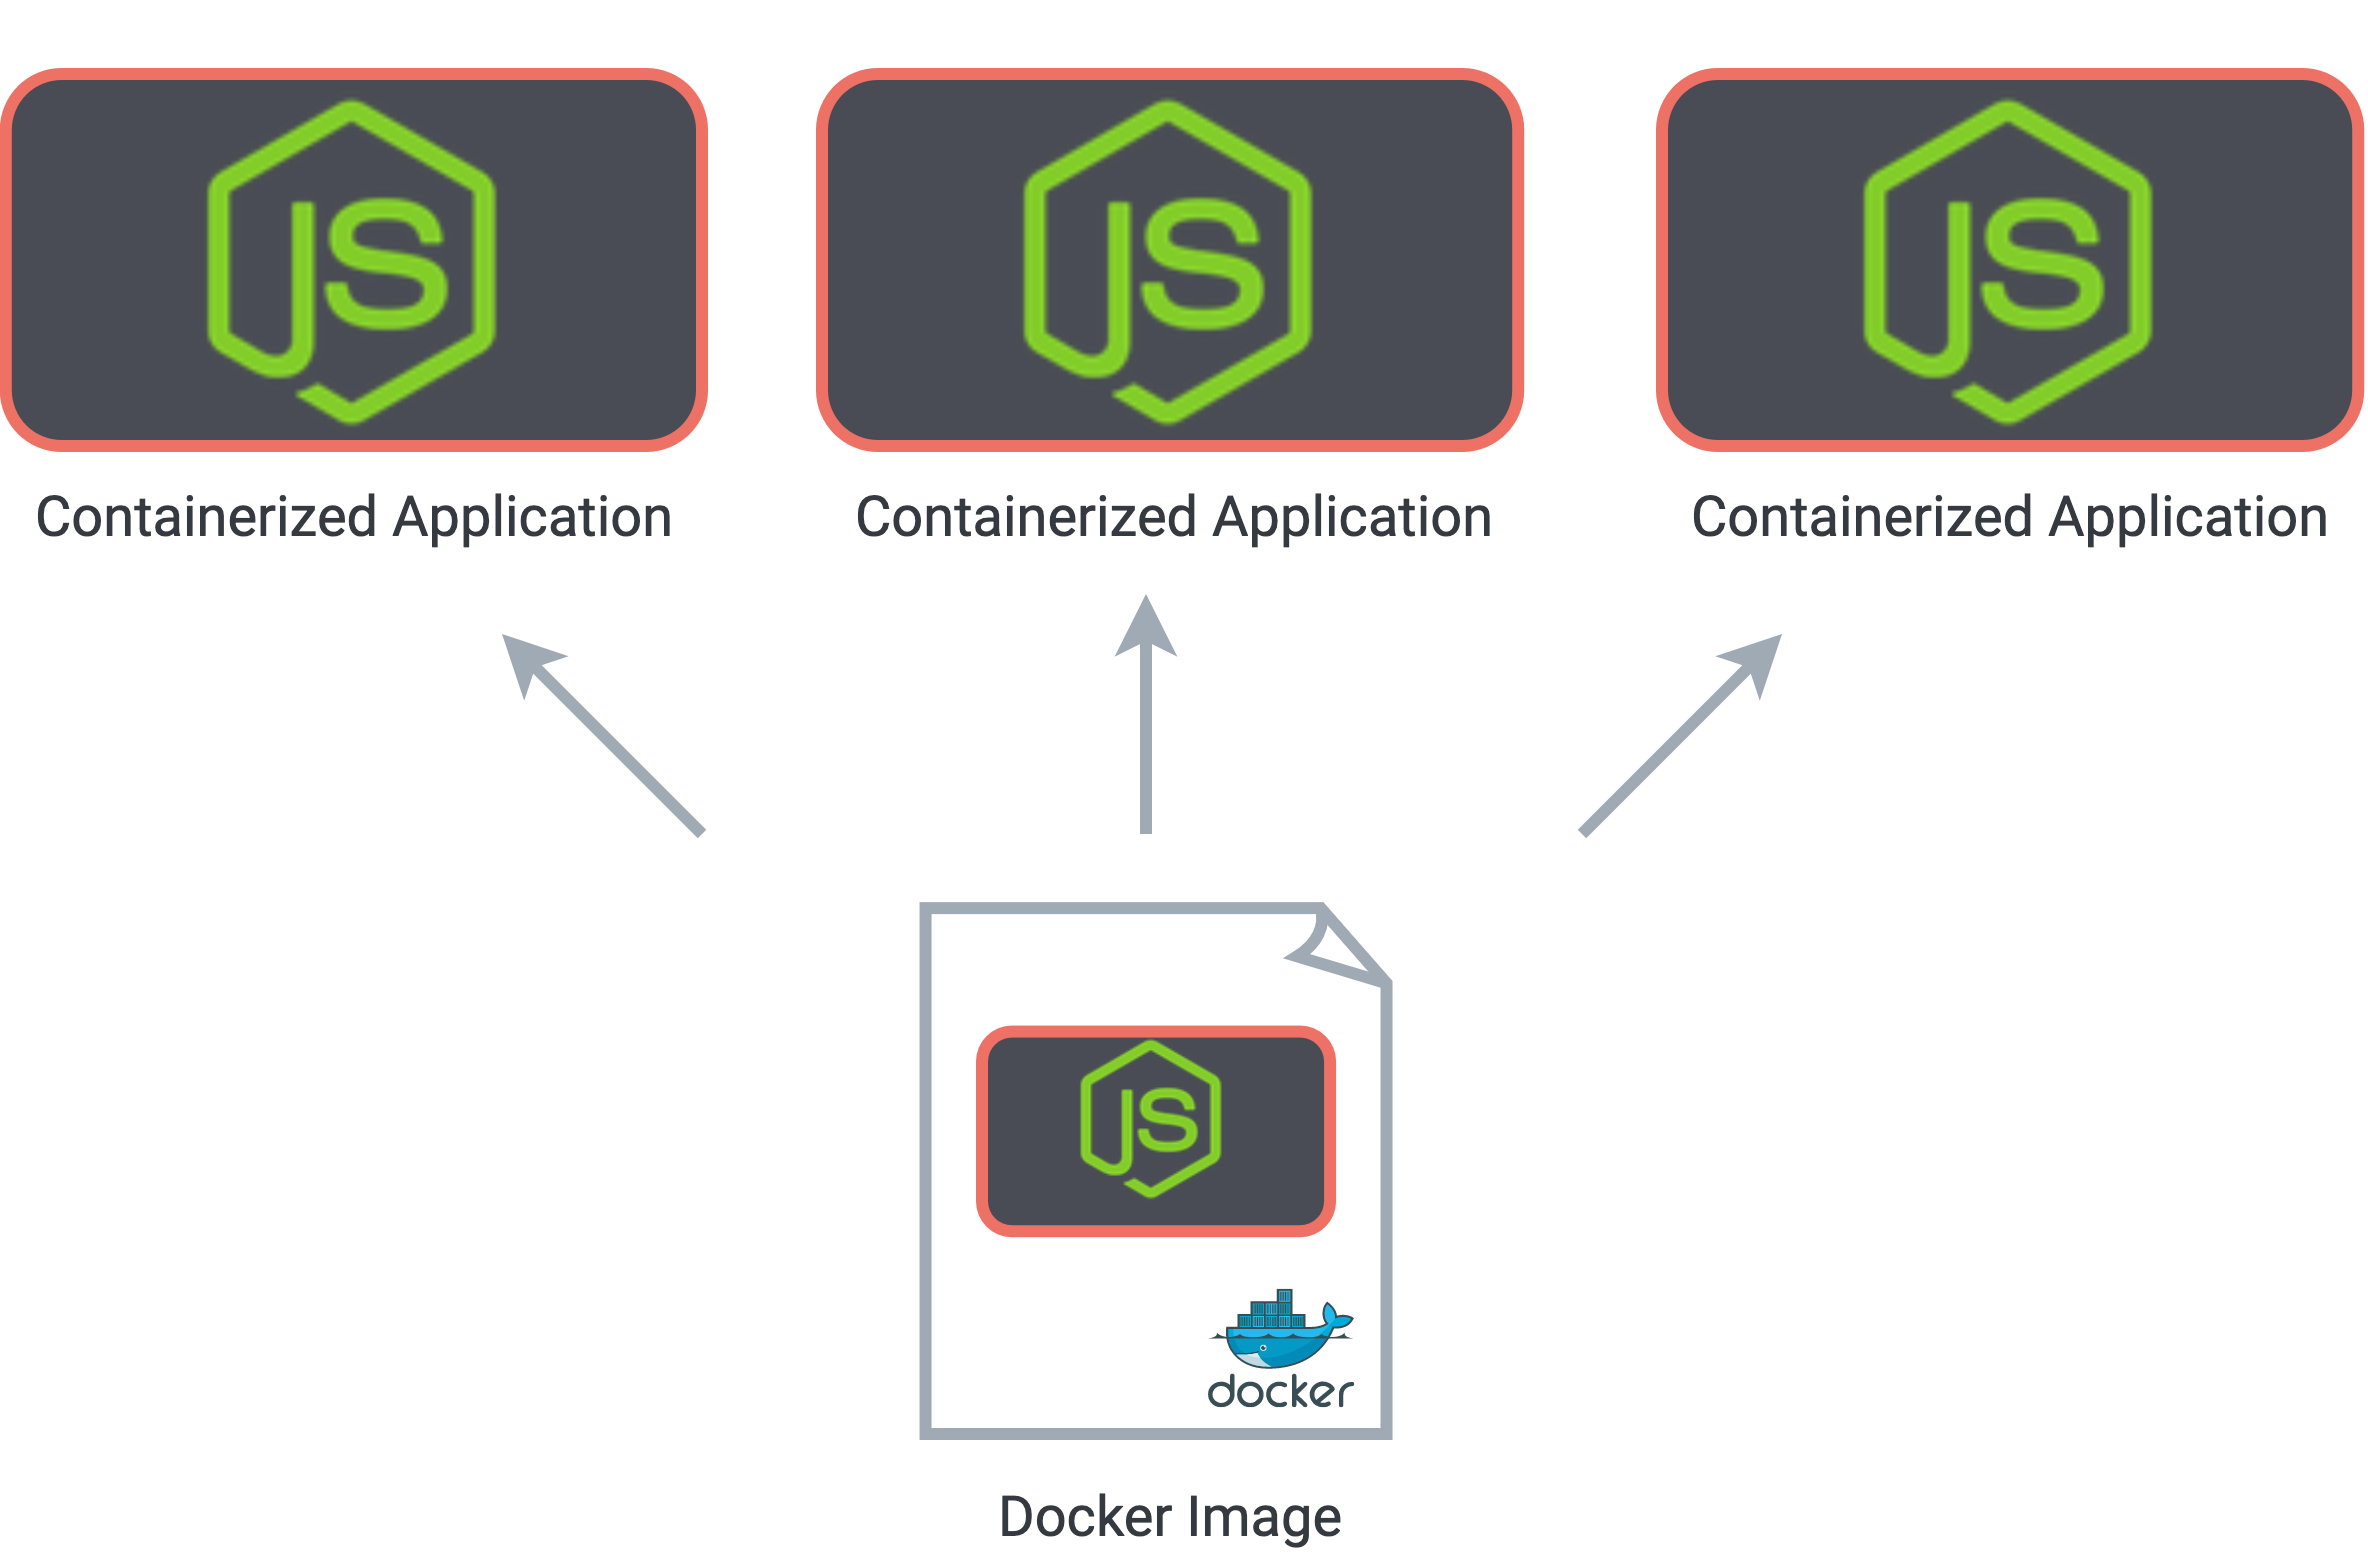
A docker image acts as a blueprint to create self-contained copies of an application
Containerized deployment means that we can be sure that our application runs in a consistent environment with all necessary dependencies, regardless of the underlying host system that runs the containers. It also provides a degree of isolation between the concurrent sessions of users. Docker makes use of kernel namespaces for each container, meaning that one Docker process cannot see or interfere with the processes in another container. If one user attempts to run malicious code that crashes the container, that user's session will be terminated, but the sessions of other users will not be impacted.
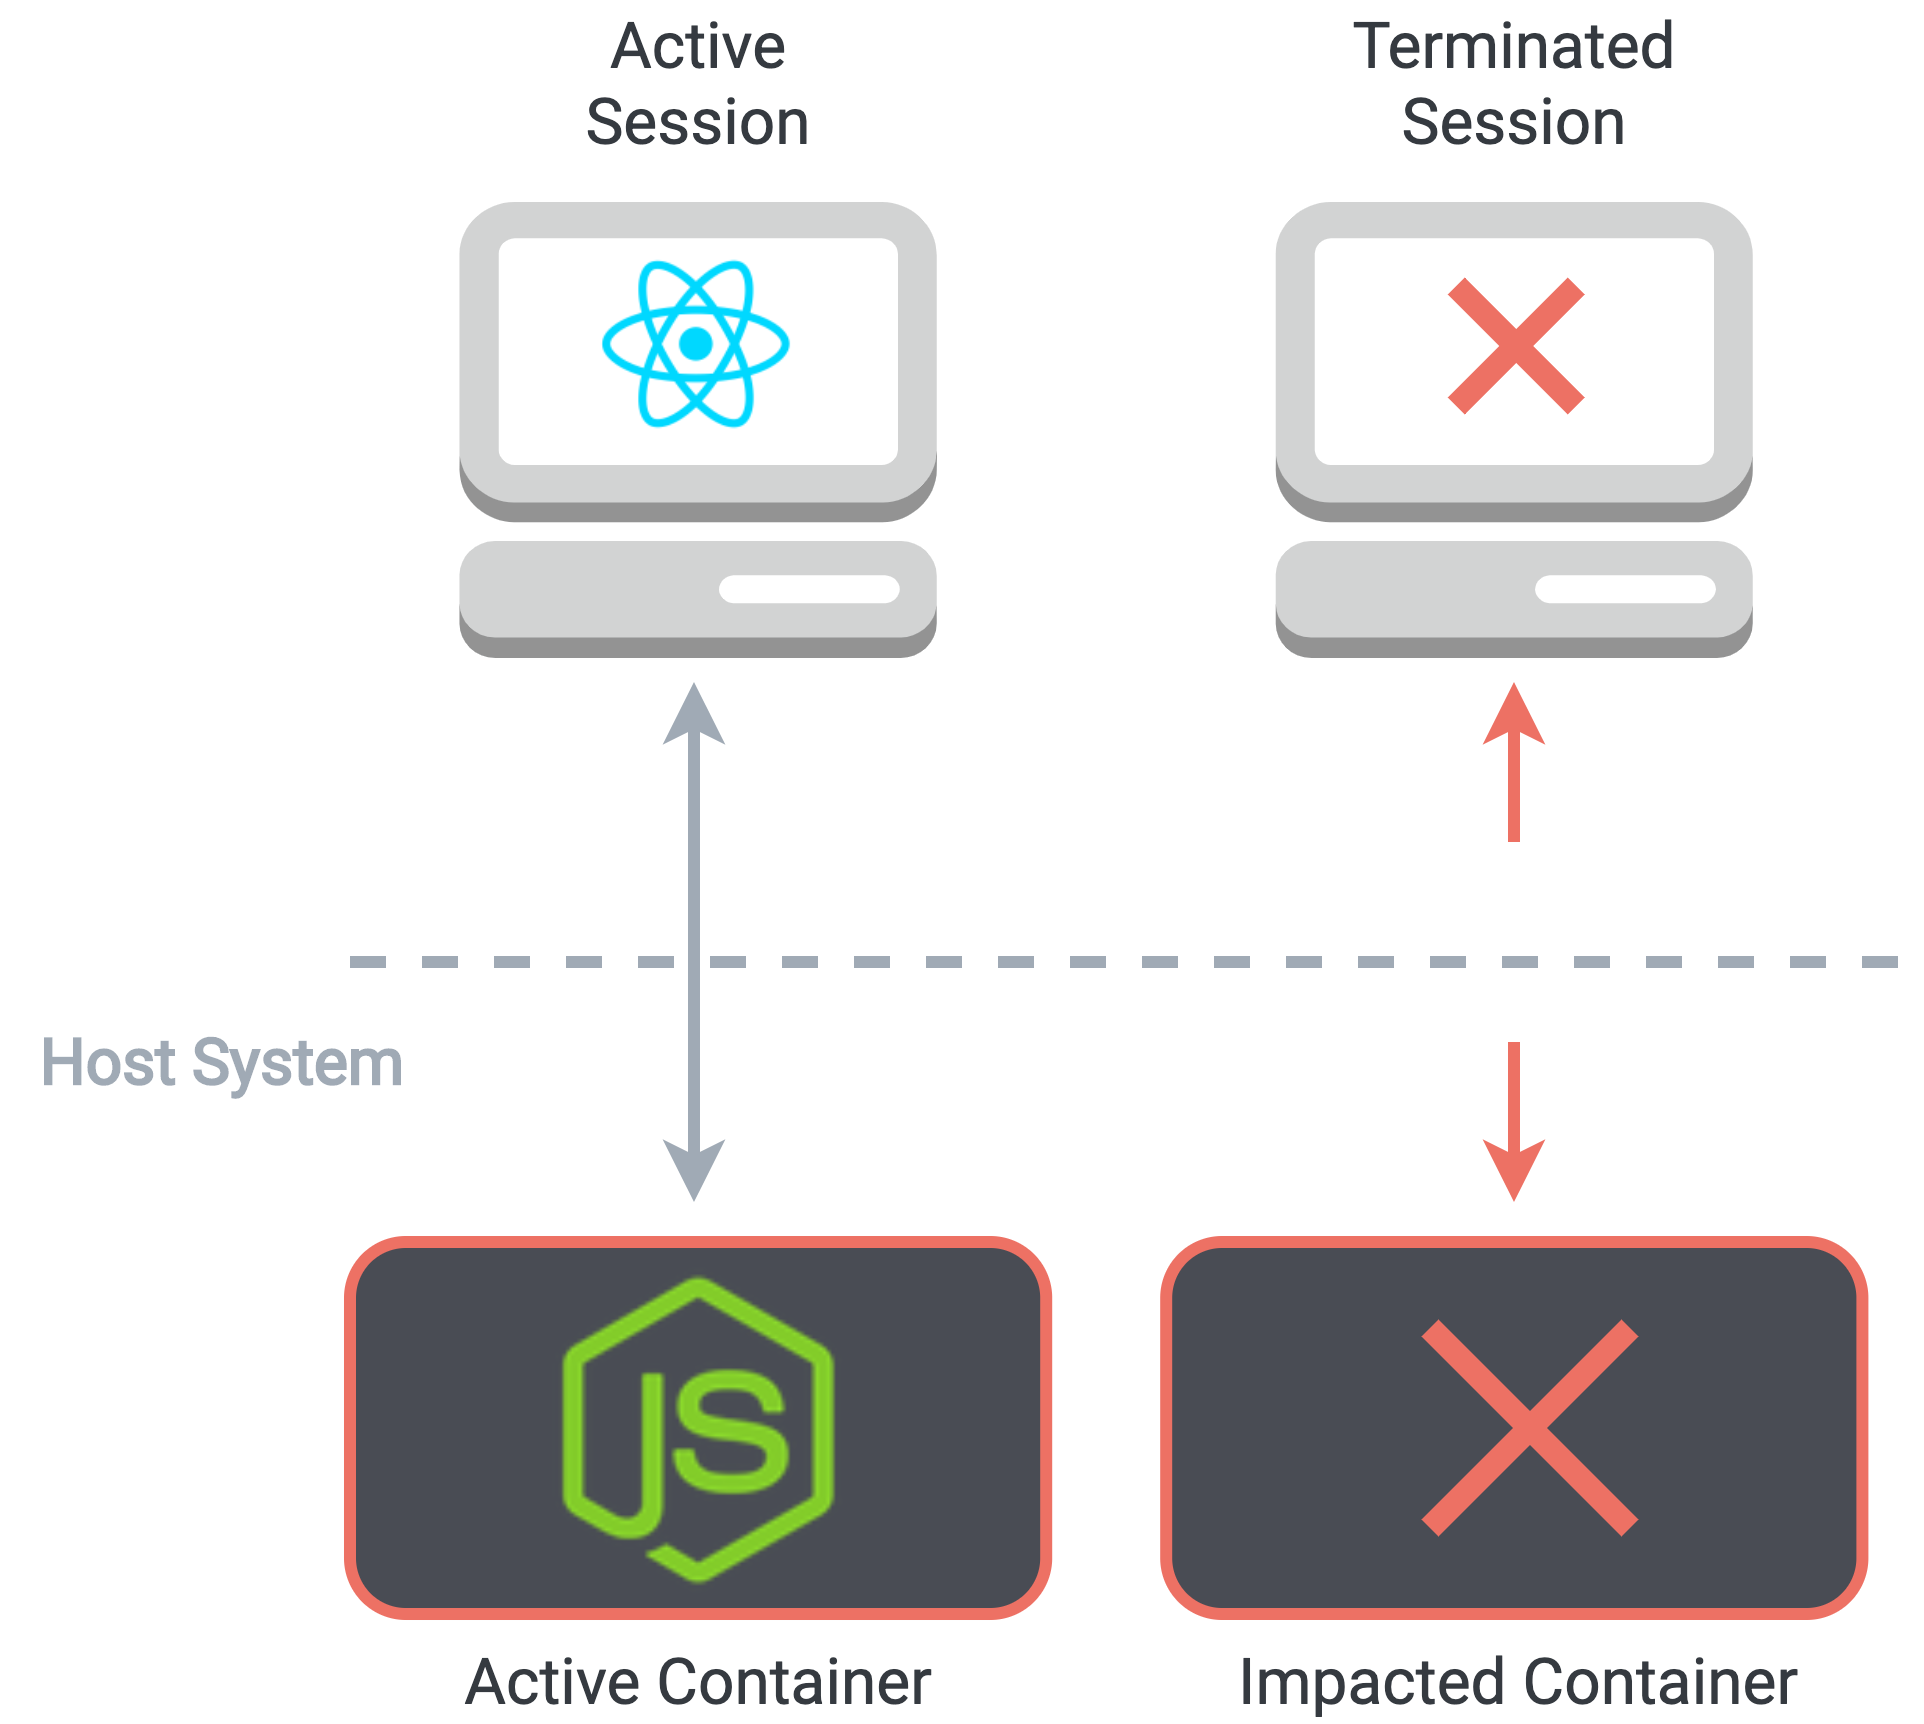
If a malicious user manages to crash one session, concurrent sessions aren't impacted
Our next layer of security involves restricting user privileges inside our containers. The default user in a Docker container is a root user, unless explicitly specified otherwise. Although root users in a Docker container have access to fewer privileges than a system-level root user, we need restrict privileges further. To do so, we take several steps:
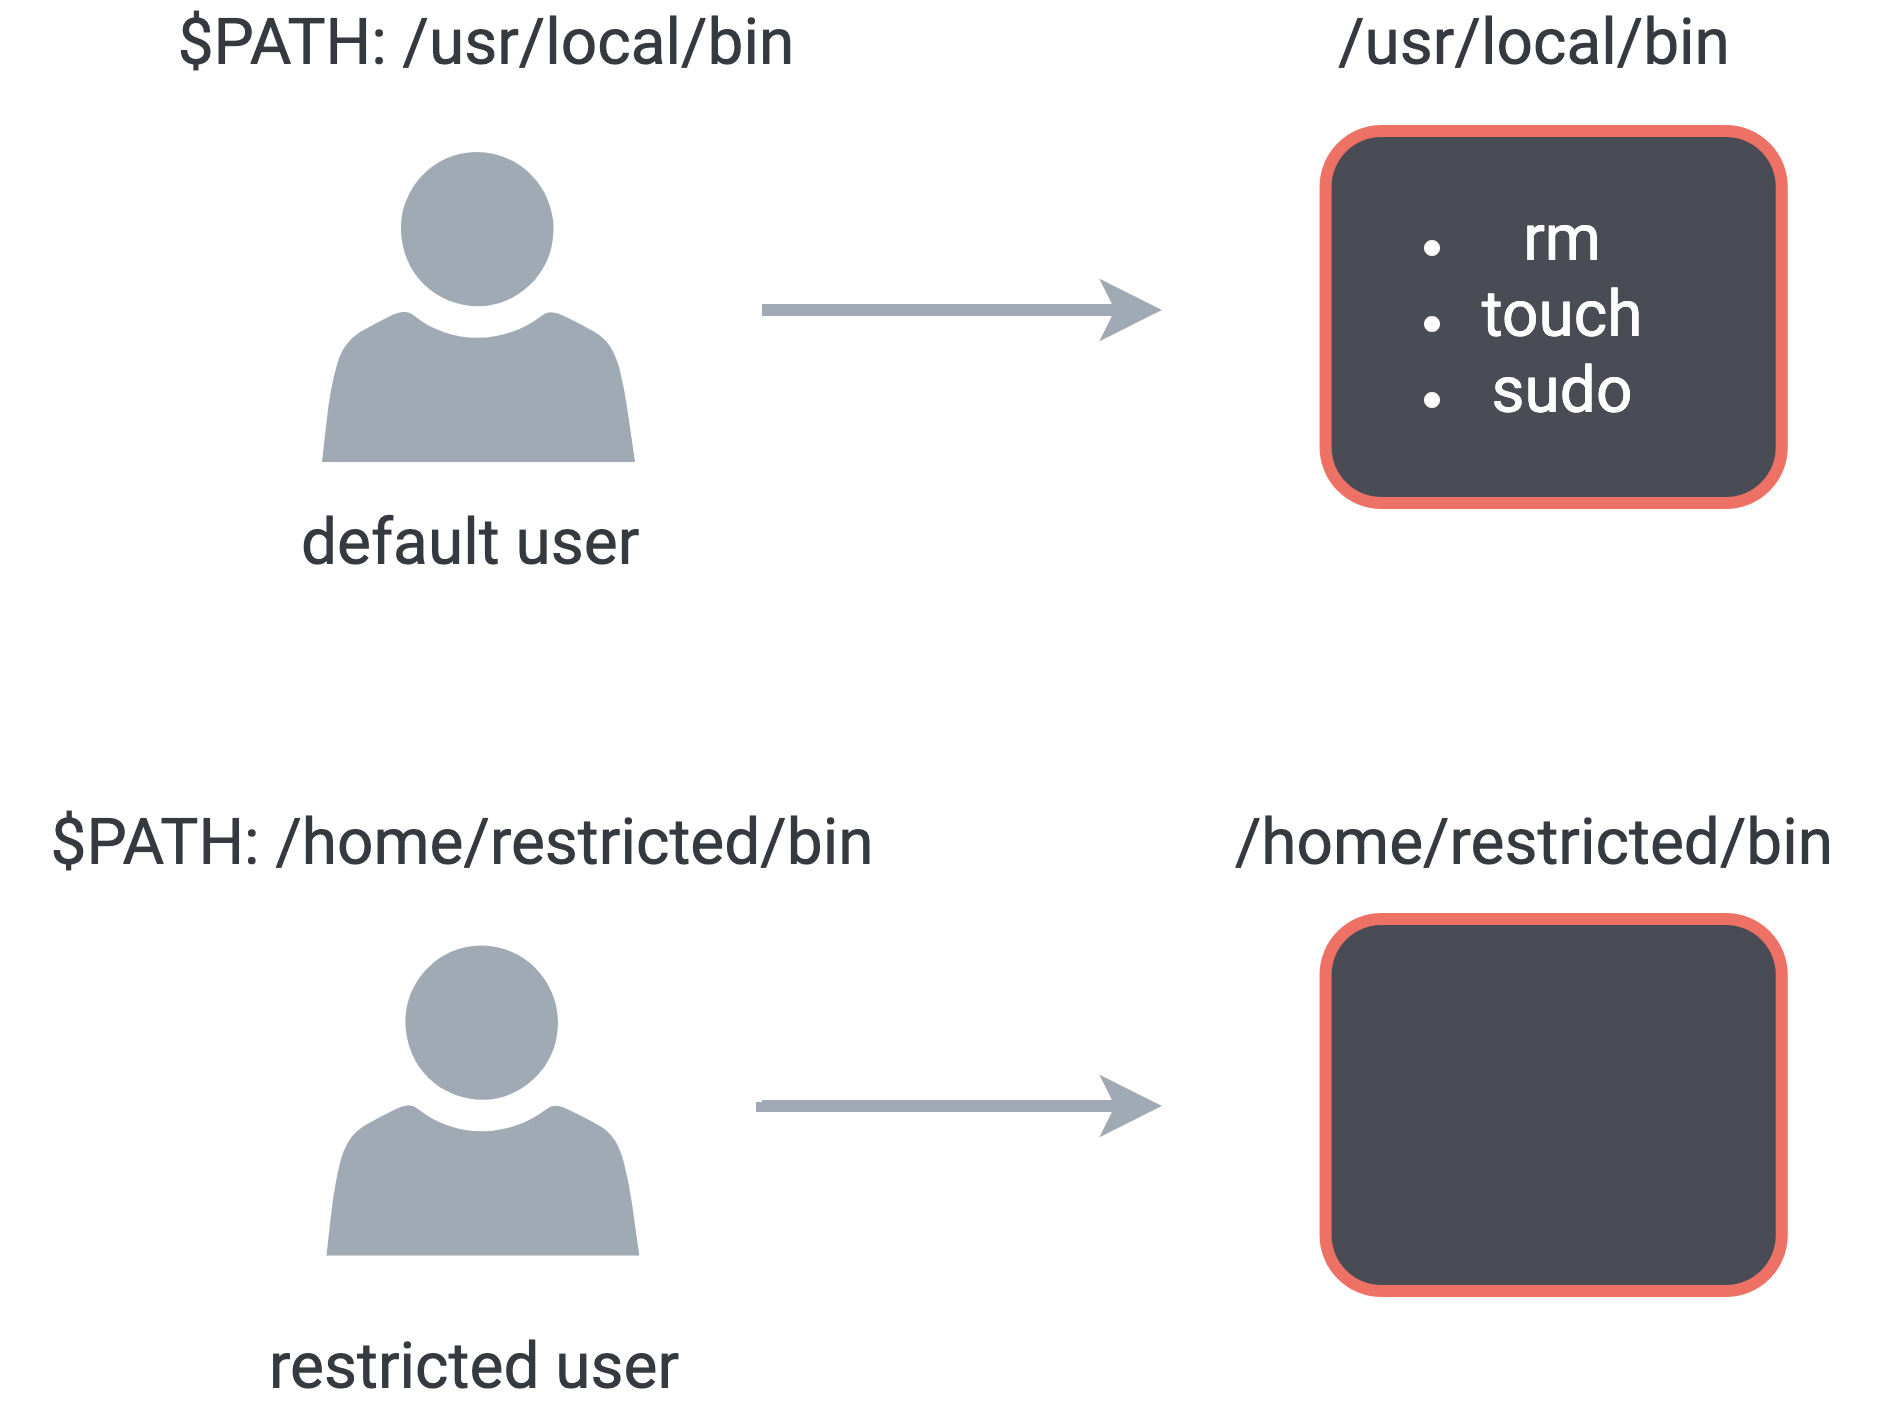
Restricting user permissions and access to harmful commands
These restrictions enhance our security profile by making it more difficult to execute destructive commands or loosen user permissions.
Although Docker containers provide a loosely isolated environment for our application, they are not a truly isolated sandbox. We considered another option, virtual machines. VMs use hypervisor virtualization to create a guest kernel for each instance, which has strong isolation from the host kernel. The trade-off is that VMs require more resources than containers, and have a significantly slower start-up time. For our use-case, where we need to create a session for a new user within a matter of seconds, they aren't a good fit.
Containers are lightweight and fast to spin up compared to virtual machines. However, the default container
runtime, runc, provides a weak level of isolation between the container and the host kernel,
which can leave the
kernel
vulnerable to exploits such as privilege-escalation attacks.
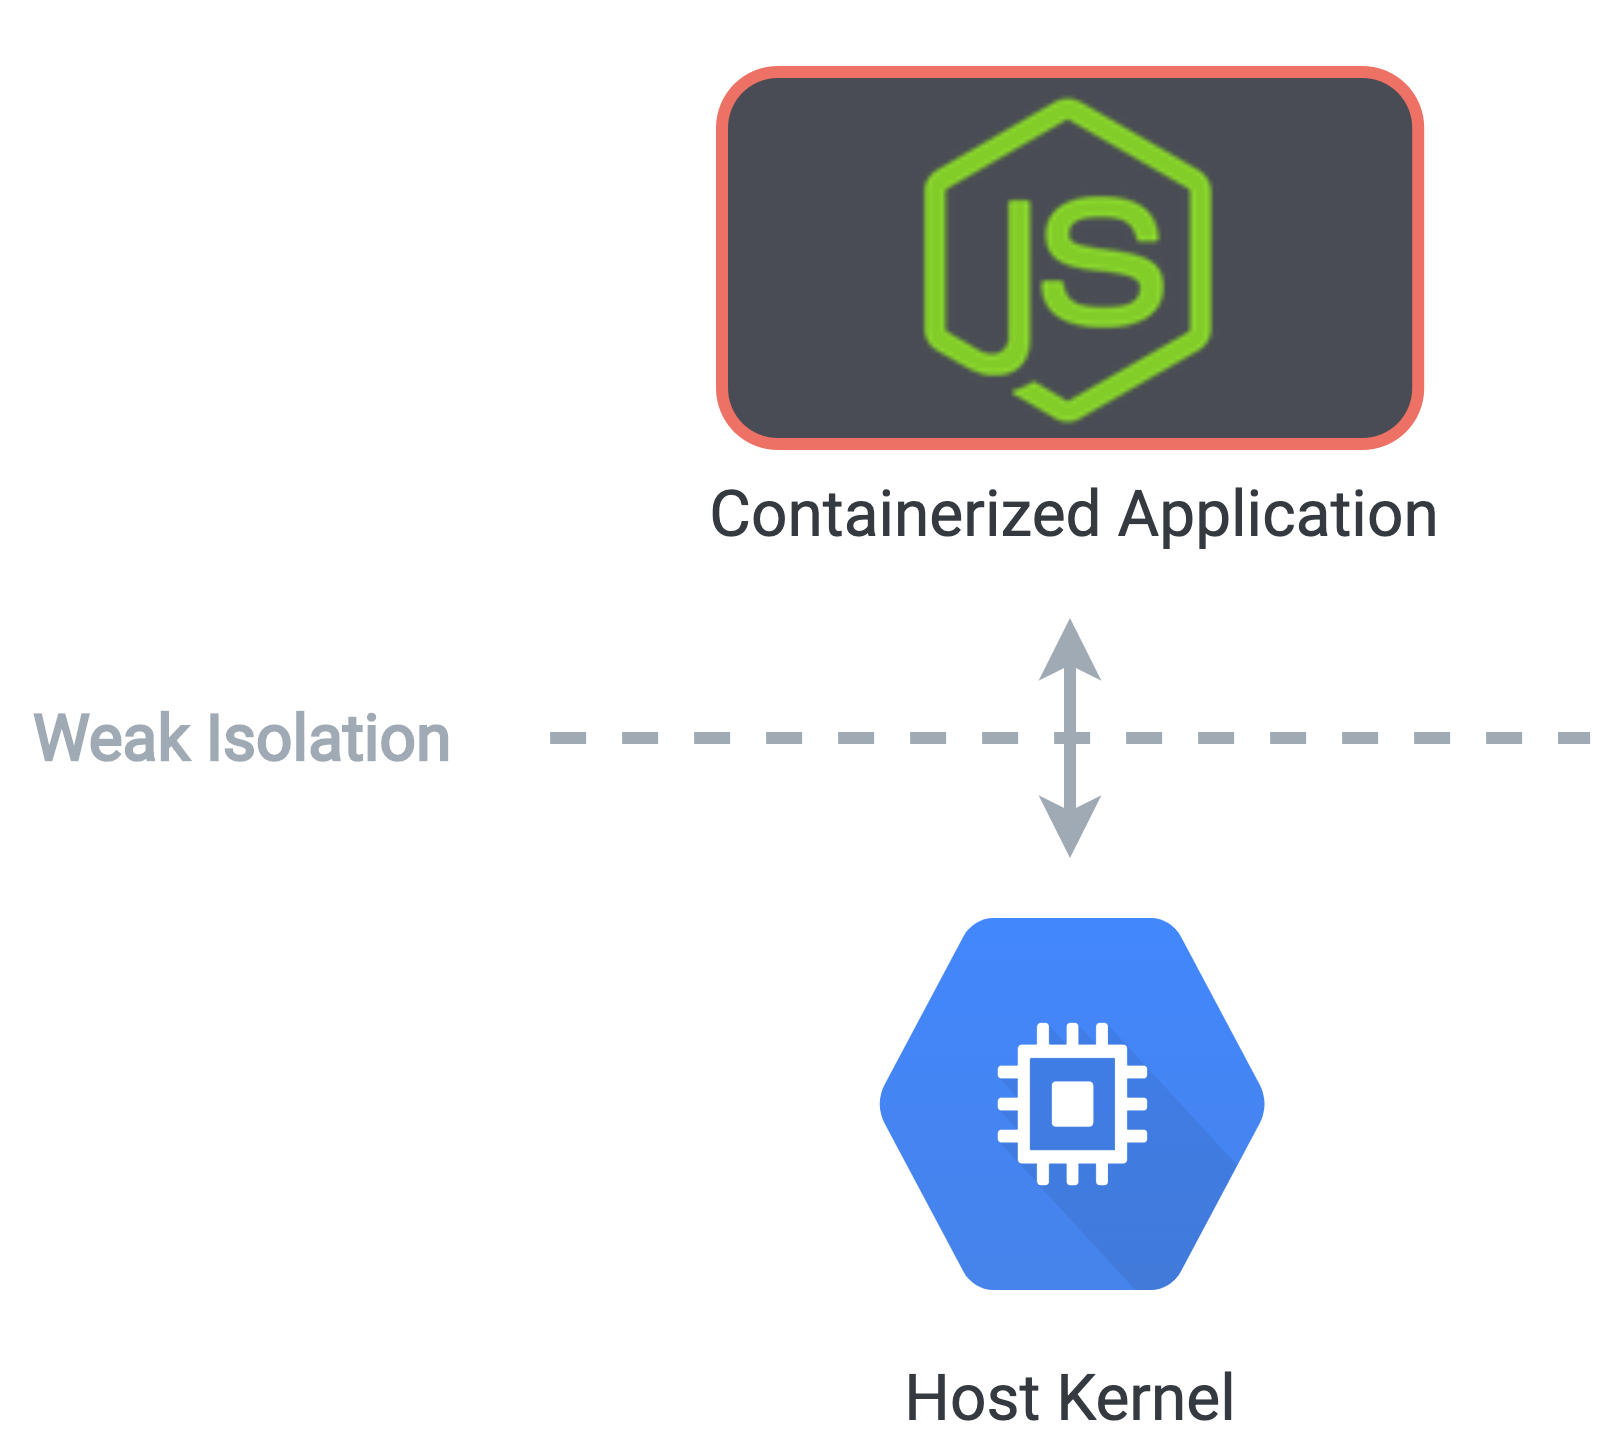
The default Docker runtime provides a weak level of isolation from the host kernel
To mitigate this risk, we added an additional level of isolation between the container and the host kernel,
using the runsc runtime from Google's gVisor. gVisor is a lightweight user-space kernel, which
acts as the guest
kernel for a
container and provides strong isolation from the host kernel, without the overhead of virtualization. It
does
so by
implementing a substantial portion of the Linux call system.
Rather than accessing the host system directly, all system calls are intercepted and implemented by the guest kernel, which has access to a safer, restricted subset of the system API. We use an additional gVisor configuration option to create a sandbox overlay for our host's filesystem. All created and modified files are stored in memory inside the sandbox, which means that if a malicious user manages to break out of a container and alter files, they are only altering an ephemeral in-memory overlay, not the actual host.
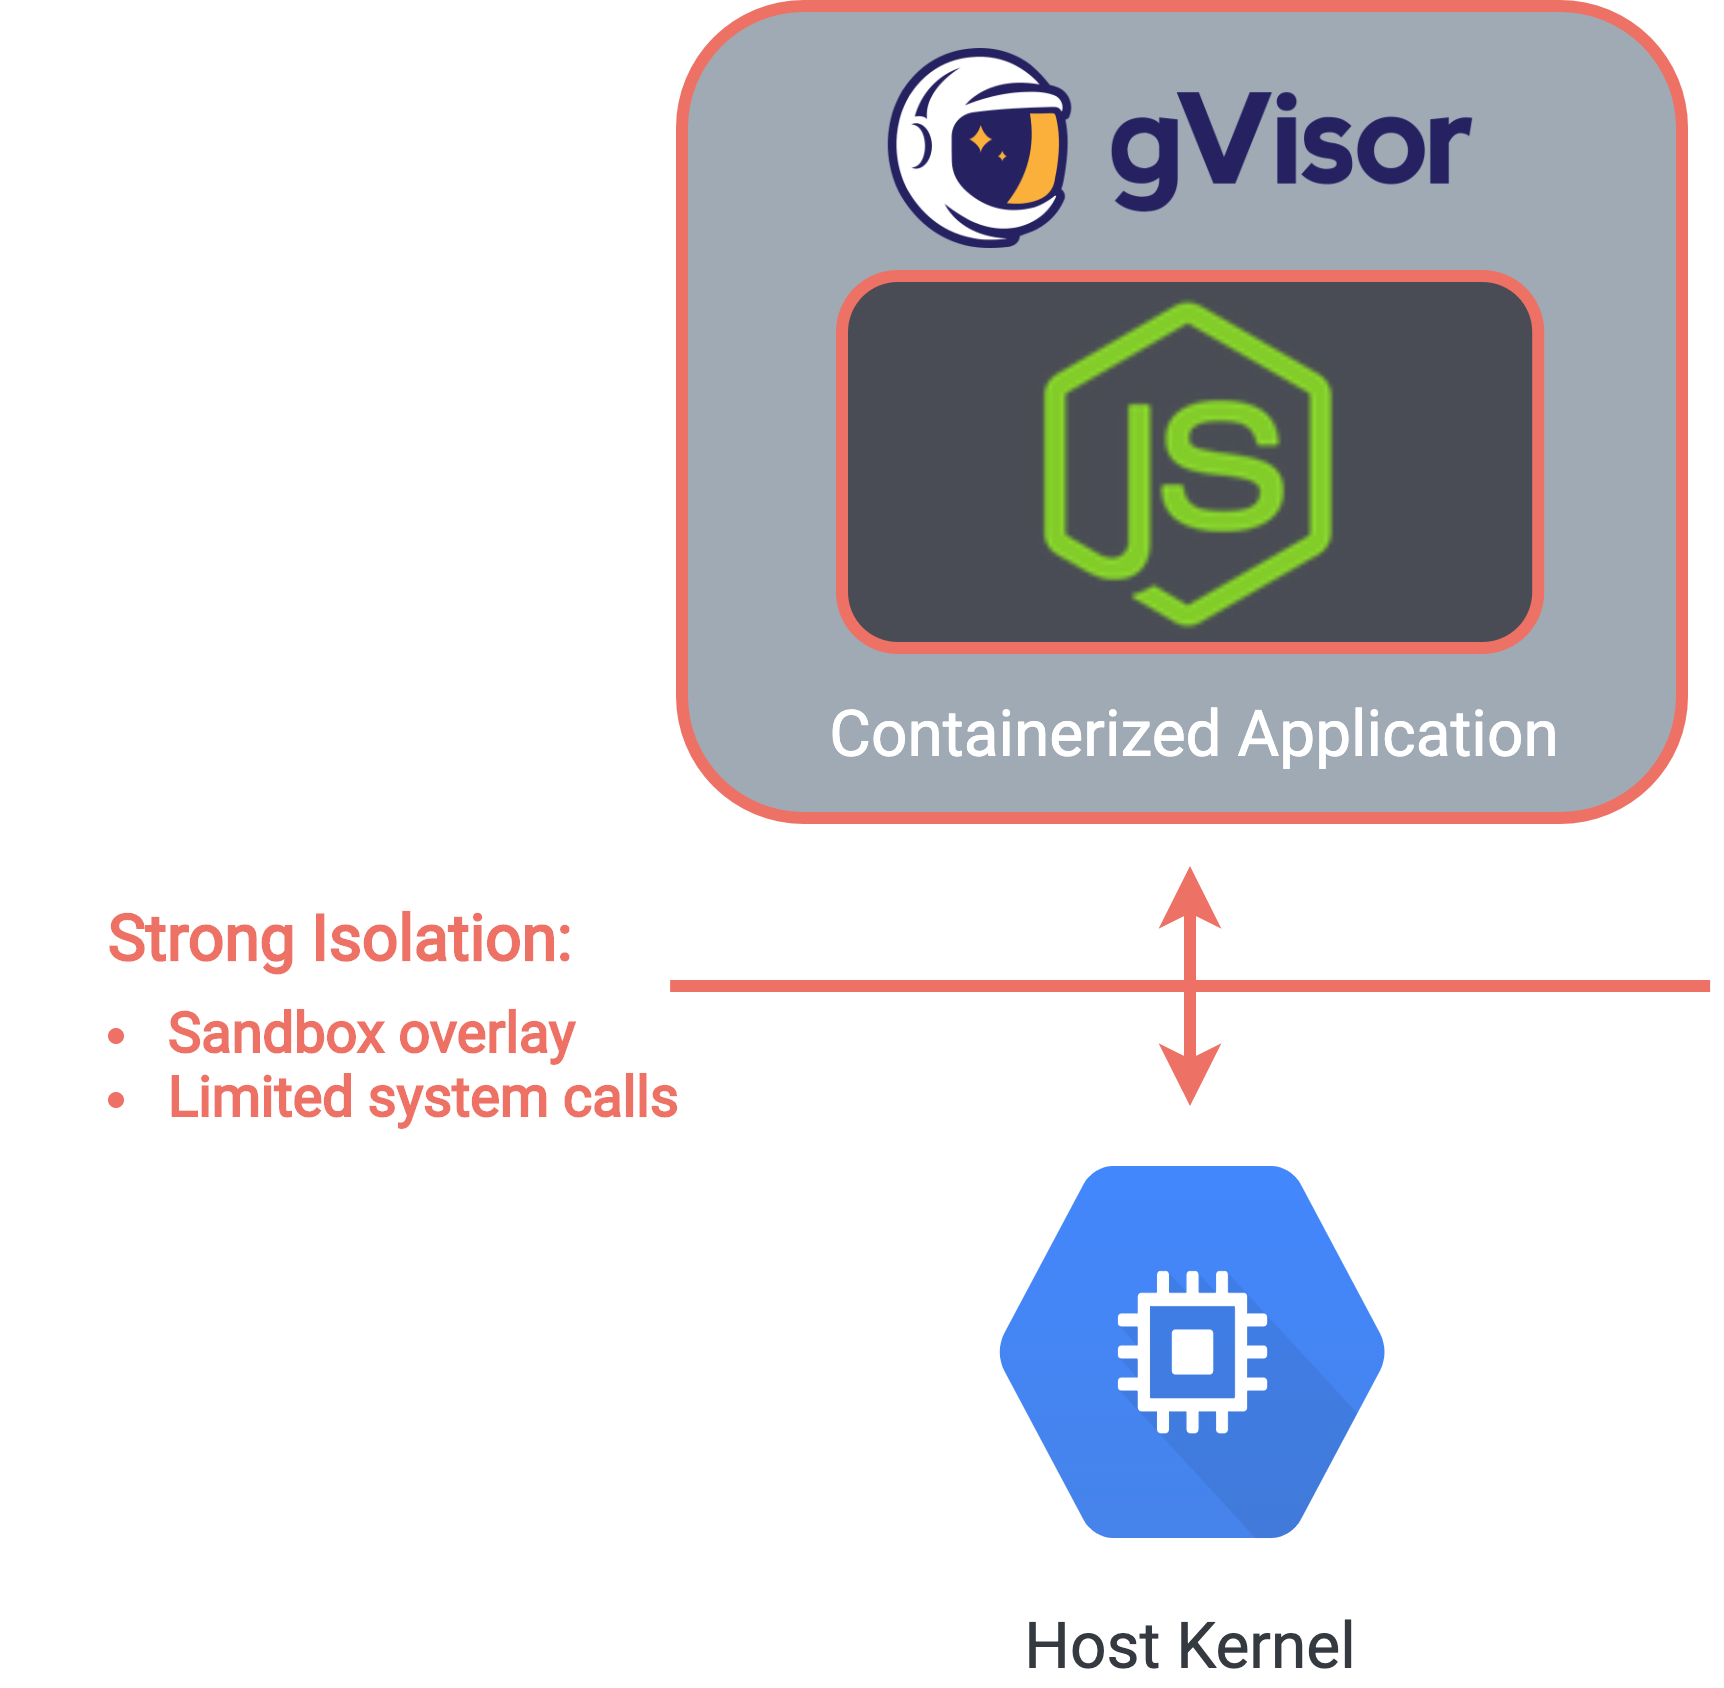
The gVisor runtime strengthens a container's isolation from the host kernel
The trade-off is that the runsc runtime consumes more memory than runc, meaning
that a given host system
can
support
fewer containers when using the more secure runtime. Using Artillery, a load testing library, we tested how
many
concurrent
container instances could be run on hosts with varying amounts of memory. The results showed that using
gVisor
reduced
the number of concurrent container a given host would support by roughly 25 percent:
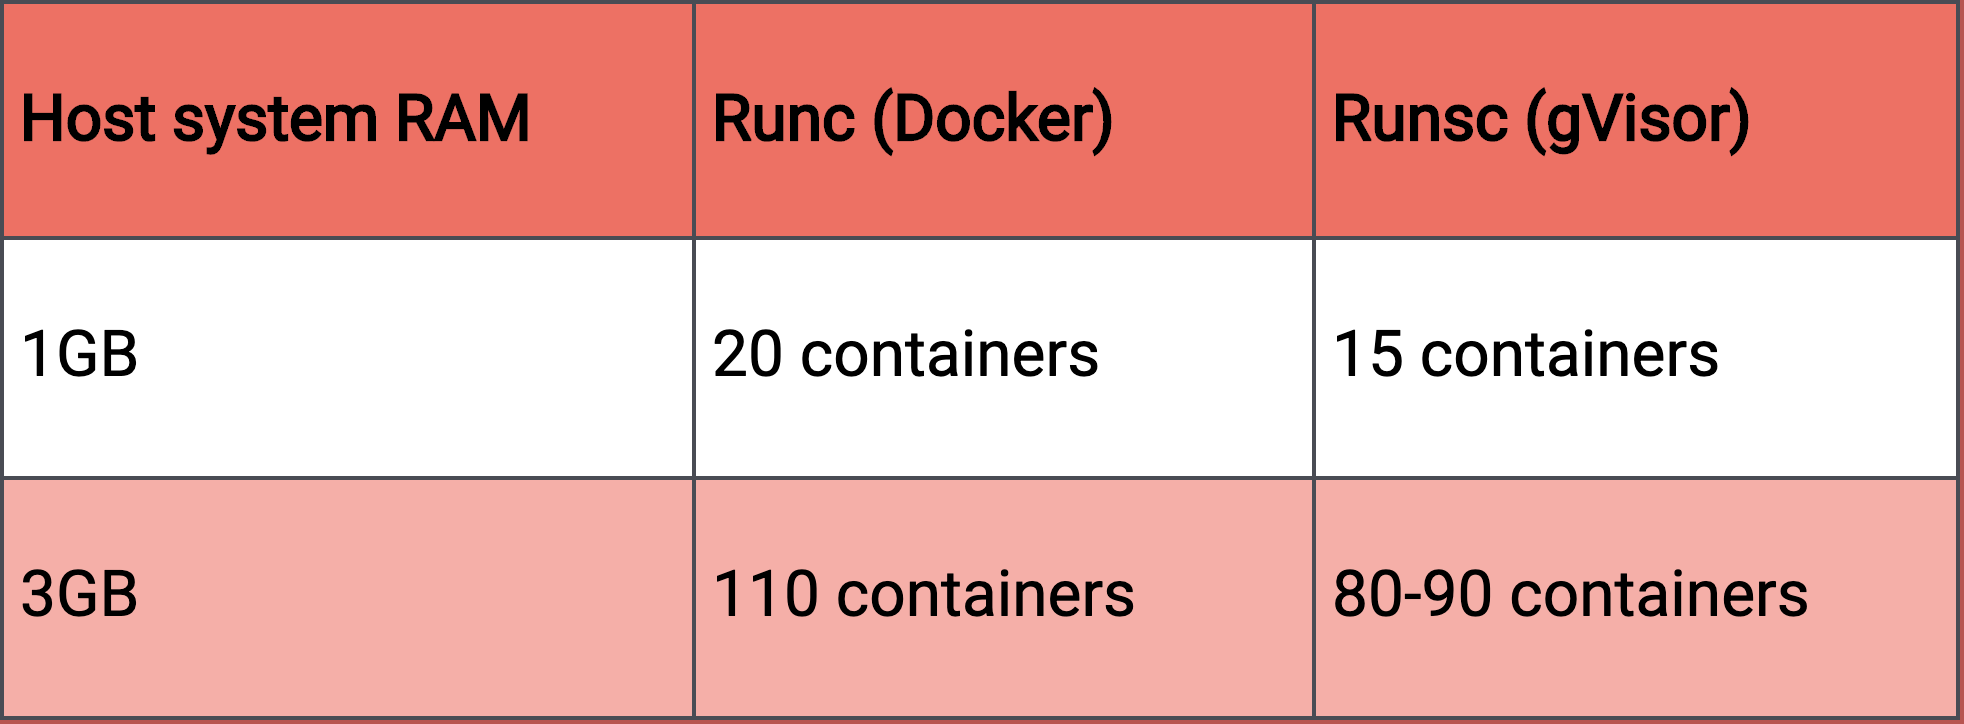
Using gVisor means fewer containers per host system
Although gVisor uses more memory and impacts our notebook performance, we decided that this trade-off was acceptable to provide a stronger security profile for our application.
We also need to be mindful of sharing resources among containers to make sure that one session doesn’t monopolize our system. By default, a Docker container has no constraints on memory or CPU cycles, and will consume as much of these resources as the host kernel allows. In our system architecture, where each user has their own containerized notebook session, we want to make sure that running computationally expensive or memory-intensive code in one container doesn't have an adverse impact on other concurrent sessions in other containers.
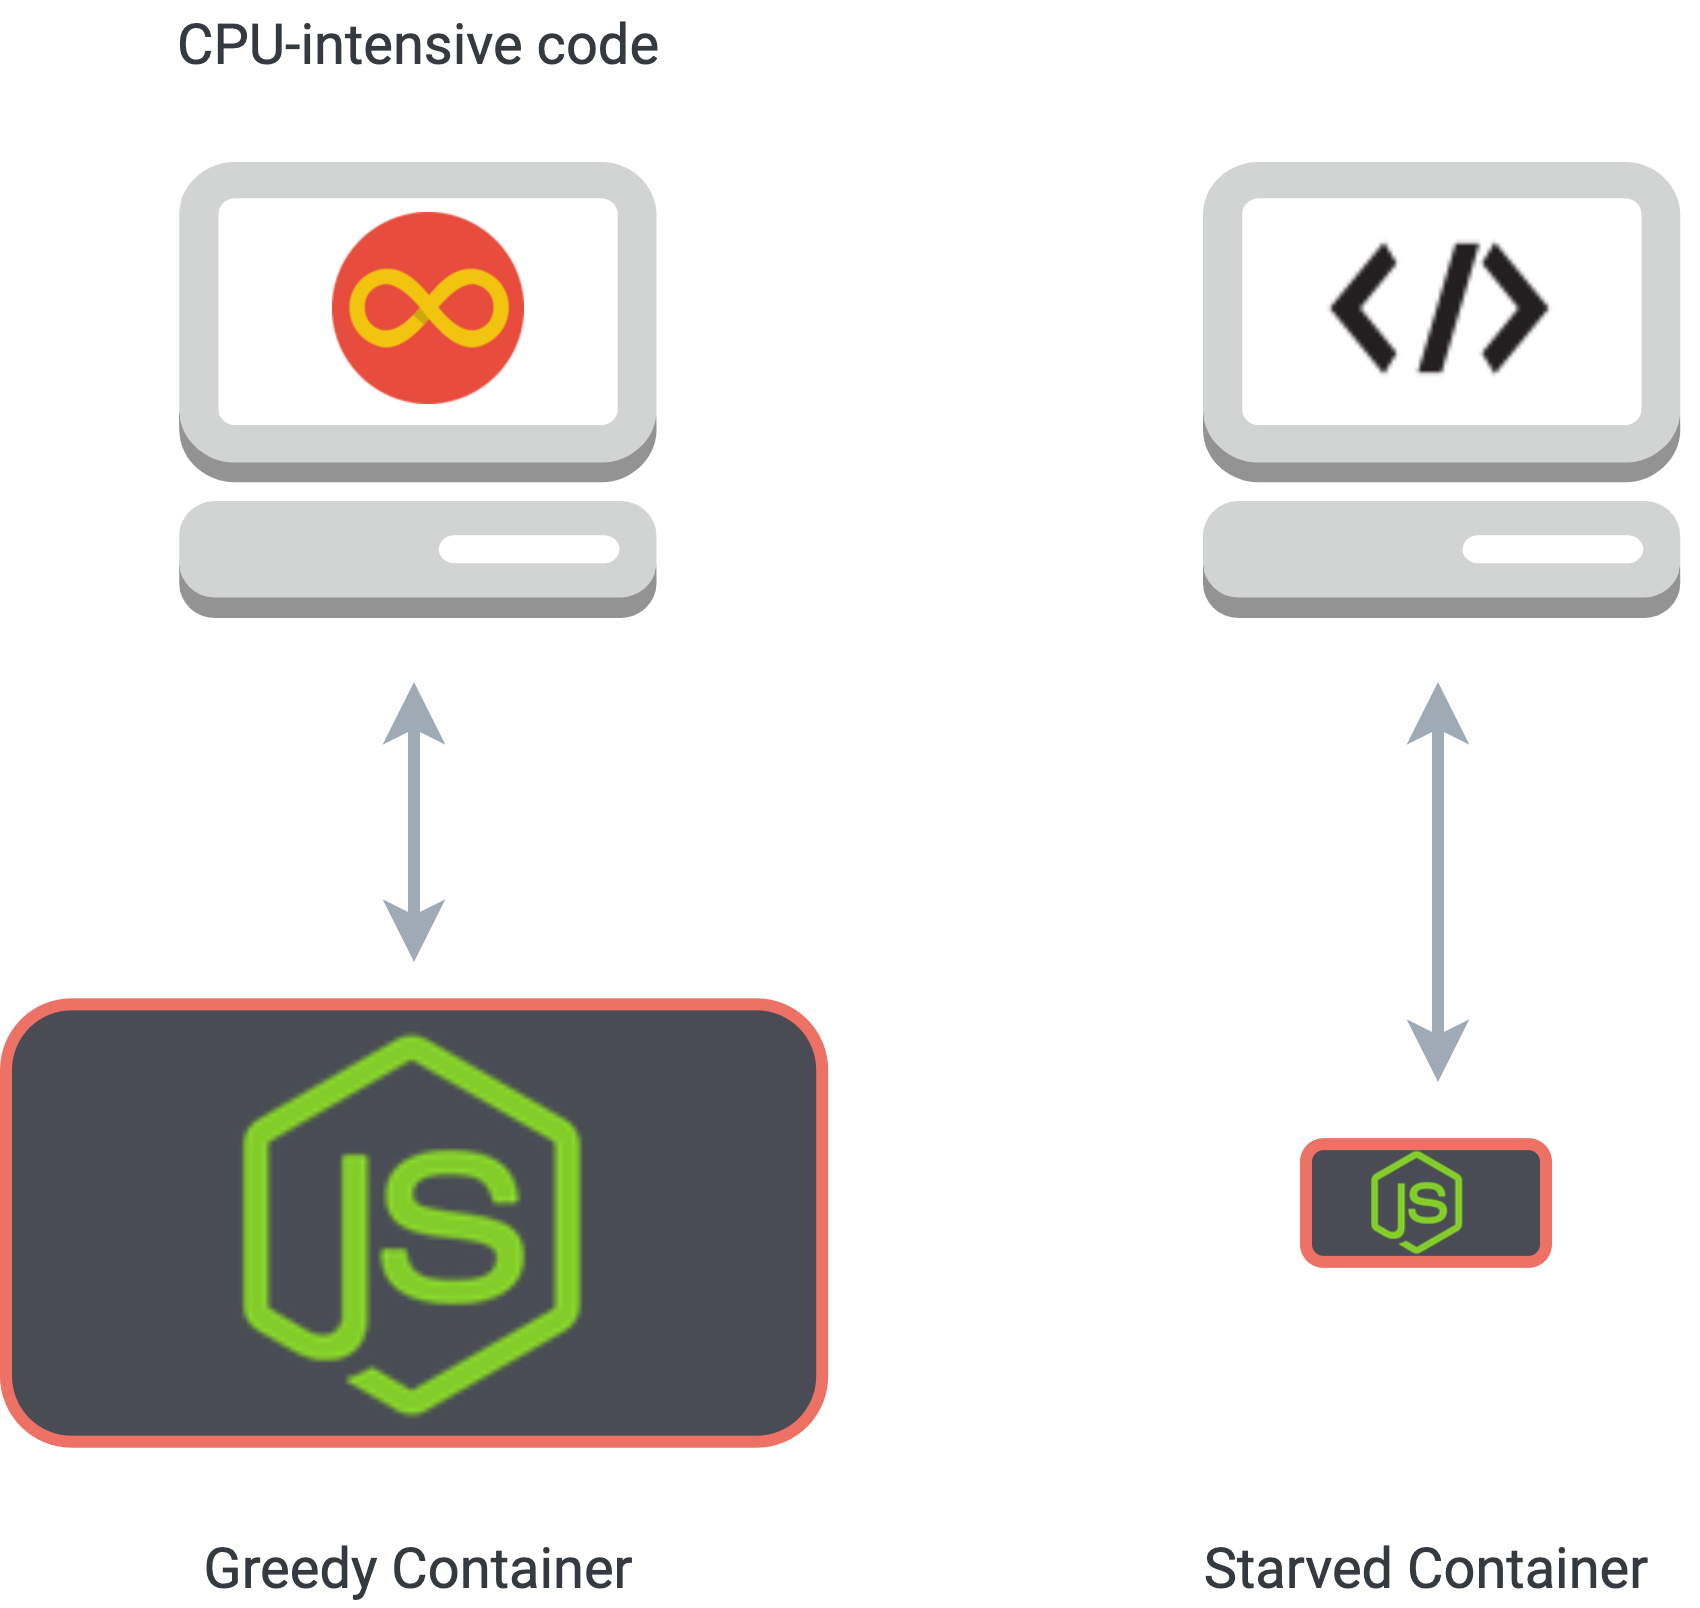
CPU-intensive code in one container could starve another container of resources
For example, one user may run a code cell with an infinite loop. Without constraints on the CPU usage of the user's container, it would consume excessive CPU cycles and slow down or even crash other sessions in other containers. Fortunately, Docker provides a method to set constraints on the resource use of containers, through the use of runtime configuration flags.
These configuration flags are used to manipulate the container's cgroup (control group), a feature of the Linux kernel that limits access to system resources. We set a limit on the number of microseconds per CPU period that the container can use before being throttled, effectively setting a ceiling on the CPU usage for a given container.
Control groups provide a way to balance resources between containers
We also set a boundary for memory usage for each container. By choosing cgroup limits that still keep our application performant, we have effectively dealt with the problem of controlling runaway container resource use.
Connecting each user with their own containerized application greatly improves our security profile, but introduces considerable engineering complexity. We needed to address these challenges:
Each of these challenges is addressed by our dispatch server, an integral component of our system architecture which is responsible for interactions between our clients, application servers, and database. The dispatch server has three broad categories of responsibility which we address in the following sections:
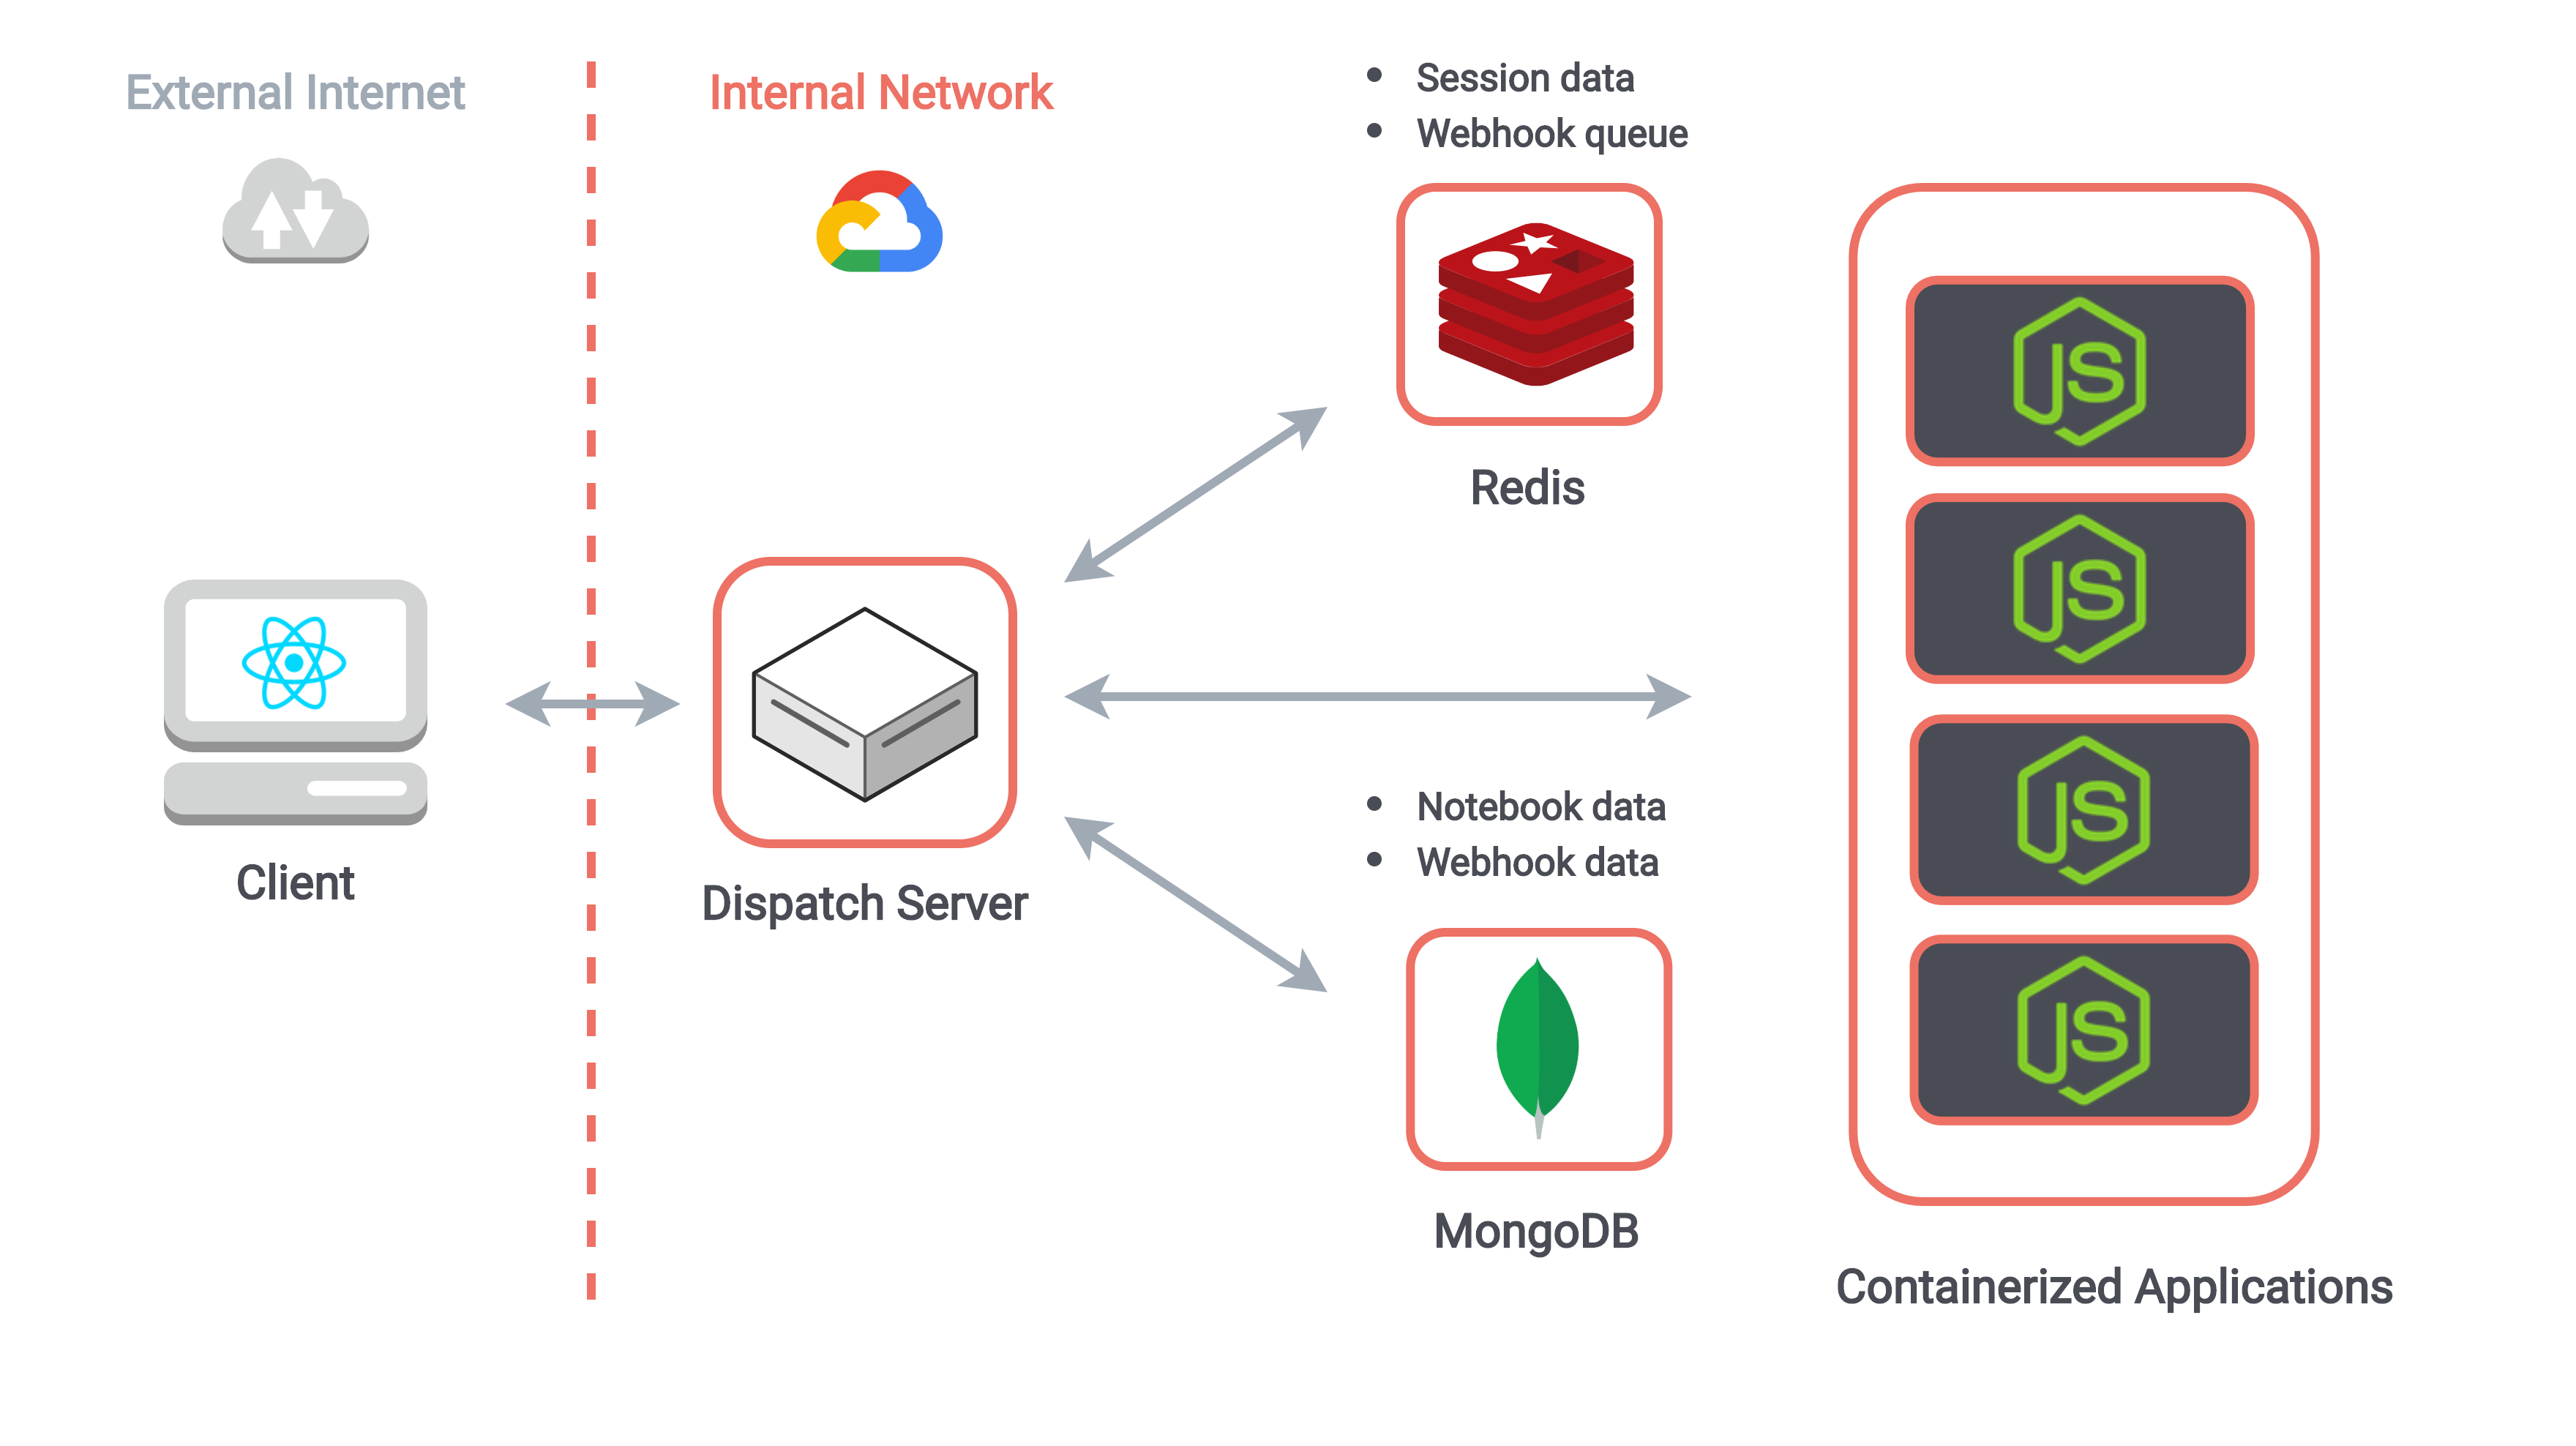
The system architecture of RedPoint
Each Docker container running on our host system has its own internal IP address and port. We need a way to connect an external address to this internal one. A simple but naive solution would be to expose a port on our host system and map that port directly to a container.
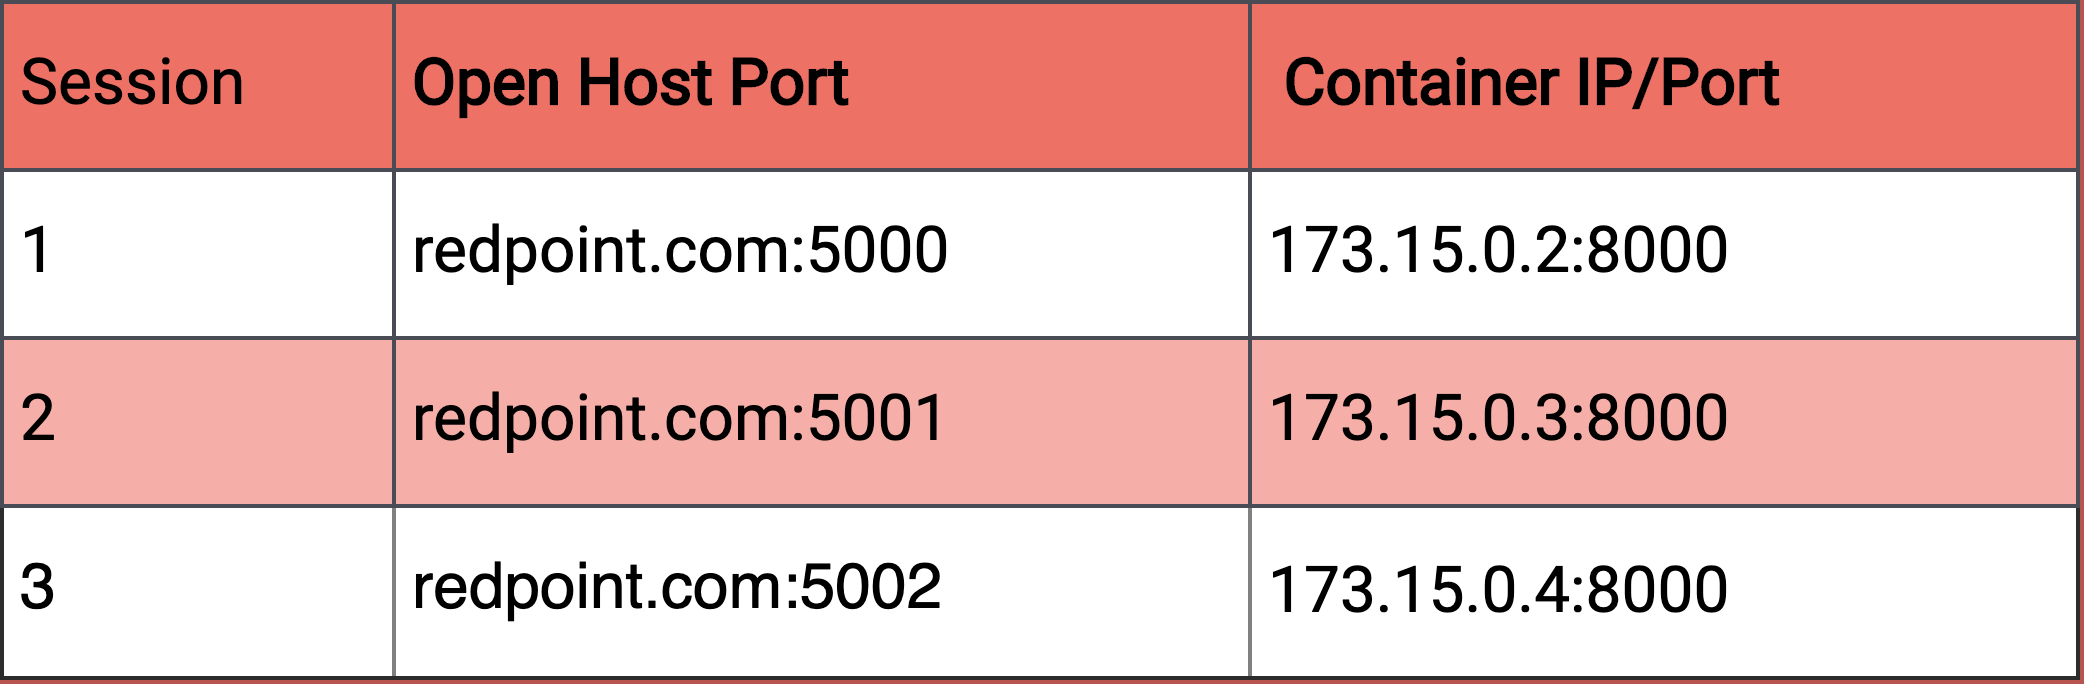
Port forwarding is a naive way to connect users with containers
This approach, known as port forwarding, would leave our application vulnerable to a port scanning attack, which would compromise the privacy of our user sessions. We'd like to keep only the ports exposed by our firewall (80 for HTTP and 443 for HTTPS) open to external traffic.
Instead, the dispatch server can receive all HTTP requests and WebSocket messages from our clients, and use the session data to proxy these messages to the internal network address of the correct Docker container. Responses from the containerized application are then proxied to the client in a similar fashion.
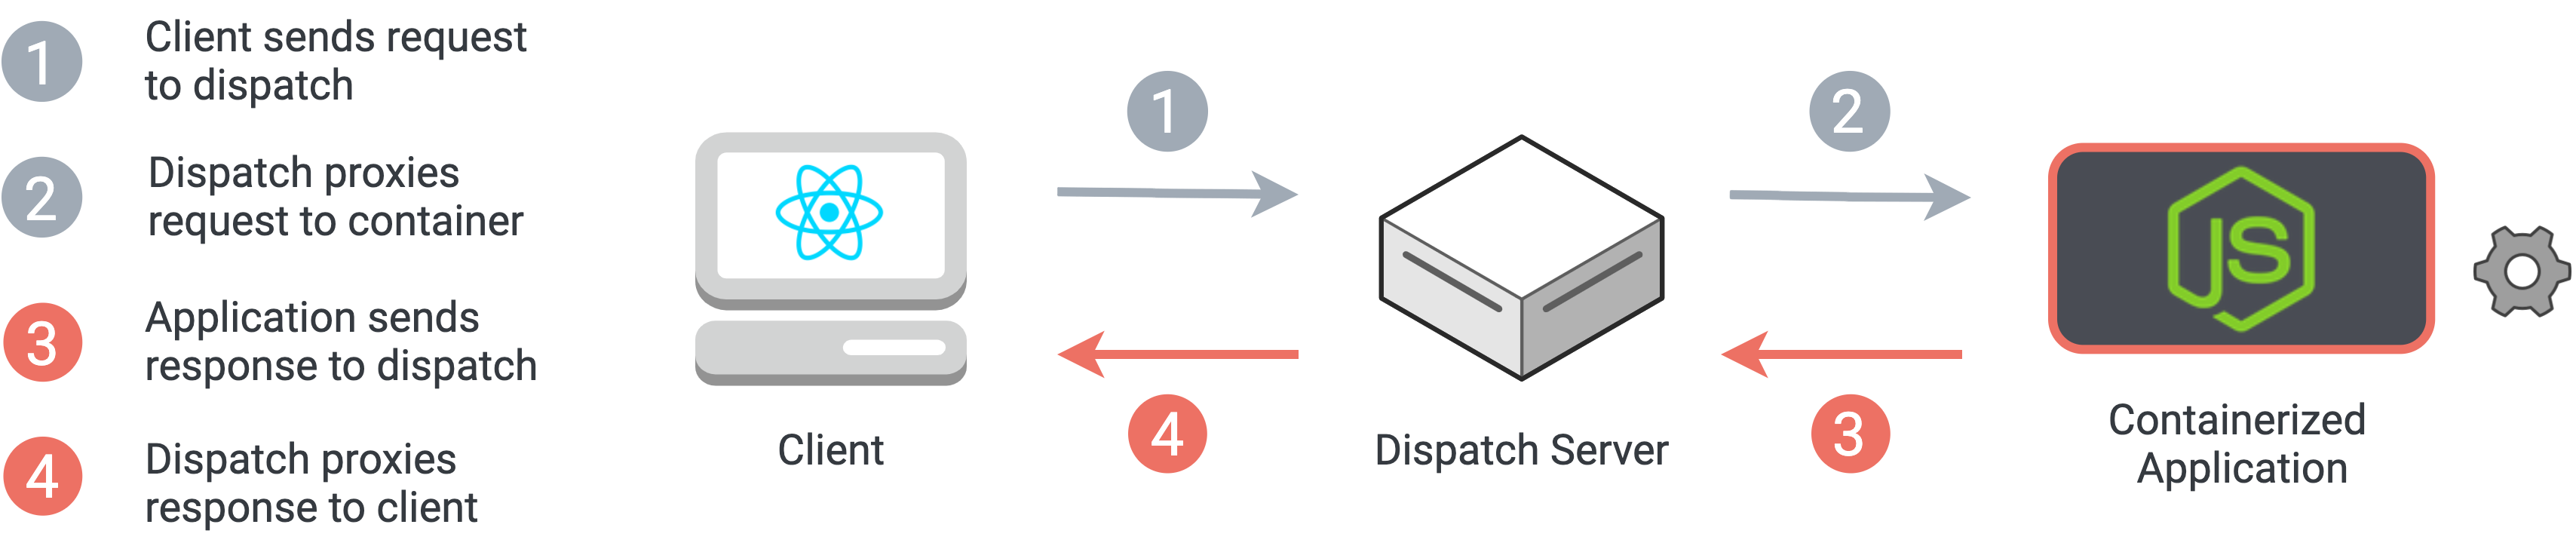
Using a reverse proxy to handle all HTTP and WebSocket messages from our clients
We considered existing reverse proxy solutions, such as NGINX or HAProxy. However, given the significant amount of custom logic that our application requires, we decided to implement our own reverse proxy server using Node.js, and node-http-proxy. This customized approach allows the dispatch server to do the work of proxying requests while also handling other important functions, such as managing sessions and containers.
When a user visits our root URL to start a notebook session, we need a way to associate that user’s session with the appropriate data on our back end. To do so, we assign each user a unique URL that they use for the duration of their session.
This URL serves two functions. First, by being sufficiently random as to be unguessable, the URL provides privacy for the user’s session. We use a UUID generator to generate a 6-digit combination of letters and numbers. With 16,777,216 possible combinations, this meets our needs. Second, the URL serves as the key to our session object, which the dispatch server uses to map important information such as container and notebook IDs to the correct session.
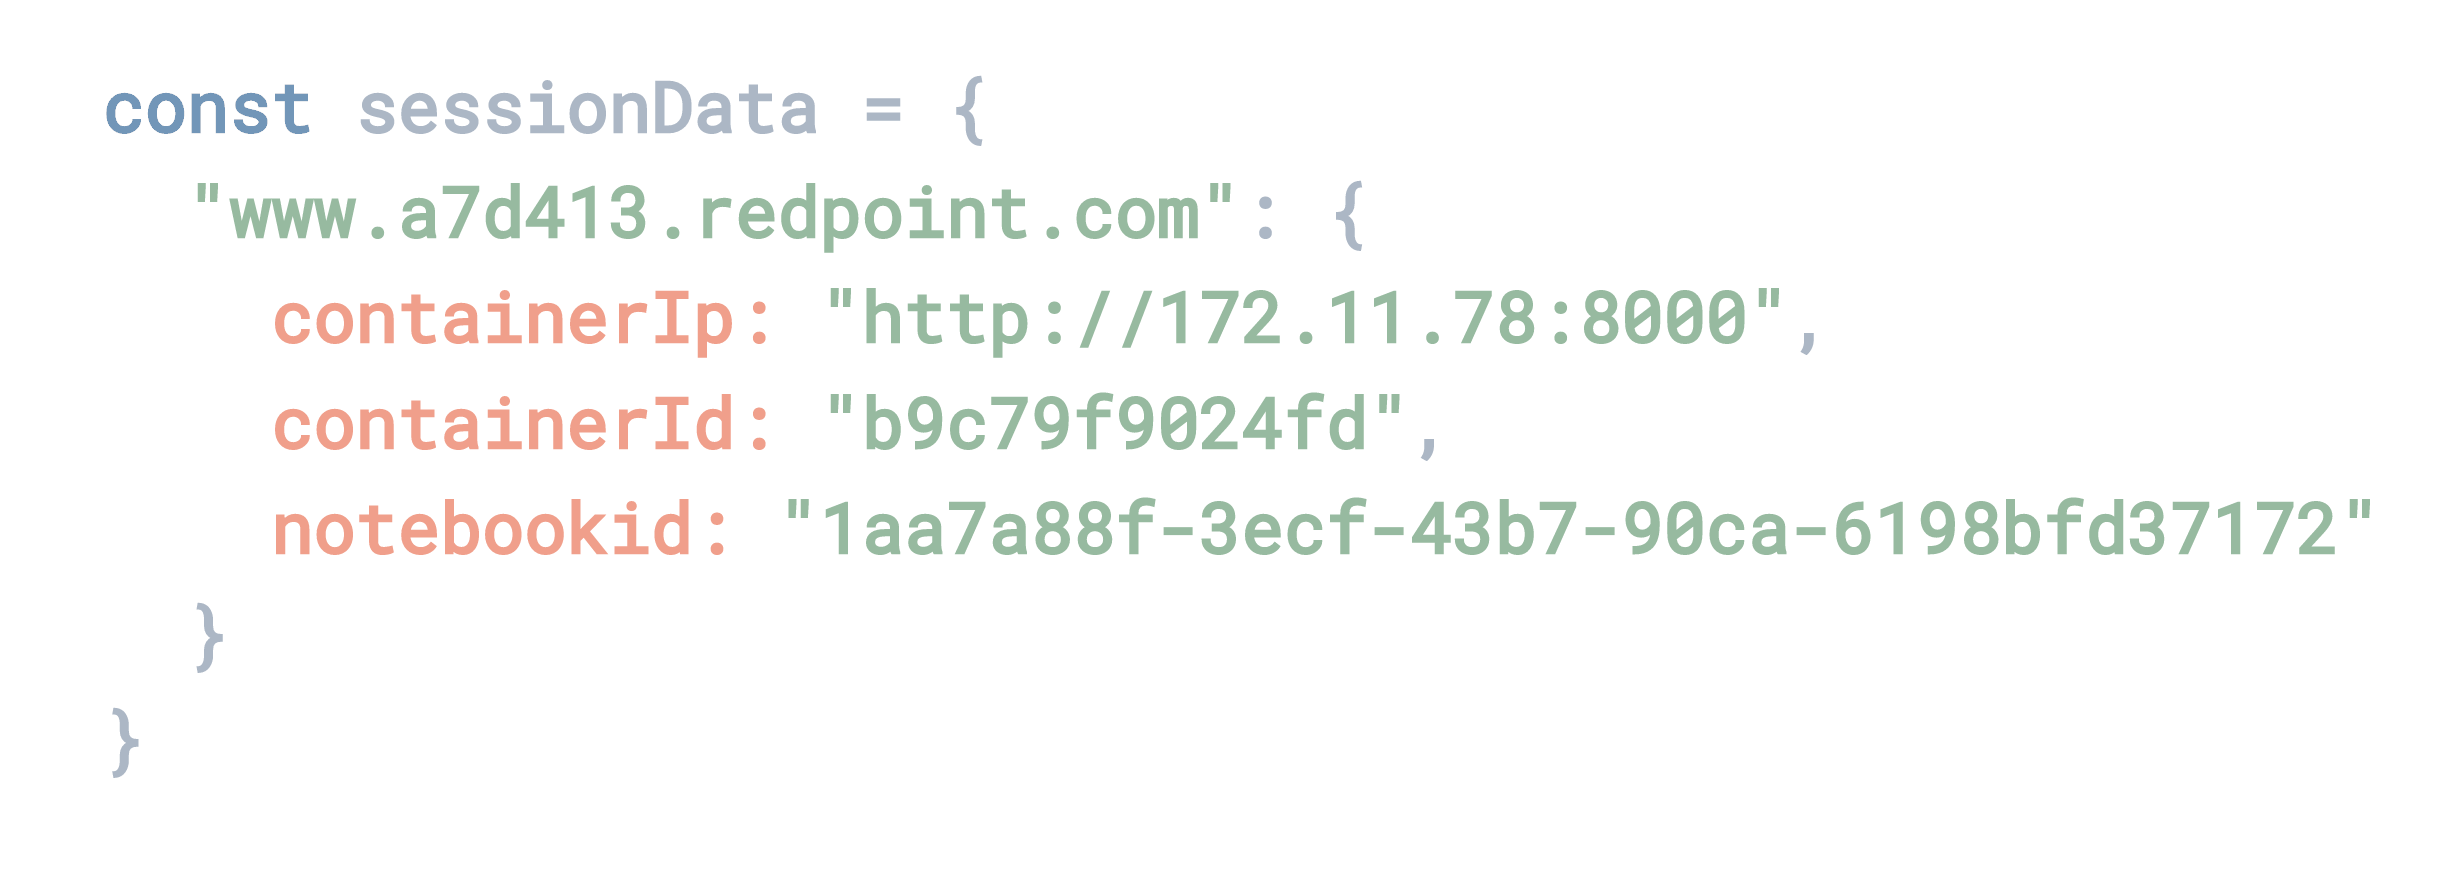
Our session data maps a unique URL to the important internal information for a session
Our original, naive implementation stored the session as an in-memory JavaScript object in our dispatch server. This had the advantage of simplifying interactions with the session data, but presented a big disadvantage: if the dispatch server ever crashed or was restarted, all current session information would be lost. A disk-based database is unsuitable, since latency incurred by reading and writing session data would be added to each proxy interaction.
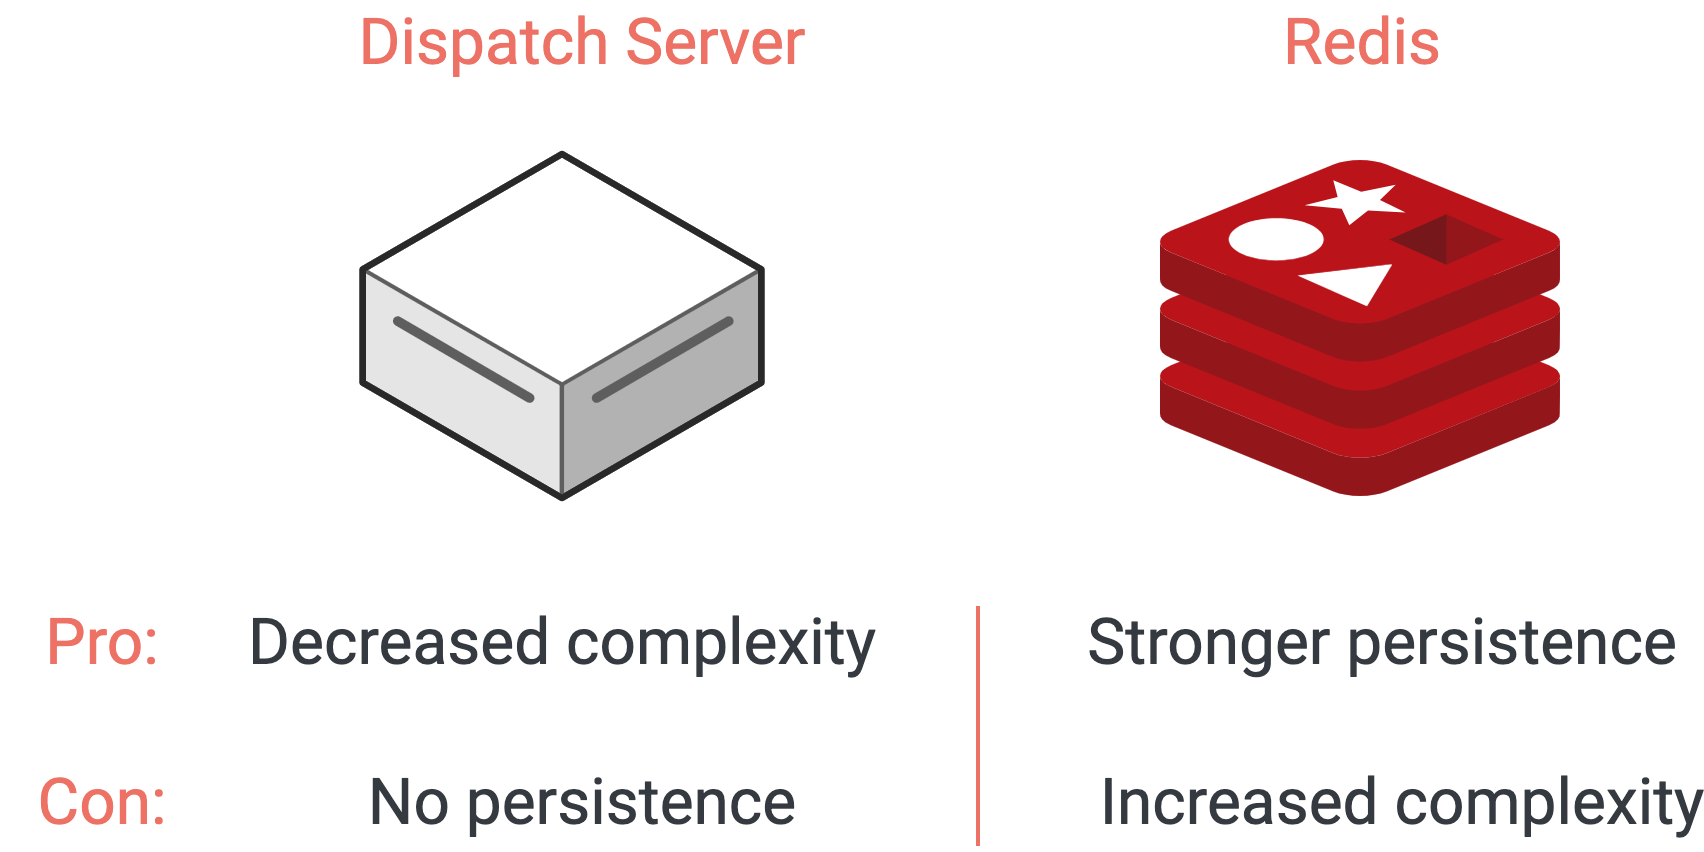
Storing session data in Redis makes our dispatch server stateless
Our solution was to use Redis to store our session data. As an in-memory data store, Redis is fast enough to meet our needs, and it has native support for the hash map data structure, which allows fast constant time reads. Since it primarily stores data in-memory rather than on disk, the durability guarantee for Redis is not as strong as a database, though it does store snapshots of its dataset at specified intervals. Redis wouldn’t be a good choice for general notebook data persistence, but to store session data it is a good fit. As a bonus, we were also able to use Redis to implement a buffer for our webhook traffic
Once the session data is stored, the session URL is inserted into a redirect page which is served to the client. While the client waits to be redirected, we use Dockerode, a Node.js wrapper for the Docker Remote API, to start a new Docker container on the host. When redirection occurs, the client’s browser sends a request to the unique subdomain session URL. The dispatch server then maps the session URL to the correlated Docker container, and proxies all subsequent HTTP and WebSocket traffic between client and container.
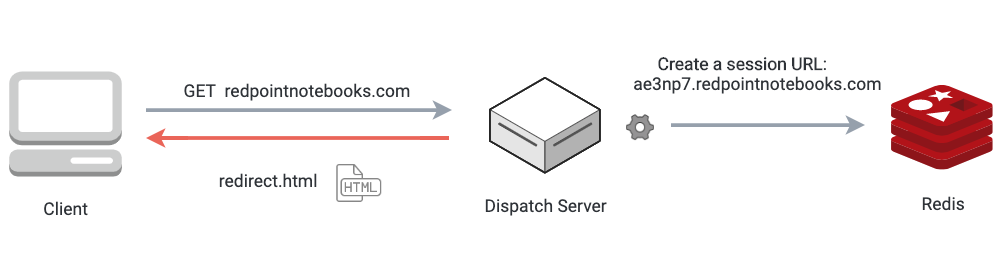
First, a unique URL is created and stored in session data. The client will be redirected to this URL once a container is ready
When a user has left a session, we need to free up system resources by tearing down the corresponding Docker container. The alternative would be to recycle the container by keeping it alive and connecting it to a new session, but that would mean that new users might encounter artifacts from previous users’ sessions.
When a user closes a tab or browser after establishing a WebSocket connection, that action triggers the firing of a ‘close’ WebSocket event. Our application server listens for this close message to be proxied by the dispatch server. Upon receiving it, the containerized application server issues an HTTP DELETE request to the dispatch server, passing along the current session information. In response to the server’s DELETE request, the dispatch server stops the running Docker container, and deletes the current session’s data from Redis.
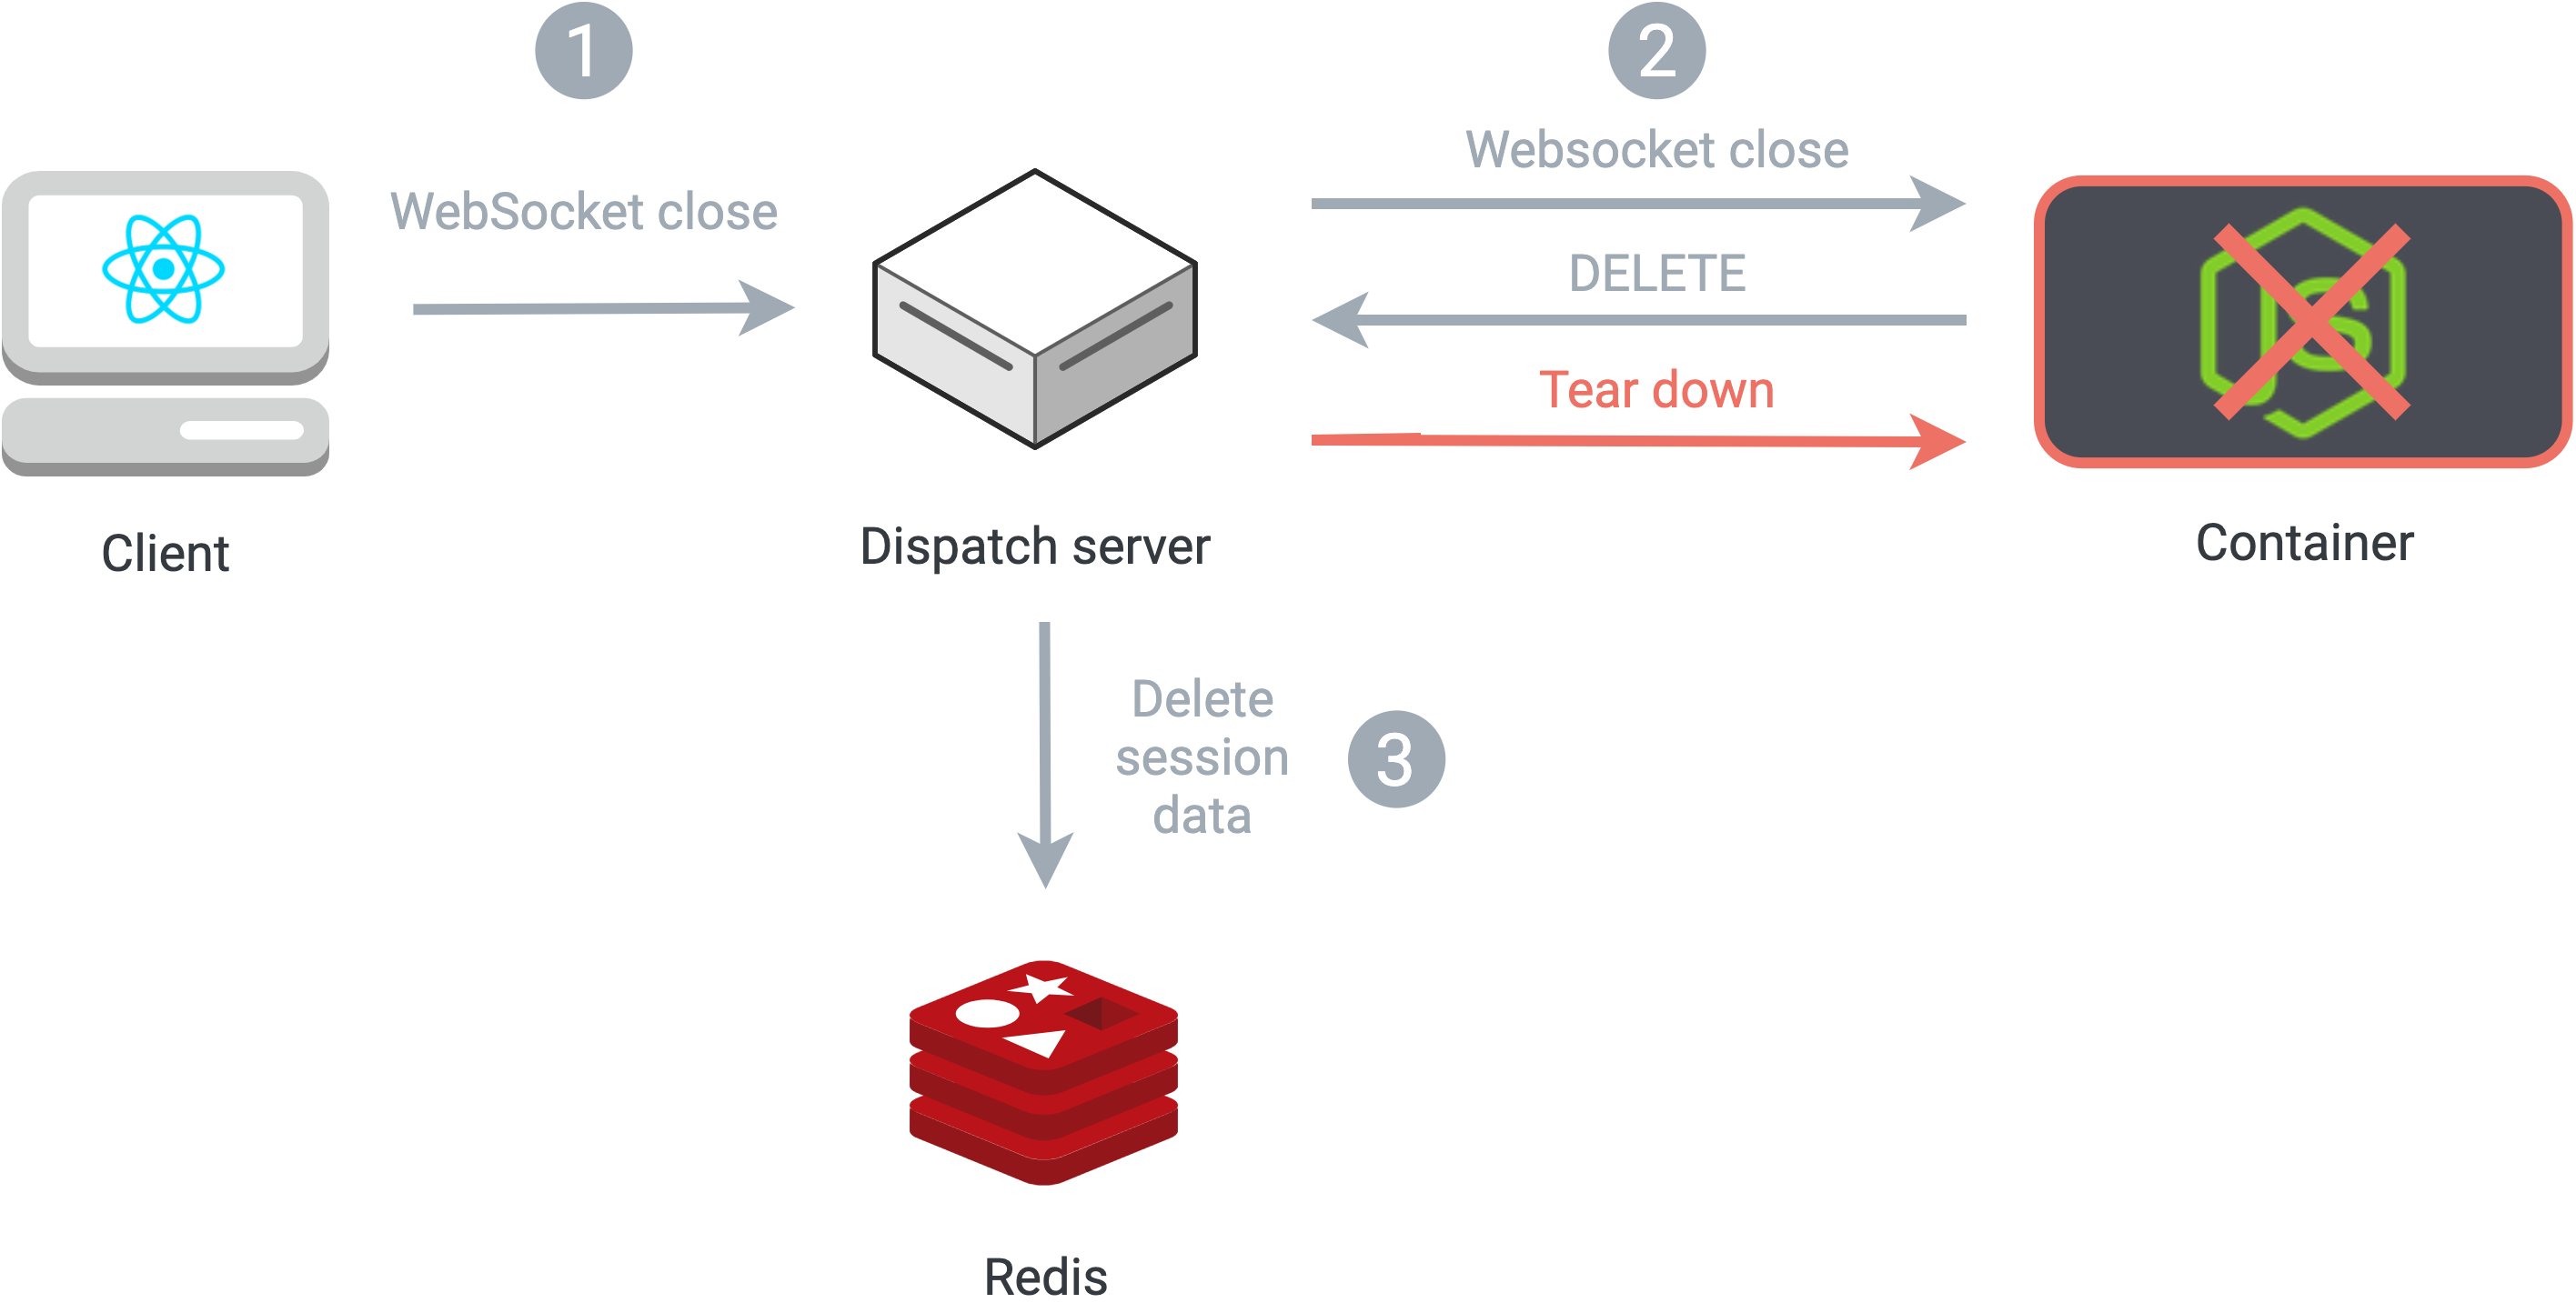
Tearing down a container and session when a client disconnects
This strategy works well for most teardown scenarios, but there are a few edge cases to consider. The first is that the WebSocket ‘close’ event also fires upon page refresh. When a user refreshes, it’s not their intention to end a session. We need a strategy to detect this case and prevent premature teardown and termination of the session.
Our solution uses a timestamp on the session object that is re-written with every proxied request between client and server. When a teardown request is received, the dispatch server sets a timeout. If the timestamp doesn’t change by the end of the timeout period, this means that the user has not revisited their session, and it’s safe to continue teardown. If the timestamps differ, it means the user has revisited the container, and the session is kept alive.
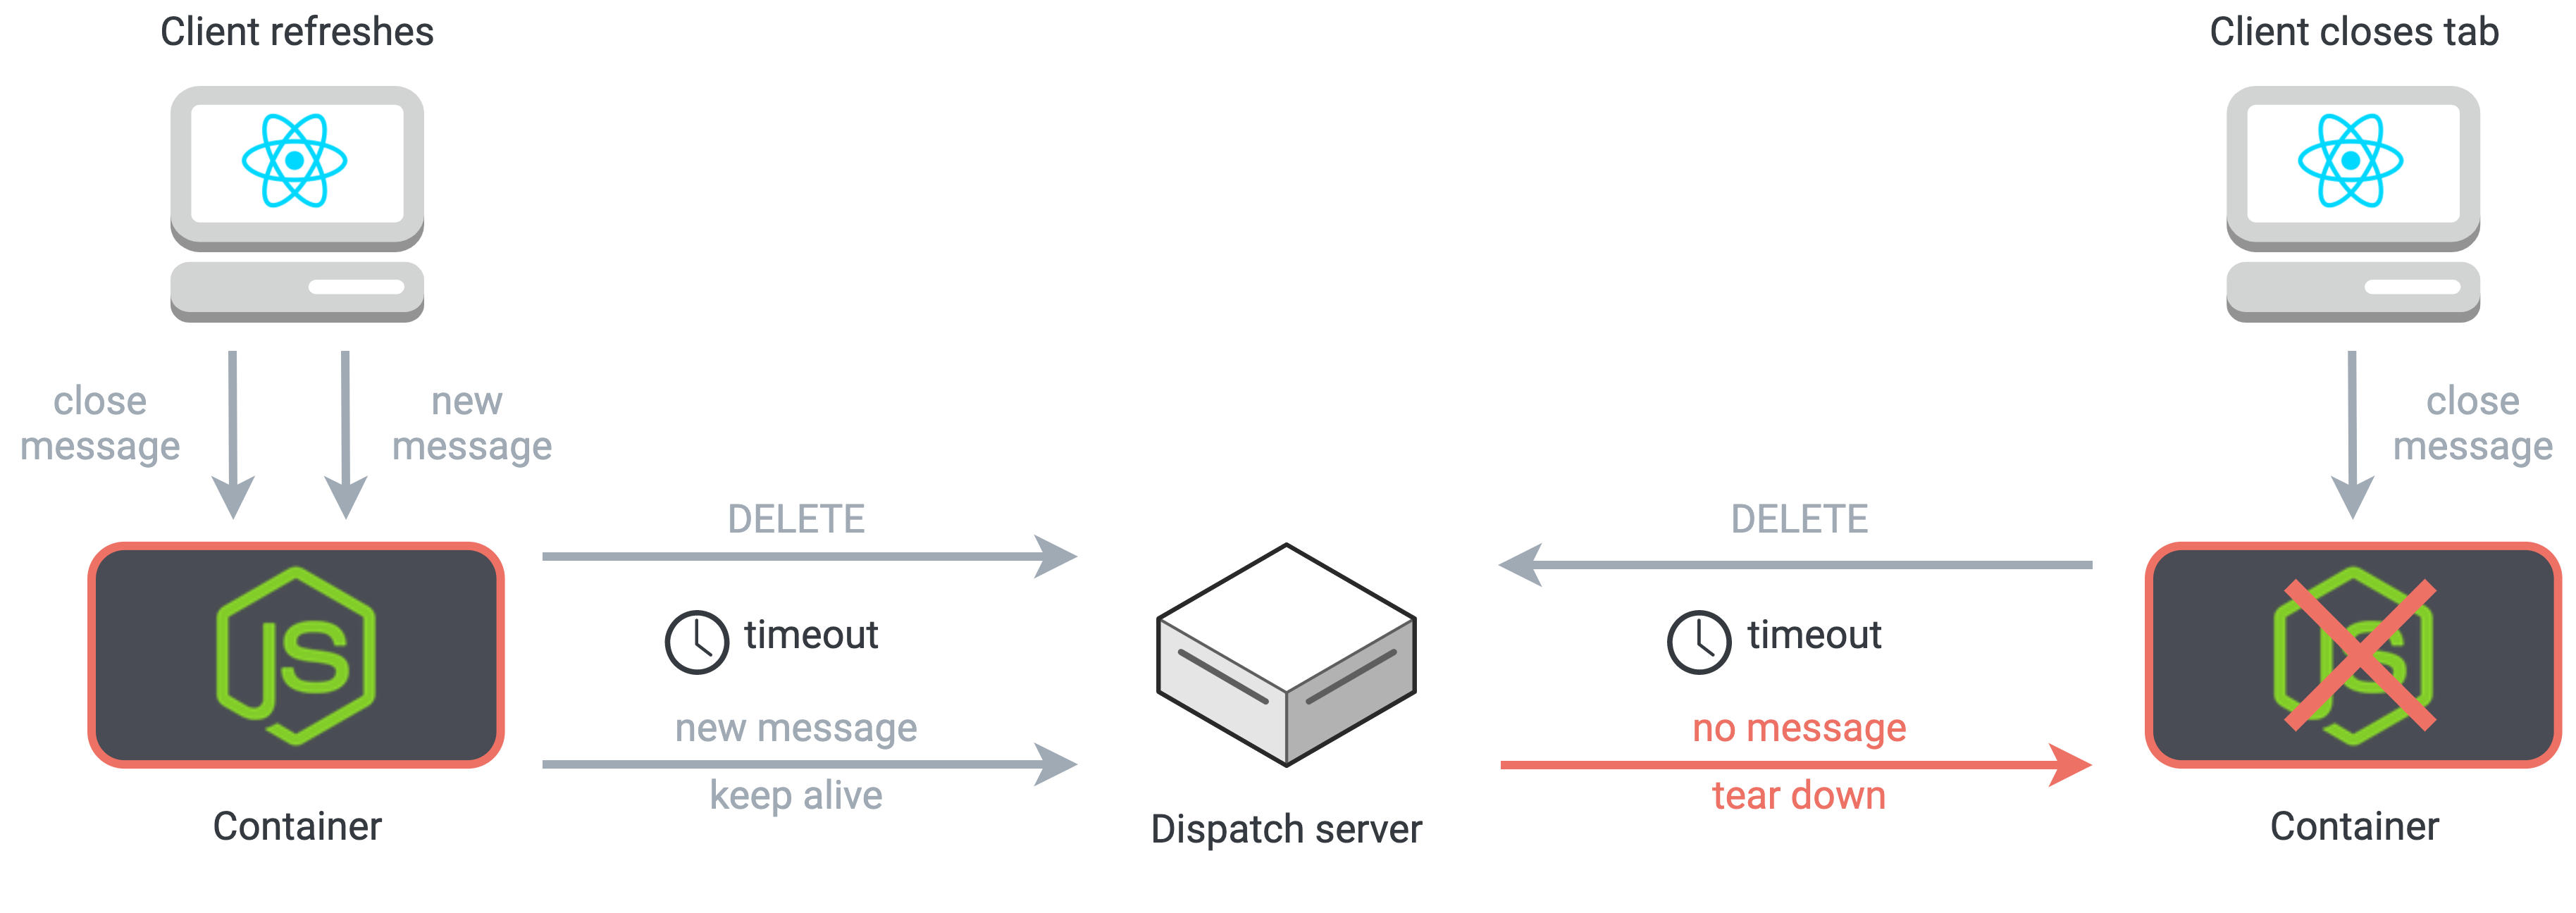
Using timestamps to avoid tearing down a session prematurely if the user refreshes
The second edge case is that if a user navigates away or closes their tab while waiting to be redirected, a container will still be created. Since no WebSocket connection is ever created to this container, no ‘close’ event will ever fire to initiate teardown, and the container will needlessly consume the host’s resources while permanently idle. We need a different teardown strategy for this kind of ‘zombie’ container.
To solve this problem, our application server sets a flag which marks the creation of a successful WebSocket connection with the client. After initiating the creation of a container, the dispatch server pings the containerized application server to check this connection flag. If the application server reports the lack of a WebSocket connection, the container has been abandoned, and the dispatch server immediately tears it down.

Pinging newly created containers to detect and tear down abandoned sessions
The final major responsibility of the dispatch server is to serve as middleware for our database. Having application servers which process arbitrary user code communicate directly with the database is not ideal. Centralizing all database interactions in the dispatch server enhances our database security, and provides a single place to handle client save/clone/load requests as well as an endpoint for external webhook traffic.
We made an early decision to use the React.js framework to write the front end of our application. React allows all of a notebook’s data to exist in one location on the client: within the state object of a top-level component. Given this architecture, all of the data that shapes a specific notebook can be easily extracted for durable storage.
A non-relational (NoSQL) database such as MongoDB uses a key/value system to store data with native support for JSON. Since a notebook’s data is self-contained and unrelated to the data within other notebooks, we chose not to use a relational storage model. By creating an index on the UUID which identifies a set of notebook data, we achieve logarithmic runtime complexity on database reads - an improvement over the linear time of a full table scan. MongoDB naturally fits our use case for data persistence by due to the minimal object relational mapping (ORM) layer required when converting between a JavaScript object and a JSON object.
The main trade-off with using a document-oriented database is the weak guarantee on the schema of the data stored within, but for our use case this tradeoff is acceptable. This flexibility allows us to focus our efforts on supporting the current design, while avoiding the time-consuming step of carefully anticipating future growth directions, as we would if using a traditional SQL database.
One of our core design goals was to make it easy to share notebooks with a minimal barrier to entry. We decided that requiring signup and user authentication before creating a notebook would be a barrier to use. Instead, we adopted a URL-based strategy for saving and sharing notebooks, backed by MongoDB and using the transactional email provider SendGrid.
Since the state of all notebook cells lives as a JavaScript object in a top-level React component, it’s relatively simple to serialize this state for a persistence operation. When the user saves or clones a notebook, an HTTP POST request is sent to the dispatch server. The payload of the request includes the serialized notebook data and a unique notebook ID, which is used as a key for the notebook’s data in MongoDB. If the user chooses to receive an email record of the URL, another HTTP POST request is sent to the dispatch server, where an email template is populated with the notebook URL. An email with a link to the notebook is then sent to the user using the SendGrid API.

The dispatch server coordinates the interactions involved in a save request
After a successful write to the database, the user is presented with a URL in the format
www.yourdomain.com/notebooks/$notebookID. When a user navigates to this URL to load the notebook,
the
dispatch server updates the session data in Redis to associate the notebook ID from the URL with the unique
subdomain
of the session. When the client makes a subsequent request for notebook data, the dispatch server fetches the
notebook ID from
Redis using the subdomain
as the key, pulls the notebook data from the database using the notebook ID, and then sends that data to
the
client to hydrate the notebook state.
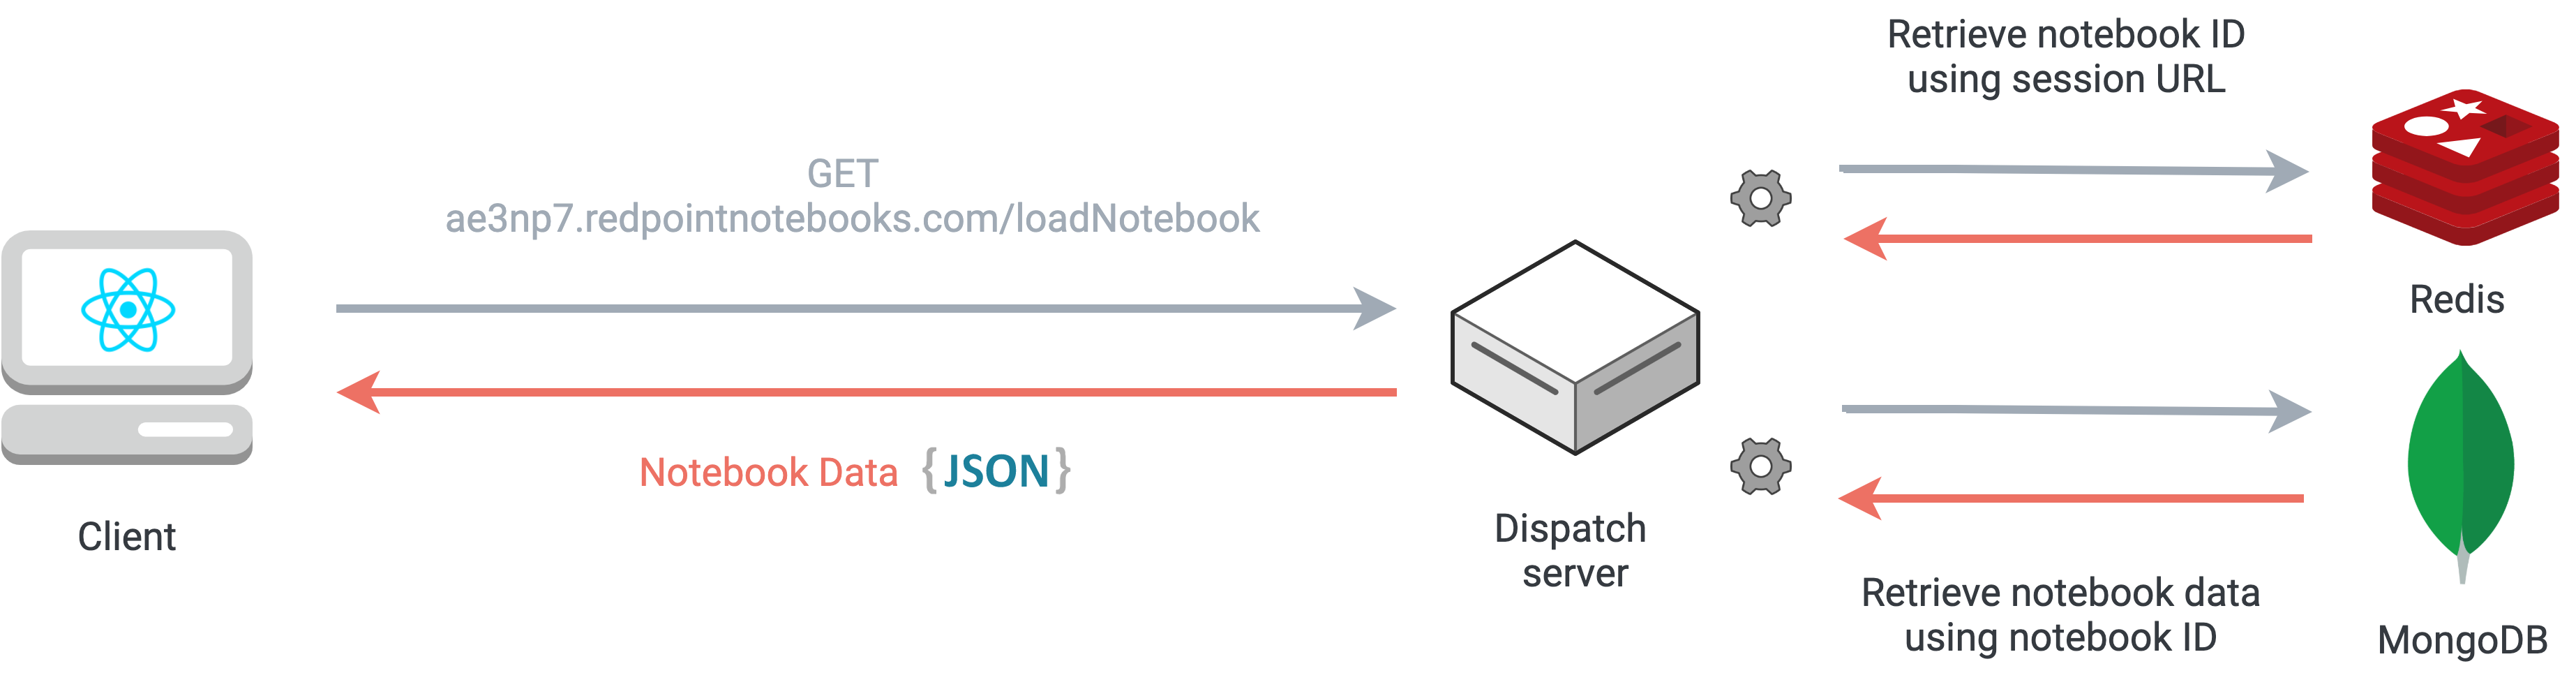
Handling a load notebook request from a client
Saving a notebook is meant for personal use, while cloning a notebook is designed for sharing. Changes made to a cloned notebook shouldn’t alter the state of the original notebook. This allows users to share a consistent public copy of their notebook, without fear that changes by other users will affect the original cloned notebook. Subsequent saves of the same ID overwrite the same MongoDB document. Therefore, when cloning a notebook, a new Mongo document with identical data to its parent is created and associated with a new notebook ID.
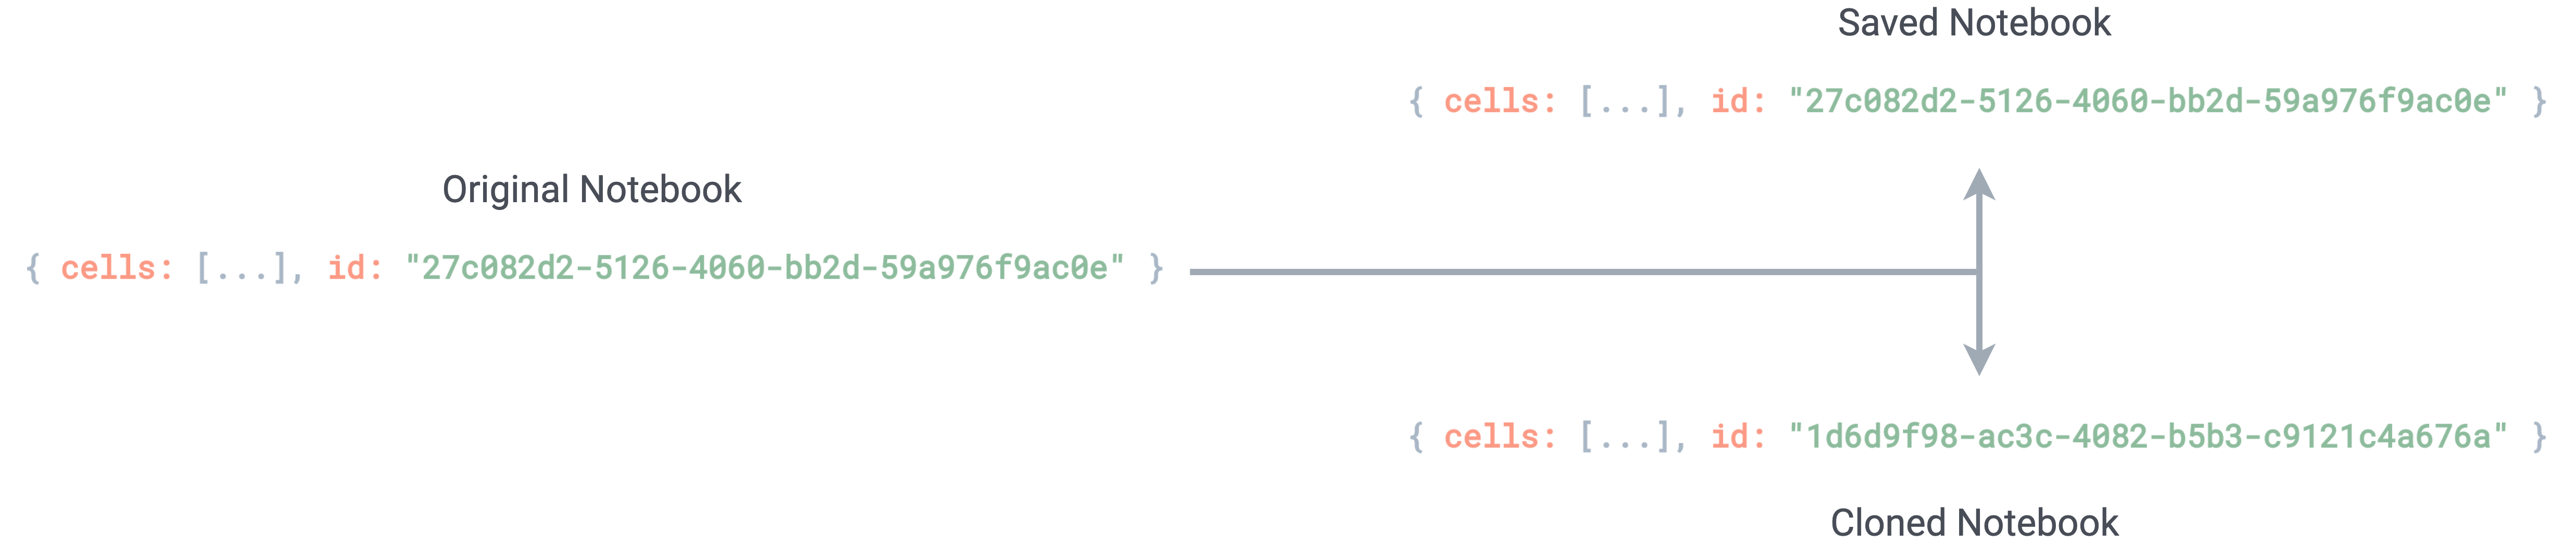
Cloning a notebook creates a new notebook ID
There’s still a problem, however: if multiple users are given the cloned notebook URL (such as a publicly posted notebook), any subsequent saves will mutate all copies of the clone. Our solution to this problem is to give every notebook document in our database a boolean flag that marks whether or not the notebook is a clone. If an attempt to save a clone is made, a new ID is assigned to the notebook, and the ‘clone’ flag is set to false. This ensures that the newly saved notebook doesn’t mutate other clones.
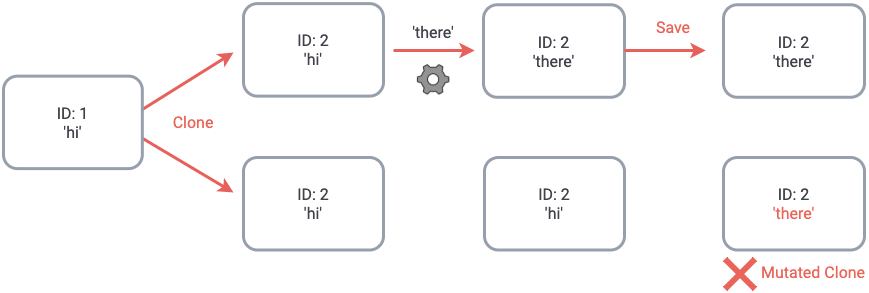
Without a way to flag a cloned notebook, subsequent saves will mutate the original
We are looking forward to new opportunities. Please contact us if this project interested you, or if you have any questions!

Denver, CO

Portland, ME

Toronto, ON